Range Rover Evoque: Heating and ventilation controls
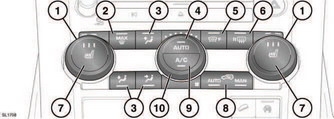
Controls
1. Temperature controls. For individual driver/passenger settings.
2. Maximum defrost program.
3. Air distribution.
Note: More than one setting may be selected at a time to achieve the desired distribution.
4. AUTO mode. For fully automatic operation.
5. Heated windscreen.
6. Heated rear screen.
7. Front seat heaters.
8. Recirculation. Press repeatedly to cycle through options.
9. Air conditioning.
10. Blower speed control. In manual mode current speed selection is indicated by illuminated LED’s.
Note: The indicator lights in the switches will illuminate when the function is selected.
Note: In low temperatures it is advisable to close the centre face level vent and direct air flow from the outer face level vents towards the side windows. This will help to keep the windows clear of ice.
Timed climate controls the optional auxiliary heater and can be set in the touch screen. See 65, TIMED CLIMATE.
READ NEXT:
 Auto mode
AUTO mode should be used as the normal
operating mode. The air conditioning, heating
and ventilation controls automatically provide
an optimum environment at the selected
temperature.
To resume f
Temperature controls
Rotate to set a temperature.
Note: The maximum possible temperature
differential between the driver and passenger
settings is 4°C (7°F).
Maximum defrost
Press to remove frost or heavy misting from
the front screen. The system will adjust the
front blower output for maximum clearing. In
addition the rear screen and optional front
screen heaters wil
SEE MORE:
Important information
The information contained in this handbook covers all vehicle derivatives and
optional equipment,
some of which may not be fitted to your vehicle. Due to printing cycles, this
handbook may include
descriptions of options before they become generally available.
The vehicle options, hardware an
Symbols used in this handbook
Safety warnings indicate either a procedure which must be followed
precisely, or
information that should be considered with great care, in order to avoid the
possibility
of personal injury.
Cautions indicate either a procedure which must be followed precisely, or
information that
should
