Range Rover Evoque: Timed climate remote control
The dedicated remote control has a range of approximately 100m (328ft). Press and hold the ON button for two seconds.
Note: Avoid touching the antenna when operating the ON or OFF button.
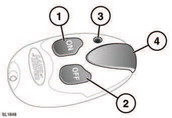
Timed climate remote control
1. On button.
2. Off button.
3. LED (operation indicator).
4. Antenna.
Press and hold the ON button for approximately two seconds. The green LED will illuminate for 2 seconds to confirm that a program has been initiated. The LED flashes once every 2 seconds to indicate that the program is active.
The timed climate program will continue for 30 minutes and then switch off automatically to prevent the vehicle battery from discharging. It also turns off automatically if the engine is started.
The system may not operate, or will switch off automatically, if: - Fuel level is low.
- The vehicle’s battery charge is low.
- Engine coolant temperature is at or above its required temperature.
- The engine has not been started since the last programme cycle.
The remote control LED indicator signals other states and conditions for the timed climate as follows: - Illuminates red for 2 seconds when the OFF button is pressed, to indicate that the program has stopped.
- Flashes green or red for 2 seconds then stops when the ON or OFF buttons are pressed, to indicate that no action has been taken.
- Illuminates orange for 2 seconds before showing green or red, to indicate that the remote battery is low.
- Flashes orange for 5 seconds to indicate that no action has been taken and the remote battery should be replaced.
READ NEXT:
 Replacing remote control batteries
Replacing remote control batteries
With the back of the remote control facing
upwards, use a coin or similar implement to
rotate the battery cover. Lift the cover off to
reveal the battery compa
Additional remote controls
A maximum of three controls can be
programmed to each vehicle. Contact your
Land Rover dealer to purchase additional units
and have them programmed to your vehicle.
SEE MORE:
Pairing and connecting from the touch screen
1. Switch on your mobile phone’s Bluetooth®
connection. Make sure that your mobile
phone is in Bluetooth® discoverable mode,
sometimes referred to as find me mode
(see your phone’s operating instructions
for more information).
2. Switch the ignition on and ensure that the
touch screen is acti
Changing the connected phone
Up to 10 mobile phones can be paired with the
vehicle in the same way. However, only one can
be connected and ready for use as a phone at
any one time.
To connect a different paired phone, follow the
steps below:
1. From the Home menu, select Phone.
2. A menu will appear. Select Change phone.
