Range Rover Evoque: Vehicle information and settings menu
Vehicle information and settings menu
A number of vehicle features and display settings may be configured via the vehicle information and settings menu.
To display and navigate through the vehicle information and settings menu, operate the menu control on the steering wheel.
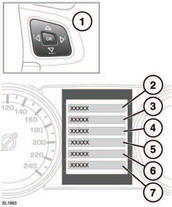
1. Steering wheel menu control.
- Press the up/down arrows to scroll through a list. The current selection will be highlighted.
- Press the right arrow to view a sub list.
- Press the left arrow to return to the previous menu.
- Press the OK button to select the highlighted item.
2. Select to close or return to main menu.
3. Select to view all active warning messages.
4. Select to access the Vehicle Set-up menu.The following features can be personalised:
 Before making any changes to
the
vehicle set-up, you must ensure
that you have read and fully
understood the relevant sections
of the handbook. Failure to do so
could lead to serious injury or
death.
Before making any changes to
the
vehicle set-up, you must ensure
that you have read and fully
understood the relevant sections
of the handbook. Failure to do so
could lead to serious injury or
death.
- Blind spot monitor.
- Speed warning.
- High beam assist.
- Passenger airbag.
- Alarm sensors.
- Cruise Eco data - Reverse-dip mirrors.
- Easy entry/exit.
- 2-stage locking.
- Audible lock warning - Winter wiper park.
- Drive-away locking.
- Headlamp delay.
5. Select to access the Trip Computer menu.
6. Select to access the Display Settings menu.The following features can be personalised: - Language for message centre display.
- Temperature units.
- Appearance of the instrument panel.
7. Select to access the vehicle Service Menu.
Can be accessed only when the engine is not running.
Note: Some personalisation options may not be available in all markets.
READ NEXT:
 Warning and information messages
Do not ignore warning
messages.Take
appropriate action and, when
necessary, seek qualified assistance
before driving the vehicle.
If more than one message is active, each is
displayed in turn
Trip computer
The computer memory stores data for a
journey or series of journeys until it is reset to
zero.
The displayed information is for guidance only,
as it can be affected by traffic, road and
weather c
SEE MORE:
Rear Wheelhouse Outer
Removal
NOTES:
It is necessary to remove the inner quarter panel to enable removal and
installation of the rear wheelhouse outer.
The rear wheelhouse outer is manufactured from mild steel.
This method describes the LH rear wheelhouse outer, the RH side is similar.
1. The rear wheelhouse outer is
Rear Bumper Mounting
Removal
NOTE: The rear bumper mounting is manufactured from mild steel.
1. In this procedure, to make sure the vehicle is correctly
aligned, it must be placed on an approved alignment
jig.
2. The rear bumper mounting is replaced in conjunction with:
Rear bumper cover
Rear bumper
Back panel
3.
