Range Rover Evoque: Wheel changing
 WARNING - THAT NO PERSON
SHOULD PLACE ANY PORTION OF
THEIR BODY UNDER A VEHICLE THAT
IS SUPPORTED BY A JACK.
WARNING - THAT NO PERSON
SHOULD PLACE ANY PORTION OF
THEIR BODY UNDER A VEHICLE THAT
IS SUPPORTED BY A JACK.
Position the jack from the side of the
vehicle, in line with the appropriate
jacking point.
 Jack up the vehicle using
only the
jacking points described, or damage to
the vehicle could occur.
Jack up the vehicle using
only the
jacking points described, or damage to
the vehicle could occur.
Note: Your vehicle may be fitted with a tilt
sensor which activates the alarm if the vehicle
is tilted in any direction after it has been locked.
To lock the doors while changing the wheel,
and avoid the alarm activating, tilt sensor can
be temporarily disabled. See 56, VEHICLE
INFORMATION AND SETTINGS MENU.
Before rasing the vehicle, use the wheel nut brace to slacken the wheel nuts half a turn counter clockwise.
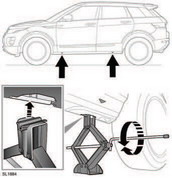
1. Locate the jack under the relevant jacking point.
Note: Do not allow the jack to contact the sill at any other point as damage may result.
Note: The Sports pack sills include arrows to identify jacking points.
2. Attach the cranking lever to the jack using the adaptor. Fit the wheel nut brace to the end of the cranking lever.
3. Rotate clockwise to raise until the jack pin locates into the jacking point.
4. Continue raising the vehicle until the wheel is clear of the ground.
5. Remove the wheel nuts and place them together where they cannot roll away.
6. Remove the wheel and place to one side.
Do not lay the wheel on its face, as this may damage the finish.
7. Fit the temporary spare wheel to the hub.
8. Re-fit the wheel nuts and lightly tighten them. Ensure that the wheel is making contact with the hub evenly.
9. Ensure that the space under the vehicle is clear of obstructions and lower the vehicle slowly and smoothly.
10. With all wheels on the ground and the jack removed, fully tighten the wheel nuts. The wheel nuts must be tightened in sequence (see illustration) to the correct torque of 133 Nm (98 lb.ft).

Note: If it is not possible to torque the wheel nuts when a wheel is replaced, they should be set to the correct torque as soon as possible.
Check and adjust the tyre pressure as soon as possible.
READ NEXT:
 Tyre care
Do not drive the vehicle if a
tyre is
damaged, excessively worn, or
incorrectly inflated.
Avoid contaminating the tyres with
vehicle fluids as they may cause
damage to the tyre.
Avoid spinnin
Tyre pressures
Never drive your vehicle if
the tyre
pressures are incorrect.
Pressure checks should only be
carried out when the tyres are cold,
and the vehicle has been stationary
for more than three hours.
SEE MORE:
Important information
The information contained in this handbook covers all vehicle derivatives and
optional equipment,
some of which may not be fitted to your vehicle. Due to printing cycles, this
handbook may include
descriptions of options before they become generally available.
The vehicle options, hardware an
Symbols used in this handbook
Safety warnings indicate either a procedure which must be followed
precisely, or
information that should be considered with great care, in order to avoid the
possibility
of personal injury.
Cautions indicate either a procedure which must be followed precisely, or
information that
should
