Range Rover Evoque: Wiper blade replacement
Fit only replacement wiper blades that are identical to the original specification.
Before changing a wiper blade, the wiper arms must be set in the ‘service’ position as follows;
Note: The Smart Key must remain in the vehicle while wiper blades are replaced.
1. Ensure that the ignition is turned off.
2. Turn the ignition on then off again.
3. Immediately push the wiper control down to start the single wipe operation and turn on the ignition again.
The wipers will move to their service position.
4. When the new parts have been fitted, turn the ignition off. This will return the wipers to park position.
Front wiper blade: Lift the blade clear of the screen.
1. Push down on the button and hold.
2. Pull the wiper blade away from the button.
When the new blade is pushed into the receiver, the button will click into place.
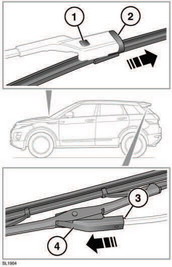
Rear wiper blade: Lift the blade clear of the screen.
3. Prise the tab out and hold.
4. Slide the blade down the wiper arm to clear the mounting.
When the new blade is pushed into the wiper arm, the tab will click into place.
READ NEXT:
 Opening and closing the bonnet
Opening and closing the bonnet
Opening
1. Pull the bonnet release lever, located in the
left-hand front footwell.
2. Lift the bonnet safety catch lever, located
below the centre point of the bo
Poisonous fluids
Fluids used in motor vehicles are poisonous
and should not be consumed or brought into
contact with open wounds.
For your own safety, always read and obey all
instructions printed on labels and co
SEE MORE:
Important information
The information contained in this handbook covers all vehicle derivatives and
optional equipment,
some of which may not be fitted to your vehicle. Due to printing cycles, this
handbook may include
descriptions of options before they become generally available.
The vehicle options, hardware an
Symbols used in this handbook
Safety warnings indicate either a procedure which must be followed
precisely, or
information that should be considered with great care, in order to avoid the
possibility
of personal injury.
Cautions indicate either a procedure which must be followed precisely, or
information that
should
