Range Rover Evoque: Engine System - General Information
Cylinder Head Gasket Selection TD4 2.2L Diesel
Special Tool(s)
 303-979
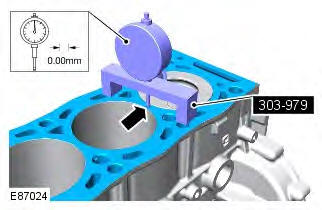
Measuring Bridge, Piston Protusion
1. CAUTION: Make sure that the surface is clean and free of foreign material. Zero the gauge on the cylinder block machined face.
Special Tool(s): 303-979
2. CAUTION: Make sure that the surface is clean and free of foreign material.
NOTE: Note the dial gauge readings. Take 2 measurements on each piston crown.
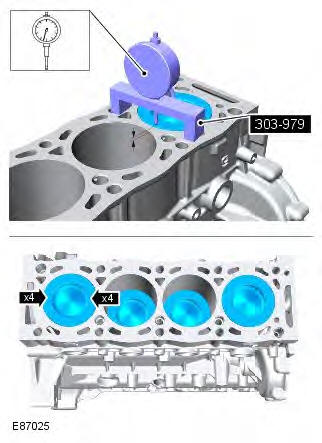
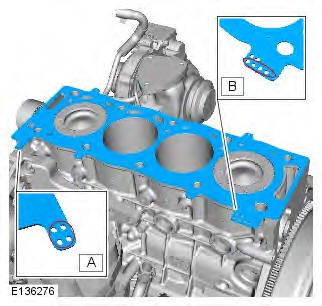
3. CAUTION: The gasket thickness is identified by the number of holes (1 to 4) at either of the locations shown. Use the highest piston protrusion measurment, to select the correct thickness cylinder head gasket.
Refer to: Specifications (303-01A Engine - TD4 2.2L Diesel, Specifications).
Leakage Test Using Smoke Test Equipment
CAUTION: The compressed air line supply pressure must be between 3.5 and 12 bar (50 and 175 psi) for the smoke test equipment to function correctly. Do not exceed this pressure. Failure to follow this instruction may result in damage to the smoke test equipment.
NOTES:
The vehicle battery must be in good condition and fully charged before carrying out this procedure.
On vehicles with 3.0L TDV6, it will be necessary to insert smoke at both air cleaner outlet pipes independently if the right hand turbocharger and associated hoses are to be tested.
In some cases it may be necessary to remove undertrays, trim or engine covers to obtain access to all potential leak locations.
Some variation in the illustrations may occur, but the essential information is always correct.
For further information regarding operation of the test equipment refer to the manufacturers operators manual supplied with the kit.
1. WARNING: Use an additional support to prevent the hood from falling if the smoke test equipment is secured to the hood. Failure to follow this instruction may result in personal injury. Install the smoke test equipment to a suitable location under the hood.
2. Connect a suitable compressed air line to the smoke test equipment.
3. Connect the smoke test equipment positive power cable to the battery positive terminal.
4. WARNING: Do not connect the smoke test equipment negative cable to the battery negative terminal. Connect the smoke test equipment negative cable to a suitable body ground point.
5. NOTE: A flashing green light indicates low battery voltage. In this case, place the battery on charge and make sure that the battery is fully charged before using the smoke test equipment. Observe the power indicator lamp on the smoke test equipment. Make sure that a continuous green light is displayed.

6. NOTES:
In some cases it may be necessary to remove the air cleaner(s) to allow access to the air cleaner outlet pipes.
In some cases it will be necessary to cap one of the air cleaner outlet pipes. Use the blanking caps supplied in the kit to cap the open orifice. Disconnect the air cleaner outlet pipe(s).
7. NOTE: Make sure the smoke test equipment adapter is a good fit to the air cleaner outlet pipe. This must be an air tight seal. Connect the smoke test equipment supply hose to the air cleaner outlet pipe.
- Install the appropriate adapter to the air cleaner outlet pipe.
- Connect the smoke test equipment supply hose to the adapter link hose.

8. NOTES:
The flow control valve must be in the fully open position.
Smoke is produced for 5 minutes. The smoke test equipment will automatically switch off after this period of time.
Switch the smoke test equipment on.

9. Remove the oil filler cap, and observe until a constant flow of smoke is visible leaving the oil filler orifice. Install the oil filler cap.
10. NOTE: The longer smoke is allowed to exit from a leak, the more fluorescent dye will be deposited at a leak location. Using the torch supplied in the kit set to white light, look for escaping smoke. Alternatively, use the ultraviolet light to look for fluorescent dye deposits at the source of a leak.
Cylinder Head Distortion
Activation
1. Using a suitable metallic straight edge and feeler gauge, measure the cylinder head face in the areas illustrated. Note the maximum value.
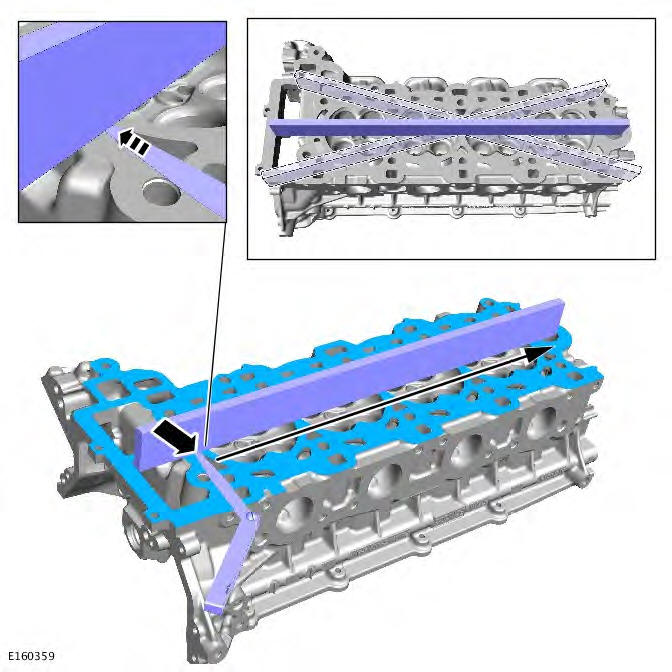
2. CAUTION: Machine the minimum thickness of material from the cylinder head to meet specification, then increase the thickness of the cylinder head gasket by one size.
NOTES:
Prior to having the cylinder head being machined, prior approval is required by Jaguar or Land Rover engineering.
If the cylinder head requires machining, this must be carried out by a local engineering company.
If the cylinder head exceeds the maximum value (0.2mm), the cylinder head must be machined.
READ NEXT:
 Engine - Component Location, System Operation and Component
Description
Engine - Component Location, System Operation and Component
Description
Component Location
EXTERNAL VIEW
Overview
OVERVIEW
The 2.0L Gasoline Turbocharged Direct Injection (GTDi) engine is an in-line,
double overhead camshaft, 4 cylinder engine,
which is transverse mount
Cylinder Block Components - 2.0L GTDi
Component Description
Front crankshaft oil seal
Front cover assembly
Knock sensor - cylinders 1 and 2
Gasket - thermostat housing
Thermostat
Cylinder block
Knock sensor - cylinders 3 and 4
B
SEE MORE:
Important information
The information contained in this handbook covers all vehicle derivatives and
optional equipment,
some of which may not be fitted to your vehicle. Due to printing cycles, this
handbook may include
descriptions of options before they become generally available.
The vehicle options, hardware an
Symbols used in this handbook
Safety warnings indicate either a procedure which must be followed
precisely, or
information that should be considered with great care, in order to avoid the
possibility
of personal injury.
Cautions indicate either a procedure which must be followed precisely, or
information that
should
