Range Rover Evoque: Lower Arm
Removal
CAUTION: Nuts and bolts must be tightened with the weight of the vehicle on the suspension.
NOTES:
RH illustration shown, LH is similar.
Removal steps in this procedure may contain installation details.
1. WARNING: Make sure to support the vehicle with axle stands. Raise and support the vehicle.
2. Refer to: Wheel and Tire (204-04 Wheels and Tires, Removal and Installation).
3. WARNING: Make sure that a new nut is installed. Torque: 60 Nm
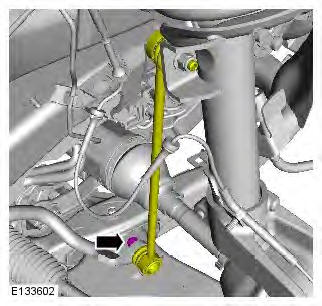
4.
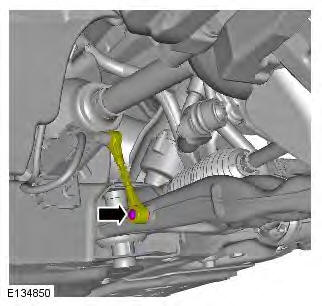
5. WARNING: Make sure that a new bolt is installed. Torque: 200 Nm
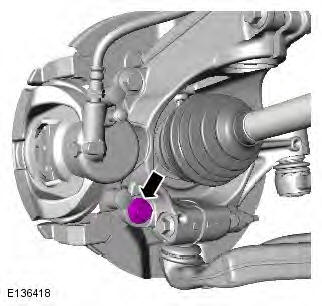
6. WARNING: Make sure that a new bolt is installed.
Torque:
Stage 1: 48 Nm
Stage 2: 180
READ NEXT:
 Front Stabilizer Bar AWD
Removal
CAUTION: Nuts and bolts must be tightened with the weight of the vehicle
on the suspension.
NOTES:
Only use clean water as a lubricant for the bushing, if required.
Removal steps in this pro
Front Stabilizer Bar Bushing
Removal
NOTES:
Some variation in the illustrations may occur, but the essential
information is always correct.
Removal steps in this procedure may contain installation details.
1. WARNING: Make sure
Wheel Knuckle
Special Tool(s)
205-754A
Splitter, Ball Joints
205-857
Remover, Halfshaft
JLR-204-804
Lever, Wheel Knuckle
Removal
CAUTIONS:
Nuts and bolts must be tightened with the weight of the vehicle on the
sus
SEE MORE:
Radio controls
Radio controls
See 104, TOUCH SCREEN OVERVIEW.
1. Radio: Waveband selection. Touch to view
and select a waveband. The radio will tune
to the last used station on that waveband.
Touch again to close.
The waveband selection box will close
automatically after 5 seconds without use.
2. Display
Radio data system (RDS)
Your radio is equipped with RDS which enables
the audio unit to receive additional information
with normal FM radio signals.
Note: Not all FM radio stations broadcast RDS
information.
Select Settings (6) to view or alter RDS
settings.
- Traffic/News: Provides local travel or news
information
© 2011-2026 Copyright www.rrevoque.org - 0.0036
