Range Rover Evoque: Front Stabilizer Bar Bushing
Removal
NOTES:
Some variation in the illustrations may occur, but the essential
information is always correct.
Removal steps in this procedure may contain installation details.
1. WARNING: Make sure to support the vehicle with axle stands.
Raise and support the vehicle.
2. Remove the front wheels and tires.
Refer to: Wheel and Tire (204-04 Wheels and Tires, Removal and
Installation).
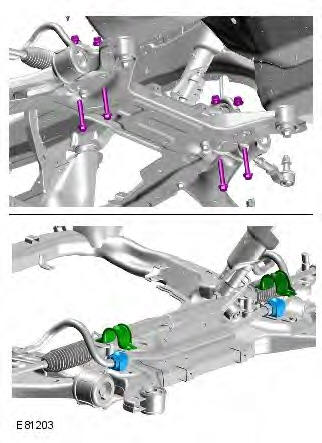
3. WARNING: Make sure that new nuts are installed.
Torque:
Stage 1: 175 Nm
Stage 2: 175 Nm

Installation
1. To install, reverse the removal procedure.
Front Stabilizer Bar Link
Removal
NOTES:
Some variation in the illustrations may occur, but the essential
information is always correct.
Removal steps in this procedure may contain installation details.
1. WARNING: Make sure to support the vehicle with axle stands.
Raise and support the vehicle.
2. Refer to: Wheel and Tire (204-04 Wheels and Tires, Removal and
Installation).
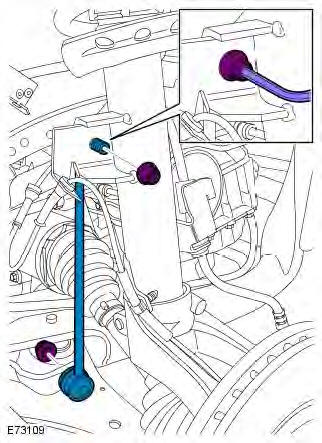
3. WARNING: Make sure that new nuts are installed.
CAUTION: Use an Allen key to prevent the ball
joint rotating whilst removing the nut.
Torque: 60 Nm

Installation
1. To install, reverse the removal procedure.
READ NEXT:
Special Tool(s)
205-754A
Splitter, Ball Joints
205-857
Remover, Halfshaft
JLR-204-804
Lever, Wheel Knuckle
Removal
CAUTIONS:
Nuts and bolts must be tightened with the weight of the vehicle on the
sus
General Equipment
Suspension Spring Compressor
Vise
Removal
WARNINGS:
Make sure the spring compressor Safe Working Load (SWL) meets or exceeds
the spring rating quoted in the
Specifcations sectio
Special Tool(s)
205-754A
Splitter, Ball Joints
205-857
Remover, Halfshaft
JLR-204-804
Lever, Wheel Knuckle
General Equipment
Transmission jack
Wooden Block
Removal
CAUTION: Nuts and bolts must be
SEE MORE:
Land Rover vehicles are fitted with emission
and evaporative control systems. In many
countries it is unlawful to tamper, modify or
replace such equipment and legal penalties
apply if the laws are flouted.
Land Rover Dealers/Authorised Repairers are
properly equipped to perform repairs and to
Torque Specifications
Turbocharger
Removal
NOTES:
Some illustrations may show the engine removed for clarity.
Some variation in the illustrations may occur, but the essential information is
always correct.
Removal steps in this procedure may contain installation details.
1. Disconnect the batter
© 2011-2026 Copyright www.rrevoque.org


