Range Rover Evoque: Rear loadspace
 Never allow passengers to
travel in
the loadspace under any
circumstances. All vehicle occupants
should be seated correctly and wear a
seat belt at all times when the vehicle
is in motion.
Never allow passengers to
travel in
the loadspace under any
circumstances. All vehicle occupants
should be seated correctly and wear a
seat belt at all times when the vehicle
is in motion.
Always ensure that objects carried
within the vehicle are secured
properly.
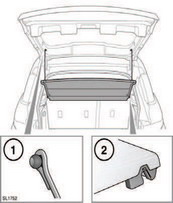
To remove the loadspace cover: 1. Release the two straps from the pins on the tailgate.
2. Pull the cover rearwards to release the retaining brackets on the edges of the cover from the pins on the loadspace side trim.
 Never place objects on top of
the
loadspace cover. During an accident
or sudden manoeuvre, loose objects
Never place objects on top of
the
loadspace cover. During an accident
or sudden manoeuvre, loose objects
Installation of the cover is the reverse of removal.
Storing the cover:
 Do not store the loadspace
cover
loose in the vehicle.
Do not store the loadspace
cover
loose in the vehicle.
1. Remove the loadspace cover.
2. Fold the rear seats forward.
3. Position the cover vertically in the vehicle approximately where the upright rear seat backrests are normally. The top surface of the cover must be facing forwards with the retaining brackets at the top.
4. Locate the retaining brackets onto the side trim pins.
5. Return the rear seats to the upright locked position.
READ NEXT:
 Roof racks
A loaded roof rack can reduce
the
stability of the vehicle, particularly
when cornering and during cross
winds.
Driving off road with a loaded roof
rack is not recommended.
Fit only a roof ra
Luggage anchor points
Luggage anchor points
All items
carried in the luggage area
should be properly secured.
1. Bag hooks.
- The bag hooks should only be used to
secure light items such as shopping
bags.
2. Lo
SEE MORE:
Important information
The information contained in this handbook covers all vehicle derivatives and
optional equipment,
some of which may not be fitted to your vehicle. Due to printing cycles, this
handbook may include
descriptions of options before they become generally available.
The vehicle options, hardware an
Symbols used in this handbook
Safety warnings indicate either a procedure which must be followed
precisely, or
information that should be considered with great care, in order to avoid the
possibility
of personal injury.
Cautions indicate either a procedure which must be followed precisely, or
information that
should
