Range Rover Evoque: Seats - Diagnosis and Testing
Principle of Operation
For a detailed description of the seating systems and operation, refer to the relevant Description and Operation section of the workshop manual. REFER to: Seats (501-10 Seating, Description and Operation).
Inspection and Verification
CAUTION: Diagnosis by substitution from a donor vehicle is NOT acceptable. Substitution of control modules does not guarantee confirmation of a fault and may also cause additional faults in the vehicle being checked and/or the donor vehicle.
NOTES:
Check and rectify basic faults before beginning diagnostic routines involving pinpoint tests.
If the control module is suspect and the vehicle remains under manufacturer warranty, refer to the Warranty Policy and Procedures manual or determine if any prior approval programme is in operation, prior to the installation of a new module.
Generic scan tools may not read the codes listed, or may read only five digit codes. Match the five digits from the scan tool to the first five digits of the seven digit code listed to identify the fault (the last two digits give additional information read by the manufacturer approved diagnostic system).
When performing electrical voltage or resistance tests, always use a digital multimeter (DMM) accurate to three decimal places, and with an up-to-date calibration certificate. When testing resistance, always take the resistance of the DMM leads into account.
Inspect connectors for signs of water ingress, and pins for damage and/or corrosion.
If DTCs are recorded and, after performing the pinpoint tests, a fault is not present, an intermittent concern may be the cause. Always check for loose connections and corroded terminals.
1. Verify the customer concern.
2. Visually inspect for obvious signs of mechanical or electrical damage.
Visual Inspection

3. If an obvious cause for an observed or reported concern is found, correct the cause (if possible) before proceeding to the next step.
4. If the cause is not visually evident, verify the symptom and refer to the Symptom Chart, alternatively check for Diagnostic Trouble Codes (DTCs) and refer to the DTC Index.
Symptom Chart


DTC Index
For a list of Diagnostic Trouble Codes (DTCs) that could be logged on this vehicle, please refer to Section 100-00. REFER to: Diagnostic Trouble Code (DTC) Index - DTC: Module Name: Driver/Passenger Front Seat Module (100-00 General Information, Description and Operation).
Pinpoint Tests
PINPOINT TEST A : FRONT SEAT FORE/AFT MOVEMENT NOT FUNCTIONING
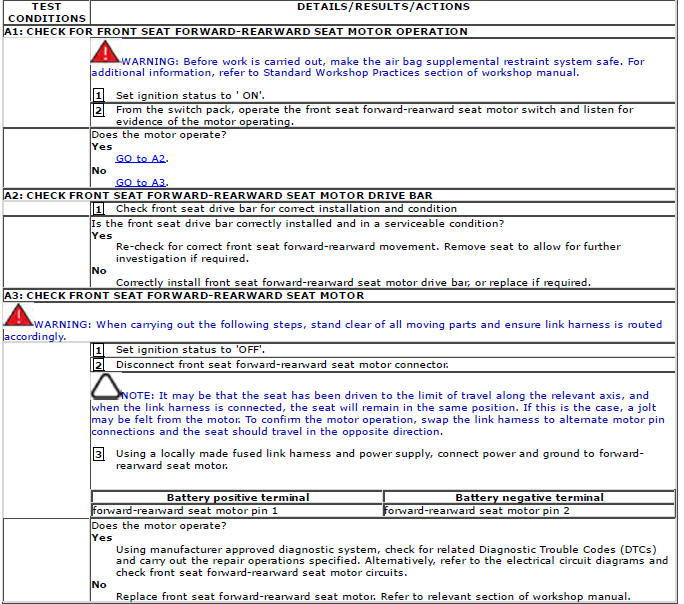
PINPOINT TEST B : FRONT SEAT EXCESSIVE FORWARD-REARWARD FREE PLAY

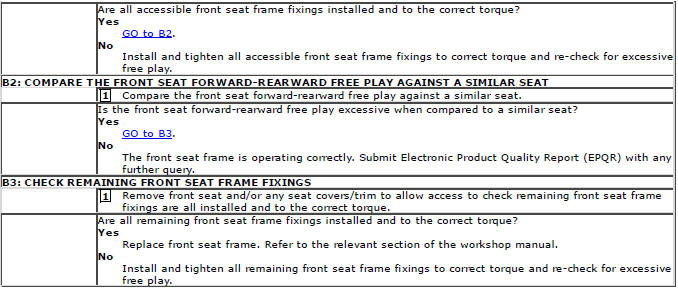
PINPOINT TEST C : FRONT SEAT FORWARD-REARWARD MOVEMENT NOISY
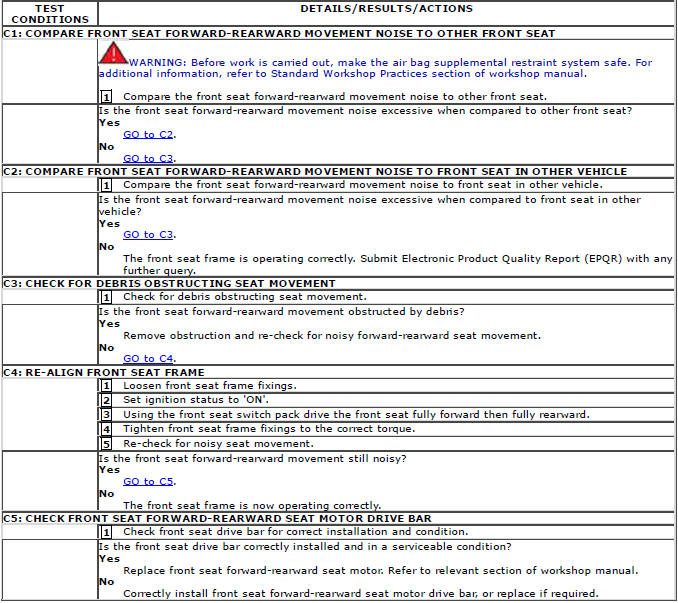
PINPOINT TEST D : FRONT SEAT HEIGHT, TILT AND/OR SEAT EXTENSION MOTOR MOVEMENT NOT FUNCTIONING

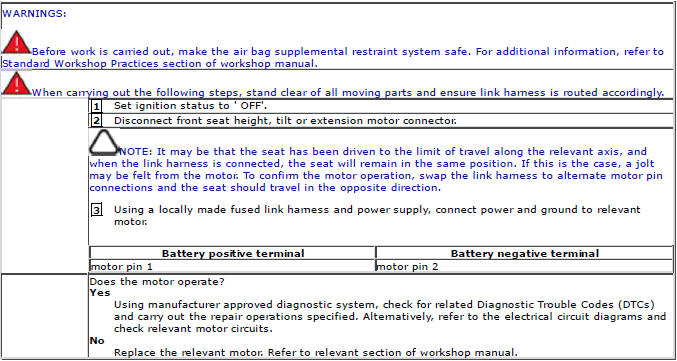
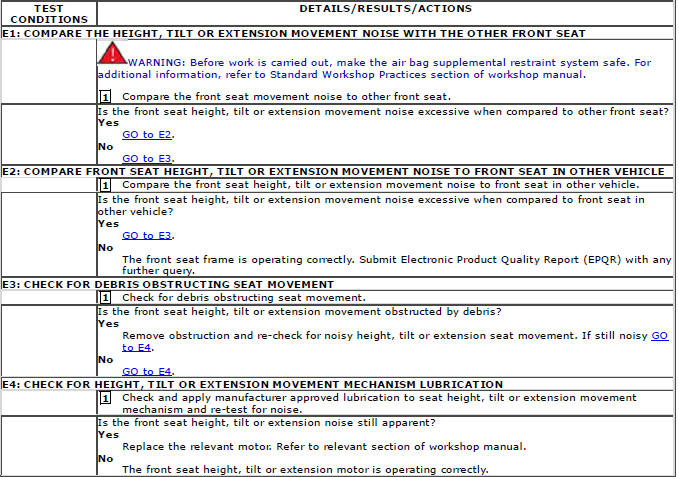
PINPOINT TEST E : FRONT SEAT HEIGHT, TILT AND/OR EXTENSION MOVEMENT NOISY
Component Location
COMPONENT LOCATION - SHEET 1 OF 2
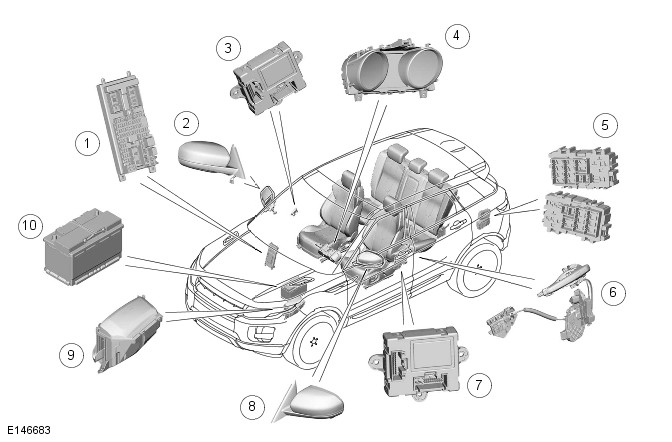
- CJB (central junction box)
- RH (right-hand) door mirror
- RH front door module
- Instrument cluster
- RJB (rear junction box)
- LH (left-hand) front door latch and ajar switch
- LH front door module
- LH front door mirror
- BJB (battery junction box)
- Battery
COMPONENT LOCATION - SHEET 2 OF 2
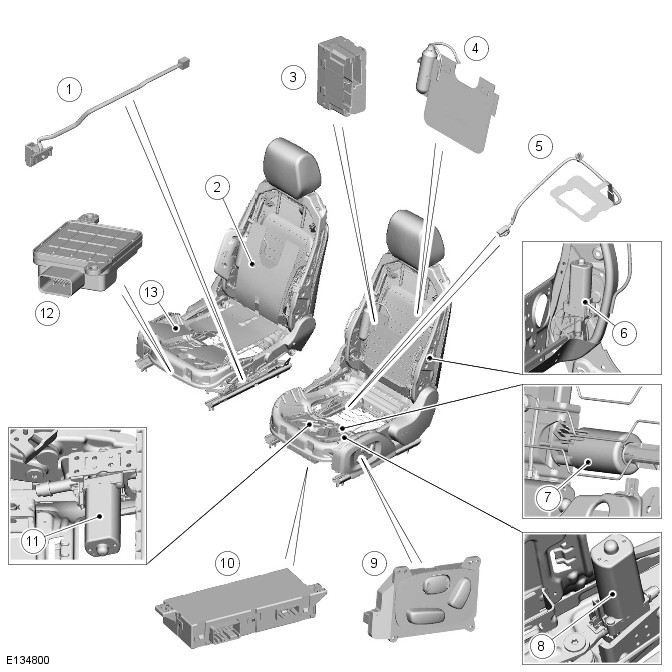
- Seat position sensor
- Heated seat backrest element
- Heated seat module
- Power operated lumbar support
- Seat occupancy detection sensor
- Seat recline motor
- Seat forward-rearward motor
- Seat height motor
- Seat switch pack
- Seat memory module
- Seat tilt motor
- Occupant classification sensor control module
- Heated seat cushion element
Overview
OVERVIEW
Leather Seat Covers
Leather is a natural product, therefore it bears natural characteristics, such as grain variations, growth & bush marks.
These non-weakening marks show the true nature of the hide and are the hallmarks of Leather. In order to maintain the beauty of the vehicles natural Leather upholstery it requires regular cleaning, which if neglected, may cause deterioration.
Where dust and dirt are allowed to accumulate and become ingrained in the surface of the Leather, the upholstery may become permanently damaged.
Light coloured upholstery can be particularly susceptible to soiling and staining and care should be taken to ensure that where there is evidence of any soiling or staining on the upholstery then this should be cleaned immediately using the Jaguar/Land Rover approved products, failure to do this could lead to the stain becoming permanent, this applies to all leather upholstery and is not colour specific.
Leather trimmed seats will naturally exhibit areas of creasing and wrinkling over a period of time and is a normal characteristic as the Leather ages.
Particular care should be taken where there is evidence of soiling or staining on the leather, this should be cleaned immediately. Failure to do this could lead to the stain becoming permanent.
Particular care should be taken to prevent damage from studs, zips and buckles.
NOTES:
Please refer to Leather care label attached to seats for more information.
Creasing and wrinkling does not represent a manufacturing defect.
Damage from studs, zips and buckles do not represent manufacturing defects.
Use only Jaguar/Land Rover approved products in accordance with the instructions for use.
General
All vehicles, except those manufactured to North American Specification (NAS), are installed with manually operated front seats as standard. Options available include manually, electrically power operated front seats with or without memory function. The front seats may also be provided with arm rests to improve driver and front passenger comfort.
NAS vehicles are installed with power operated front seats as standard. The front seats feature arm rests to improve driver and front passenger comfort. A driver's power operated seat with memory functionality is provided as an option for NAS vehicles.
Depending on vehicle specification and trim level, vehicles may also feature front heated seats and a lumbar support system. Lumbar support is provided as an electrically operated system, and it is available for both seats.
The rear seat is manufactured to the same specification for all vehicles, and is provided with ISOFIX child safety seat restraints.
All seats incorporate adjustable head restraints. Depending on the vehicle specification, the seats are upholstered in either partial leather, grained leather, or Windsor leather finish.

