Range Rover Evoque: Accessory Drive - GTDi 2.0L Petrol

Torque Specifications

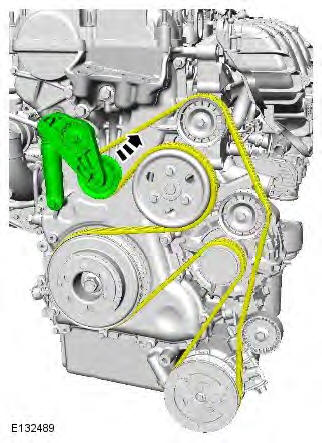
Accessory Drive Belt
Removal
NOTE: Some illustrations may show the engine removed for clarity.
1. Disconnect the battery ground cable.
Refer to: Specifications (414-01 Battery, Mounting and Cables, Specifications).
2. WARNING: Make sure to support the vehicle with axle stands. Raise and support the vehicle.
3. Refer to: Wheel and Tire (204-04 Wheels and Tires, Removal and Installation).
4. CAUTION: Take extra care not to damage the component.
5. NOTE: LH illustration shown, RH is similar.
6.

7.

8. Torque: 25 Nm
9.
Installation
1. To install, reverse the removal procedure.
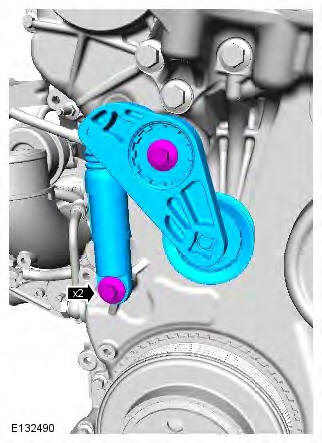
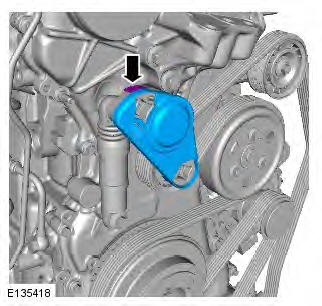
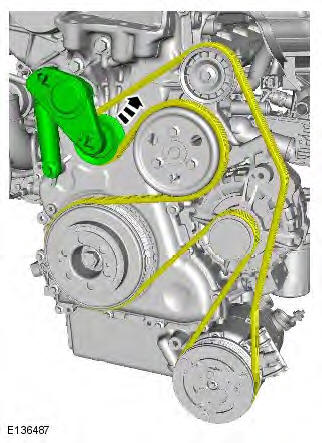
Accessory Drive Belt Tensioner
Removal
NOTE: Some illustrations may show the engine removed for clarity.
1. Disconnect the battery ground cable.
Refer to: Specifications (414-01 Battery, Mounting and Cables, Specifications).
2. WARNING: Make sure to support the vehicle with axle stands.
Raise and support the vehicle.
3. Refer to: Wheel and Tire (204-04 Wheels and Tires, Removal and Installation).
4. CAUTION: Take extra care not to damage the component.
NOTE: LH illustration shown, RH is similar.

5. NOTE: LH illustration shown, RH is similar.

6.
7.
8. Torque: 25 Nm

Installation
1. To install, reverse the removal procedure.
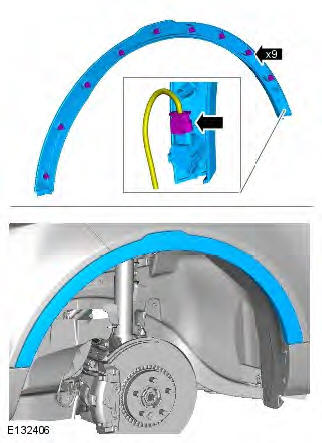
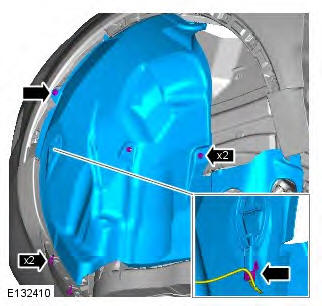
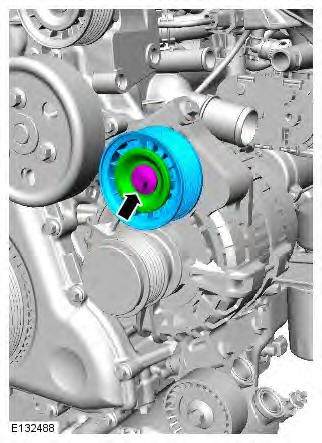
Accessory Drive Belt Idler Pulley
Removal
NOTE: Some variation in the illustrations may occur, but the essential information is always correct.
1. Disconnect the battery ground cable.
Refer to: Specifications (414-01 Battery, Mounting and Cables, Specifications).
2. WARNING: Make sure to support the vehicle with axle stands. Raise and support the vehicle.
3. Refer to: Wheel and Tire (204-04 Wheels and Tires, Removal and Installation).
4. CAUTION: Take extra care not to damage the component.
NOTE: LH illustration shown, RH is similar.
Remove the RH front wheel arch liner trim panel.

5. NOTE: LH illustration shown, RH is similar.

6.
7. Torque: 48 Nm
Installation
1. To install, reverse the removal procedure.
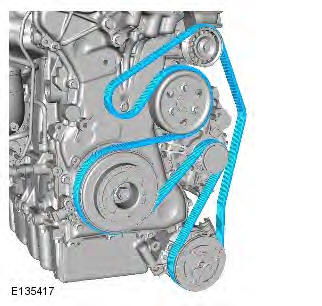
Accessory Drive - Component Location
COMPONENT LOCATION
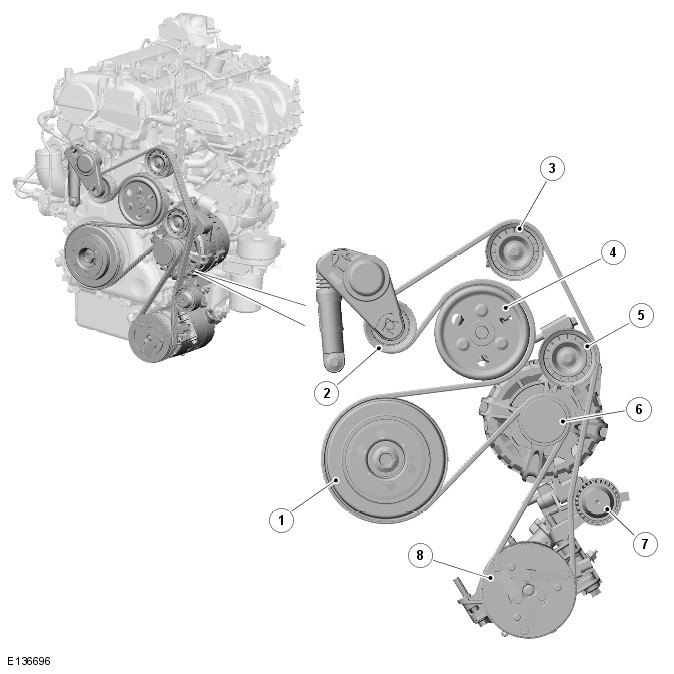
- Crankshaft pulley
- Tensioner and idler pulley assembly
- Idler pulley
- Engine coolant pump pulley
- Idler pulley
- Generator pulley
- Idler pulley
- Air Conditioning (A/C) compressor pulley
Accessory Drive - Overview
OVERVIEW
The engine crankshaft pulley drives the accessory components, which comprise the generator, engine coolant pump and the A/C (air conditioning) compressor.
Accessory Drive - System Operation and Component Description
System Operation
OPERATION
The crankshaft pulley provides the drive for the components located on the accessory drive belt. The belt is automatically pre-loaded by a tensioner and is routed over deflection idler pulleys. The idler pulleys ensure that the belt has maximum contact with the component pulleys in order to maintain sufficient grip between the belt and the component driven pulleys.
This ensures a slip-free drive of the accessory components.
Component Description
DESCRIPTION
The 20 mm belt is designed to achieve fit-for-life performance during normal use. Due to the risk of off-road stone damage, the belt is inspected periodically and, if necessary, replaced. (Refer to the vehicle service schedule for more information). The belt has a rib profile to provide high dimensional accuracy. The surface of the ribs are specially treated to reduce noise.
Engine durability during wading is protected by sealed bearings on the belt idler pulleys and the tensioner. The generator, A/C (air conditioning) compressor and the starter motor are also fully sealed.
Accessory Drive
Principles of Operation
For a detailed description of the front primary drive belt system, refer to the relevant Description and Operation section of the workshop manual. REFER to: (303-05E)
Inspection and Verification
CAUTION: Diagnosis by substitution from a donor vehicle is NOT acceptable. Substitution of control modules does not guarantee confirmation of a fault and may also cause additional faults in the vehicle being checked and/or the donor vehicle.
1. Verify the customer concern.
2. Visually inspect for system integrity and obvious signs of damage.
Visual Inspection
- Front primary drive belt
- Front primary drive belt tension
- Front primary drive belt tensioner
- Front primary drive belt pulleys
- Front primary drive belt pulley seals
3. If an obvious cause for an observed or reported concern is found, correct the cause (if possible) before proceeding to the next step
4. If the cause is not visually evident, verify the symptom and refer to the Symptom Chart.
Symptom Chart
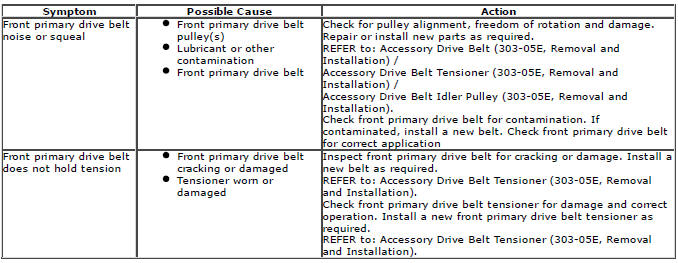
Component Tests
Front primary drive belt tensioner
CAUTION: If the engine is run without the drive belt(s) connected to eliminate driven components, diagnostic trouble codes, (DTCs) may be set which must be cleared before the vehicle is returned to the owner. The engine should not be run for more than 2-3 minutes with the belts disconnected. Failure to follow this instruction may result in damage to the vehicle
Static
The only checks required for the front primary drive belt tensioner are for stick, grab or bind.
1. Remove the drive belt in the area of the tensioner.
2. Using the correct tool, rotate the tensioner from its relaxed position through its full stroke and back to the relaxed position to make sure there is no stick, grab or bind, and to make sure that there is tension on the tensioner spring.
3. If the tensioner meets the above criteria, proceed to the dynamic test. If the tensioner does not meet the above criteria install a new tensioner.
Dynamic
The front primary drive belt tensioner can be checked dynamically as follows:
With the engine running, observe drive belt tensioner movement, the front primary drive belt tensioner should move (respond) when the air conditioning clutch cycles (if equipped), the front primary drive belt tensioner should move (respond) when the engine speed is increased rapidly. If the drive belt tensioner movement is erratic without air conditioning clutch cycling or engine acceleration, a pulley or shaft may be bent, or distorted. Excessive drive belt rideout (uneven depth of grooves in the drive belt) can also cause excessive drive belt tensioner movement.
Front primary drive belt
1. With the engine off, check routing of the drive belt.
2. Inspect the drive belt tensioner wear indicator to confirm the drive belt is within operating range. Install a new drive belt as necessary .
DTC index
For a complete list of all Diagnostic Trouble Codes (DTCs) that could be logged on this vehicle, please refer to Section 100-00.
READ NEXT:
 Starting System - GTDi 2.0L Petrol
Starting System - Component
Location
COMPONENT LOCATION
Solenoid
12V supply from battery
Solenoid power supply from Battery Junction Box (BJB)
Starter motor
Pinion gear
Starting System - Overv
Engine Ignition - GTDi 2.0L Petrol
Engine Ignition
Principles of Operation
For a detailed description of the ignition system, refer to the relevant
Description and Operation section in the workshop
manual. REFER to: (303-07D)
Inspecti
Engine Emission Control - GTDi 2.0L Petrol
Emission Control -
Component Location
COMPONENT LOCATION
Intake manifold
Bolt (8 off)
Crankcase ventilation hose
Oil separator
Gasket
Camshaft cover
Lower clean air inlet duct
Upper clean ai
SEE MORE:
Important information
The information contained in this handbook covers all vehicle derivatives and
optional equipment,
some of which may not be fitted to your vehicle. Due to printing cycles, this
handbook may include
descriptions of options before they become generally available.
The vehicle options, hardware an
Symbols used in this handbook
Safety warnings indicate either a procedure which must be followed
precisely, or
information that should be considered with great care, in order to avoid the
possibility
of personal injury.
Cautions indicate either a procedure which must be followed precisely, or
information that
should
