Range Rover Evoque: Body Repairs - Corrosion Protection
Corrosion Protection
Galvanic Corrosion
Galvanic corrosion is the cross-contamination of dissimilar metals, in this case aluminium and steel. Avoidance of galvanic corrosion is an important issue to be considered in the repair of aluminium bodied vehicles.
Precautions to prevent the contamination of exposed bare aluminium surfaces should be taken. Good housekeeping and cleanliness should be adopted throughout repairs and especially prior to welding, pre-treatment, (Pyrosil), and adhesive bonding.
The repair environment requires control and protection from dust and debris from conventional steel body repairs. All equipment must be clearly identified and used solely on aluminium.
Tools should be kept clean and in good order. Steel fastenings are coated to prevent galvanic corrosion. Fastenings should be examined during repairs and where damaged or suspect must be renewed.
The use of graphite, penetrating oil, or copper based anti-seize compounds upon the steel fixings is not recommended.
Where the original equipment surface protection (paint), is removed it must be repainted to the recommended standard.
Only Land Rover original bodywork components and Land Rover approved repair materials (sealer, paint etc.) are to be used for bodywork repairs.
General
The corrosion protection provided in production must be carefully maintained and/or reproduced during and after body repair work. It is only then that the long-term warranty against penetrative corrosion damage can be assured.
Land Rover Original Parts
All Land Rover bodywork components have a cathodic base coating. Individual bodywork components are zinc plated on one or both sides (in different areas depending on vehicle model).
Together with elastic paint coating, this guarantees an optimum, highly resistant protection against corrosion caused by the impact of small objects such as gravel.
NOTE: If possible, the individual protective layers (zinc, cathodic base coat) on Land Rover bodywork components must not be damaged or destroyed by sanding or other mechanical operations.
If hairline cracks at 'bodywork connection areas' appear after reshaping work (e.g. at door hinges), it must be ensured that the corrosion protection provided in production is recreated. The complete paint covering must be re-created if necessary. The same applies to reshaping work on heavily profiled bodywork components (e.g. floor pan). Renew or touch-up the paint coating, sealing beads and underbody protection as necessary.
After repair, any interior surfaces which are no longer visible or accessible must be primed before cavity wax is applied. To be certain of an even coating on inner surfaces, careful application of spray (twice, with drying time in-between) must be carried out throughout the whole cavity.
If bodywork panels are strongly heated during repair work, this will invariably result in damage to or even destruction of the applied corrosion protection material. The effectiveness of the cavity protection material is reduced if heating occurs.
Reworking of the affected areas is therefore vital.
Welded areas should be made good before corrosion protection is applied.
The corrosion protection measures to be taken when bodywork components are renewed are described on the following pages.
Corrosion Protection of New Components
All new components must be inspected for transport or storage damage such as scratches or dents. The following operations may be necessary, depending on the extent of damage:
Undamaged New Component
- Do not grind the cathodic primer.
- Lightly sand using a Scotchbrite pad for paint preparation
- Thoroughly clean with silicone remover and rub dry.
Slightly Damaged New Component
- Sand out scratches.
- Finely sand the surrounding surface.
- Thoroughly clean with silicone remover and rub dry.
- Apply corrosion protection primer to bare areas.
Damaged New Components (bumps and dents)
- Beat out the dented area and sand down to bare metal.
- Apply polyester filler (only onto bare metal).
- Apply filler.
- Lightly sand the whole component.
- Thoroughly clean with silicone remover and rub dry.
- Apply corrosion protection primer to bare areas.
The clinched flanges on the hood, doors, tailgate and liftgate must be sealed with clinched flange sealer, if this is not already applied.
Weld Components
Use a stripping disc to remove the cathodic primer on the inside and outside of the area to be welded. The stripped area should be kept as small as possible, retaining as much of the cathodic primer as possible, taking care not to damage the zinc coating.
Apply Welding Primer
NOTE: The welding zinc primer must be stirred well or shaken before application.
Clean the repair area thoroughly (silicone remover).
Apply welding primer evenly to all weld flanges (old and new components).
NOTE: The welding primer must be allowed to dry before welding is carried out.
All weld beads must be ground down after all welding is completed, taking care not to weaken the welded joint.
Any unevenness at the joint must be made good.
If necessary, spot weld missing weld studs into position.
The vehicle must be completely cleaned of sanding dust and metal swarf to reduce the risk of corrosion.
Clean and prime all internal areas and those to be sealed.
NOTE: The primer must be dry before sealing mastic or underbody protection is applied. Do not use thinners when applying sealing mastic (thinners may remove cathodic primers and mastic will not dry).
Partial Renewal
The procedure to follow when partially renewing components is the same as described in the section 'Welded Components'.
The main difference when components are partially, rather than completely renewed, concerns the preparation of butt or lap joints.
- When bodywork components are cut through, attention must be paid to the adequate removal of the paint and zinc coatings on inner areas. This specially applies to areas which are difficult to access internally.
- It is important for the weld quality that the inner area is bare metal. Zinc and paint residues in the weld area burn and cause serious hole formation during welding.
- If the zinc layer and the paint coating are not removed, the zinc and paint will burn during welding. The soot produced prevents satisfactory cavity protection.
Procedure
- The paint layer must be removed for a width of 30 mm from the line of the weld using a rotating tress wire brush.
- This operation must be carried out on both the new and the old parts of the bodywork.
- Depending on the bodywork component, a 10 mm width of the underlying zinc layer must also be removed along the weld line.
NOTE: A flat scraper or a wire brush can be used instead of the rotating brush if the cavity is small. Do not use an angle grinder, which would reduce panel integrity and may weaken the structure.
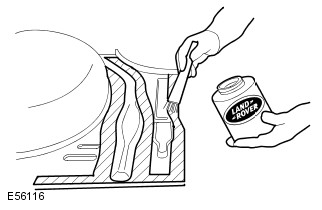
Application of Cavity Wax Protection on a Door Rocker Panel After Partial Repair

- Weld bead
- Spray head
- Distance maintainer
- Spray gun
Classification of the different corrosion protection measures for dent removal

Classification of Different Corrosion Protection Measures for Installation of New Components

Body Sealing Materials

- Between Panels - Bolted
- Panel Edge Bolted
- Between Panels - spot welded
- Panel edges - spot welded
- Between panels - bonded
- Panel edges - bonded
- Clinch joints - type A
- Clinch joints - type B
- Clinch joints - type C
- Gaps between panels - type A
- Gaps between panels - type B
- Lap joint
Approved Service Materials For Repair

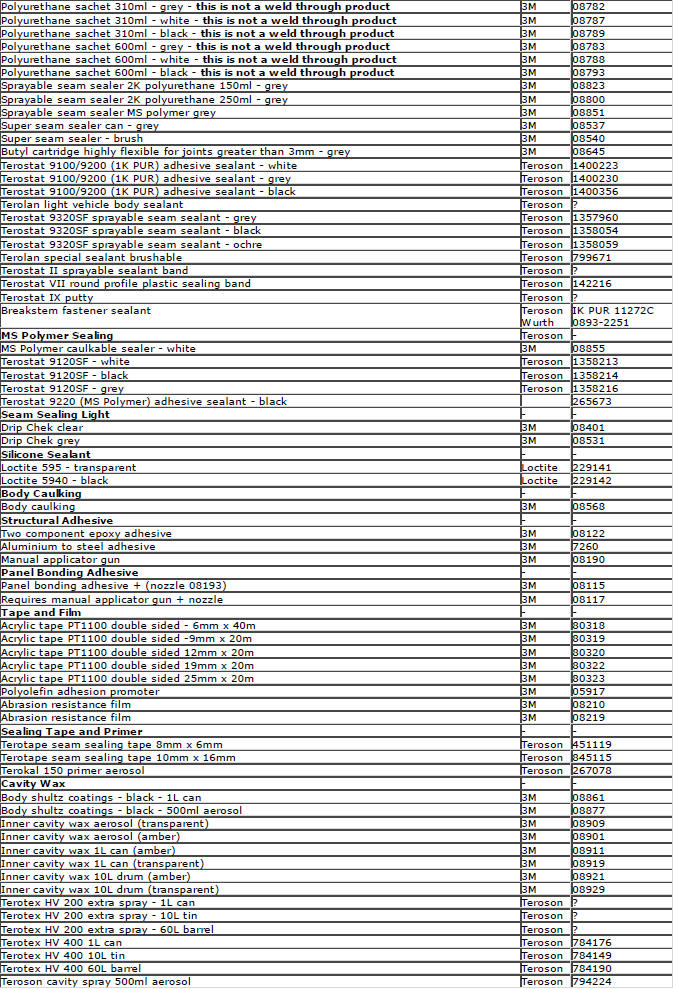
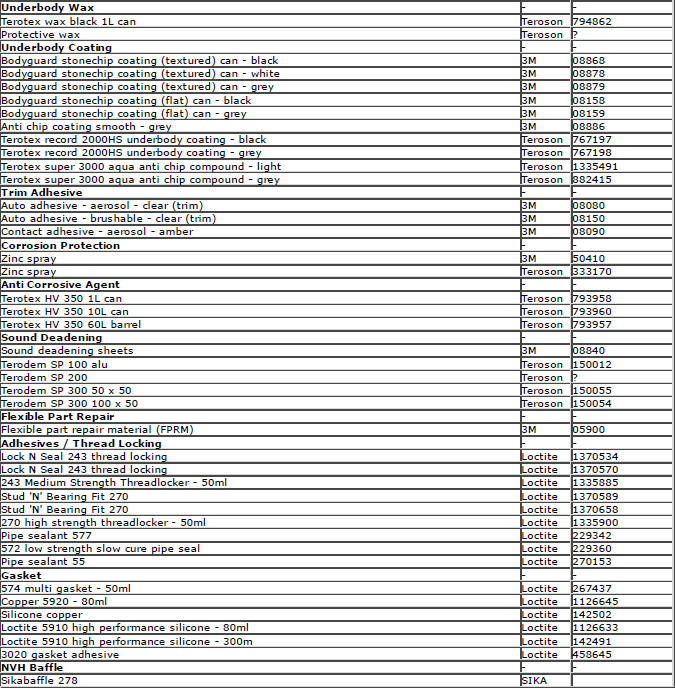
Approved Service Material Supplier - Contact Details
3M
- 3M United Kingdom PLC
- 3M Centre
- Cain Road
- Bracknell
- Berkshire
- RG12 8HT
- Telephone (01344) 858000
- www.3m.com
Cooper Pegler
- Burgess Hill
- Sussex
- RH 15 9LA
- Telephone (014446) 42526
Sika Ltd
- Watchmead
- Welwyn Garden City
- Hertfordshire
- AL7 1BQ
- Telephone (01707) 394444
- www.sika.co.uk
SATA Spray Equipment
- Minden Industrial equipment
- 16 Greyfriars Road
- Moreton Hall
- Bury St Edmunds
- Suffolk
- IP32 7DX
- Telephone (01284) 760791
- www.sata.com
Henkel Loctite Adhesives Limited
- Technologies House
- Wood Lane End
- Hemel Hempstead
- Hertfordshire
- HP2 4RQ
- Telephone (01442) 278000
- www.loctite.co.uk
Teroson
- Henkel Ltd
- Apollo Court
- 2 Bishops Square Business Park
- Hatfield
- Hertfordshire
- AL10 9EY
- Telephone (01707) 635000
- www.henkel.co.uk
Underbody sealer
Under floor areas and the front part of the spare wheel well are treated with a plastisol PVC underbody sealer. This material is not suitable for re-treatment. When repairing areas of underbody sealer, strip the factory-applied underbody sealer back to a suitable break point. Ensure that a clean metal surface is exposed and that the edge of the existing adheres soundly to the panel.
Apply new underbody sealer between primer and surface paint operations. Apply seam sealer as necessary before application of underbody sealer. Ensure that blanking plugs and grommets in the floor pan (except those used for wax injection) are fitted before underbody sealer application. Refit any heat-fusible plugs which have been disturbed in repair with the aid of a hot air blower, or replace with rubber grommets
CAUTION: Ensure that suspension units, wheels, tires, power unit, drive shafts, exhaust and brakes (including all mounting points) are shielded prior to application of fresh underbody sealer.
Area of Underbody Sealer Application - Floor Pan
Area of Underbody Sealer Application - Spare Wheel Well
Precautions During Body Repairs and Handling
Take care when handling the vehicle in the workshop. Underbody sealers, seam sealers, underbody wax and body panels may be damaged if the vehicle is carelessly lifted.
Proprietary Anti-corrosion Treatments
The application of proprietary anti corrosion treatments in addition to the factory-applied treatment could invalidate the corrosion warranty and should be discouraged. This does not apply to approved, compatible, preservative waxes which may be applied on top of existing coatings.
Fitting Approved Accessories
When fitting accessories ensure that the vehicle corrosion protection is not affected, either by breaking the protective coating or by introducing a moisture trap.
Do not screw self-tapping screws directly into body panels. Fit suitable plastic inserts to the panel beforehand. Always ensure that the edges of holes drilled into panels, chassis members and other body parts are protected with a suitable zinc rich or acid etch primer, and follow with a protective wax coating brushed onto the surrounding area.
Do not attach painted metal surfaces of any accessory directly to the vehicle's bodywork unless suitably protected. Where metal surfaces are bolted together always interpose a suitable interface material such as weldable zinc rich primer, extruded strip, or zinc tape.
Steam Cleaning
Due to the high pressure/temperature generated by steam cleaning equipment, there is a risk that certain adhesives and corrosion prevention material may become softened or liquified.
Take care not to allow the steam jet to dwell on one area, and keep the nozzle at least 300mm from the panel surface.
CAUTION: Do not remove wax or lacquer from underbody areas during repairs.
Inspection During Maintenance Servicing
It is a requirement of the corrosion warranty that the vehicle is inspected for corrosion by a Land Rover Authorised Repairer during a routine service, to ensure that the factory-applied protection remains effective.
Rectify any bodywork damage or evidence of corrosion found during inspection as soon as is practicable, both to minimise the extent of the damage and to ensure the long term effectiveness of the factory-applied corrosion prevention treatment.
Underbody Protection Repairs
Whenever body repairs have been carried out, ensure that full sealing and corrosion protection treatments are reinstated.
This applies both to the damaged areas and also to areas where protection has been indirectly impaired, as a result either of accident damage or repair operations.
Remove corrosion protection from the damaged areas before straightening or panel beating. This applies in particular to panels coated with wax, PVC underbody sealer, sound deadening pads etc.
CAUTION: Do not use oxy-acetylene to remove corrosion prevention material. Large volumes of fumes and gases are liberated by these materials when they burn.
The most common method of removal is by means of a hot air blower with an integral scraper. High temperatures can be generated with this equipment which may cause fumes. Take care during its use.
Structural Adhesive
CAUTION: When separating a joint with metal to metal adhesive, it is important to avoid distortion. Heat gradually until the bond weakens sufficiently to permit panel separation - do not apply excessive heat.
NOTE: When spot welding through metal to metal adhesive, take particular care to adjust the equipment setting to ensure a suitable weld.
Metal to metal adhesive is applied to critical joint areas during factory assembly. The material used is a high temperature, heat cured, nitrile phenolic which serves to bond two metal surfaces and also to seal the joint against ingress of dust, moisture and fumes. This material is not suitable for service use and, during repair, should be substituted by an approved structural adhesive. For panel specific information and to identify the areas of structural adhesive application in repair, refer to the relevant sheet metal removal and installation procedure.
Expanding Foam Acoustic Seals
Expanding foam acoustic seals are used in various closed-sections of the body to improve vehicle refinement. The seals are installed during the vehicle body manufacture and expand during the paint process up to ten times original size, thus locking them into position. They are located such that they prevent noise accentuation along a section and reflect air borne noise away from the cabin.
The seals have spilt functionality depending on location. The seals located at the base of the body pillars have a primary function of preventing water ingress when wading. Their secondary function is to prevent noise and dust ingress.
The seal around the fuel filler has a primary function of preventing both fuel and water ingress. With a secondary function of preventing noise and dust ingress.
The remaining seals primary function is to prevent noise accentuation along a section and reflect air borne noise away from the cabin.
Another advantage of the seals is that they marginally increase the overall stiffness of the body and its structural performance in case of a crash.
The seals are manufactured from an expandable polymer.
Replacing Expanding Foam Acoustic Seals
As paint oven temperatures used in a repair workshop are significantly lower than those that are used during manufacture of the vehicle, (the temperatures are not sufficient to expand the foam), a different process and aftersales material is required to replicate the foam in repair.
If a repair disturbs the expanding foam acoustic seal it must be reinstated. If access allows, (whether a new seal is fitted or the original is reused), acoustic foam should be injected after paint refinishing. If access is not possible, or it is not practical to apply expanding foam due to the nature of the repair, a suitable flexible PU sealer should be applied around the seal and the corresponding body panel/s prior to assembly. In all cases the application of foam / sealer should form a seal between the expanding foam acoustic seal and any adjacent panelwork.
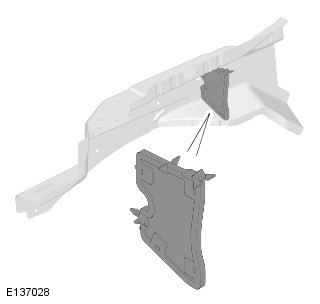
Expanding Foam Acoustic Seals in the Fender Apron Upper Panel
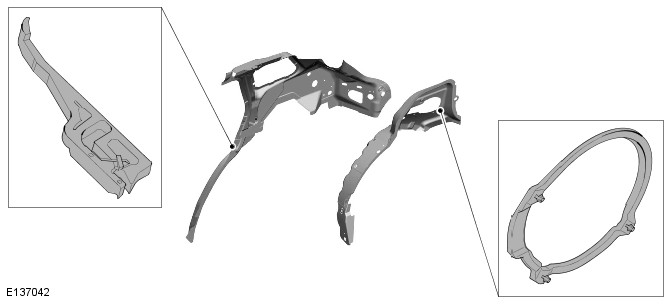
Expanding Foam Acoustic Seals in the Side Panel Reinforcement - 3dr
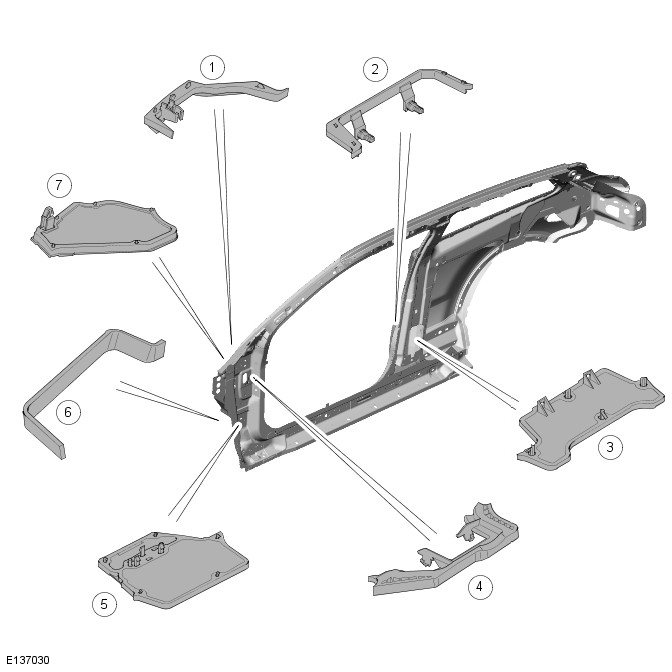
Expanding Foam Acoustic Seals in the Side Panel Reinforcement - 5dr
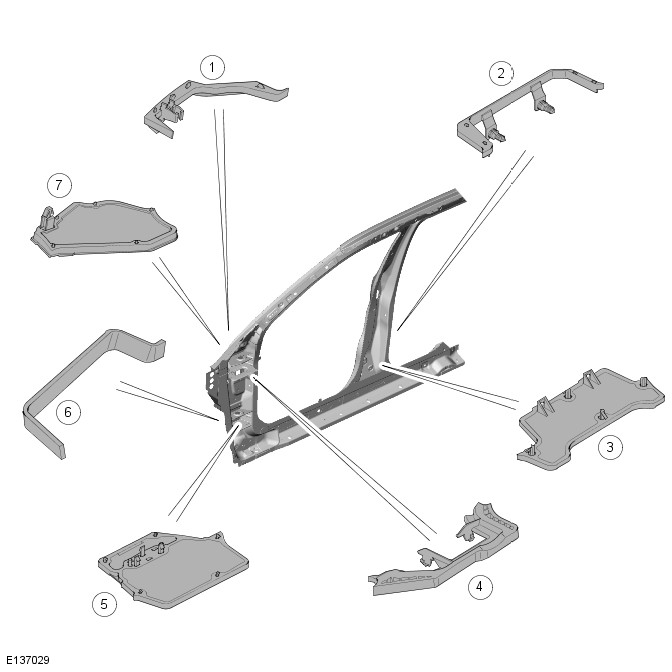
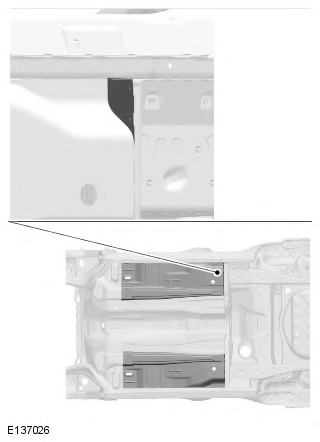
Expanding Foam Acoustic Seals in the Quarter Panel - 3dr
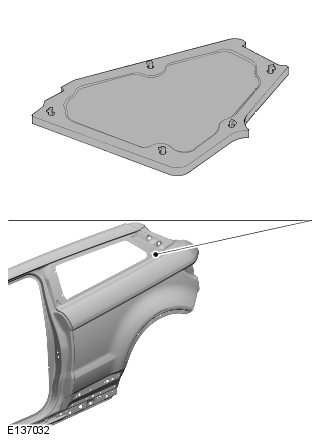
Expanding Foam Acoustic Seals in the Quarter Panel - 5dr

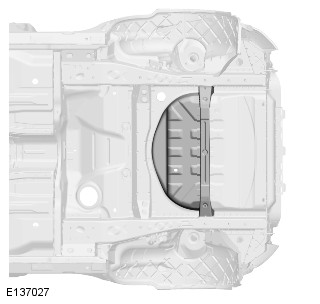
Expanding Foam Acoustic Seals in the Inner Quarter Panel and Wheelhouse - 3dr
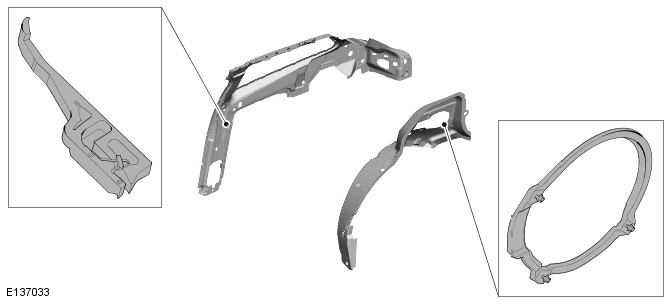
Expanding Foam Acoustic Seals in the Inner Quarter Panel and Wheelhouse - 5dr
Seam Sealer
A heat cured, PVC based sealant is applied to specific joint seams during factory assembly. This material is not suitable for service use and during repair and should be substituted by an approved aftersales seam sealer.
NOTE: Where seams are inaccessible following the reassembly or fitting of components, ensure that a paste-type seam sealer is applied to such seams. Certain seams also become inaccessible after the completion of panel repairs. In such instances apply seam sealer and paint before final assembly.
Apply seam sealers after the application of primer and before the application of top coat. The sealer must form a continuous bead, with the profile of the bead dependent on the type of seam. If the seam sealer is applied with a brush take particular care to maintain the required coverage of the seam.
Ensure that all accessible repair seams are sealed following a repair. Damage to a vehicle often flexes areas of the body remote from the impact. As a result the seam sealer in these areas may be disturbed by subsequent straightening and repair operations. Check all seams in the vicinity of the area undergoing repair for evidence of cracked seam sealer, then clean out as required and apply fresh seam sealer using the following procedure:
- Clean the affected seam and re-treat any exposed metal areas with a suitable etch phosphate primer.
- Treat affected area with an etch-acid primer.
- Apply appropriate seam sealer as necessary.
- apply appropriate color coat (and under body sealer as applicable).
Provided access is adequate, apply seam sealer to both sides of a repair joint. Where access is limited to one side only, (e.g. box section), treat the inaccessible affected box member with cavity wax.
Cavity Wax
After repairs, always re-treat these areas with an approved cavity wax. In addition, treat all interior surfaces which have been disturbed during repairs whether they have been treated in production or not. This includes all box members, cavities and door interiors.
Before wax injection, ensure that the cavity to be treated is free from any contamination or foreign matter. Where necessary, clear out any debris.
Ensure that cavity wax is applied after the final paint process and before refitting any trim components.
During application ensure that the wax covers all flanges and seam areas and that it is adequately applied to all repaired areas of both new and existing panels.
It should be noted that new panel assemblies and complete body shells are supplied without wax injection treatment.
Ensure that such treatment is carried out after repairs.
Effective cavity wax protection is vital. Always observe the following points:
- Complete all paint refinish operations before wax application.
- Check the spray pattern of injection equipment.
- Mask all areas not to be waxed.
- Remove body fixings, such as seat belt retractors, if contamination is at all likely.
- Move door glasses to fully closed position before treating door interiors.
- Treat body areas normally covered by trim before refitting items.
- Check that body and door drain holes are clear after the protective wax has dried.
- Keep all equipment clean, especially wax injection nozzles.
READ NEXT:
 Body Repairs - Vehicle Specific Information and Tolerance Checks
Body
and Frame
Front End Body Dimensions
NOTES:
All dimensions shown are in millimetres (mm).
Dimensions shown to holes, are always taken from/to the hole centre. They are
also always to the body pa
Front Bumper Mounting
Removal
NOTE: The front bumper mounting is manufactured from HSLA300 and mild
steel.
1. In this procedure, to make sure the vehicle is correctly aligned, it must
be placed on
an approved alignment j
SEE MORE:
Front Seat Backrest Cover Vehicles With: Sports Seats
Removal
NOTES:
Removal steps in this procedure may contain installation details.
Some variation in the illustrations may occur, but the essential information is
always correct.
All vehicles
1. Prior to carrying out the step by step procedure below, Steps 2
and 3 must be followed for knowledge on h
Lumbar Assembly Vehicles With: Sports Seats
Removal
NOTE: Removal steps in this procedure may contain installation details.
1. Make the SRS system safe.
Refer to: Standard Workshop Practices (100-00 General Information,
Description and Operation).
2. Disconnect the battery ground cable.
Refer to: Specifications (414-01 Battery, Mounting and
