Range Rover Evoque: Climate Control System - General Information
Climate Control

Lubricants, Fluids, Sealers and Adhesives

General Specification
Capacities

Refrigerant oil adding capacities for replacment parts
NOTE: Rotate the A/C compressor shaft at least 6 to 8 turns when draining the refrigerant oil.

Air Conditioning (A/C) System Recovery, Evacuation and Charging GTDi 2.0L Petrol
Recovery
1. WARNING: Servicing must be carried out by personnel familliar with both vehicle system and the charging and testing equipment.
All operations must be carried out in a well ventilated area away from open flame and heat sources.
2. Remove the dust covers from the high and low pressure connections.

3. Connect the high and low pressure lines to the appropriate connections.
4. WARNING: Refrigerant must always be recycled before re-use to make sure that the purity of the refrigerant is high enough for safe use in the air conditioning (A/C) system. Recycling should always be carried out with equipment which is design certified for compliance with SAE J2099 and SAE J2788. Other equipment may not recycle refrigerant to the required level of purity. R-134a Refrigerant Recover Recycling Recharging station must not be used with any other type of refrigerant. Refrigerant R-134a from domestic and comercial sources must not be used in motor vehicles A/C systems.
NOTE: Measure and record the quantity of refrigerant oil recovered from the system.
Following the manufacturer's instructions, recover the refrigerant from the A/C system.
5. CAUTIONS: Make sure that all openings are sealed. Use new blanking caps.
Always follow the health and safety precautions when handling the refrigerant R-134a.
Collect the refrigerant in specialist equipment and reuse.
Disconnect the high and low pressure connections.
Evacuation
1. Connect the high and low pressure lines to the appropriate connections.
2. Following the manufacturer's instructions, evacuate the A/C system.
3. NOTE: The desiccant bag need only be changed under the following circumstances: There is dirt in the refrigerant circuit (eg.
compressor seizure), the system is leaking and refrigerant has been lost to atmosphere, or the refrigerant circuit has been open more than 24 hours, due to repair.
Refer to: Desiccant Bag - GTDi 2.0L Petrol (412-01 Climate Control, Removal and Installation).
Charging
1. CAUTION: The system must be evacuated immediatley before recharging commences. Delay between evacuation and recharging is not permitted
2. Ensure the correct amount of oil is added to the A/C system before or during recharging.
3. Recharge the A/C system to the correct specification.
Refer to: Specifications (412-00 Climate Control System - General Information, Specifications).
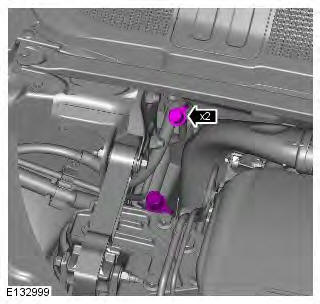
4. Disconnect the high and low pressure connections.
5. Install and firmly tighten the caps that cover the high and low pressure connections.
Torque: 6 Nm

Air Conditioning (A/C) System Recovery, Evacuation and Charging TD4 2.2L Diesel
Recovery
1. WARNING: Servicing must be carried out by personnel familliar with both vehicle system and the charging and testing equipment.
All operations must be carried out in a well ventilated area away from open flame and heat sources.
2. Remove the dust covers from the high and low pressure connections.

3. Connect the high and low pressure lines to the appropriate connections.
4. WARNING: Refrigerant must always be recycled before re-use to make sure that the purity of the refrigerant is high enough for safe use in the air conditioning (A/C) system. Recycling should always be carried out with equipment which is design certified for compliance with SAE J2099 and SAE J2788. Other equipment may not recycle refrigerant to the required level of purity. R-134a Refrigerant Recover Recycling Recharging station must not be used with any other type of refrigerant. Refrigerant R-134a from domestic and comercial sources must not be used in motor vehicles A/C systems.
NOTE: Measure and record the quantity of refrigerant oil recovered from the system.
Following the manufacturer's instructions, recover the refrigerant from the A/C system.
5. CAUTIONS: Make sure that all openings are sealed. Use new blanking caps.
Always follow the health and safety precautions when handling the refrigerant R-134a.
Collect the refrigerant in specialist equipment and reuse.
Disconnect the high and low pressure connections.
Evacuation
1. Connect the high and low pressure lines to the appropriate connections.
2. Following the manufacturer's instructions, evacuate the A/C system.
3. NOTE: The desiccant bag need only be changed under the following circumstances: There is dirt in the refrigerant circuit (eg.
compressor seizure), the system is leaking and refrigerant has been lost to atmosphere, or the refrigerant circuit has been open more than 24 hours, due to repair.
Refer to: Desiccant Bag - TD4 2.2L Diesel (412-01 Climate Control, Removal and Installation).
Charging
1. CAUTION: The system must be evacuated immediatley before recharging commences. Delay between evacuation and recharging is not permitted
2. Make sure the correct amount of oil is added to the A/C system before or during recharging.
3. Recharge the A/C system to the correct specification.
Refer to: Specifications (412-00 Climate Control System - General Information, Specifications).
4. Disconnect the high and low pressure connections.
5. Install and firmly tighten the caps that cover the high and low pressure connections.
Torque: 6 Nm
Climate Control System
Principles of Operation
For a detailed description of the Climate Control System, refer to the relevant Description and Operation section in the workshop manual. REFER to: (412-01 Climate Control)
Inspection and Verification
WARNING: Servicing must be carried out by personnel familiar with both vehicle system and the charging and testing equipment. All operations must be carried out in a well ventilated area away from open flame and heat sources.
CAUTION: Diagnosis by substitution from a donor vehicle is NOT acceptable. Substitution of control modules does not guarantee confirmation of a fault, and may also cause additional faults in the vehicle being tested and/or the donor vehicle.
NOTE: Check and rectify basic faults before beginning diagnostic routines involving pinpoint tests.
1. Verify the customer concern
2. Visually inspect for obvious signs of damage and system integrity
Visual Inspection
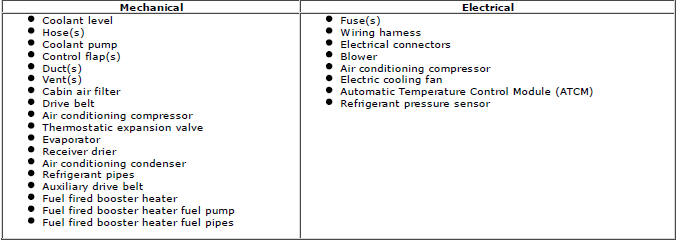
3. If an obvious cause for an observed or reported concern is found, correct the cause (if possible) before proceeding to the next step
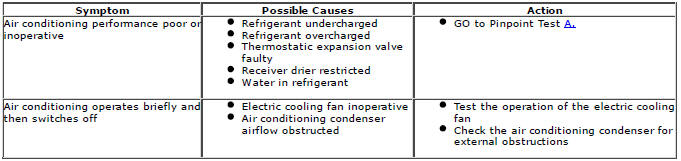
4. If the cause is not visually evident, verify the symptom and refer to the Symptom Chart, alternatively check for Diagnostic Trouble Codes (DTCs) and refer to the DTC Index
5. Check DDW for open campaigns. Refer to the corresponding bulletins and SSMs which may be valid for the specific customer complaint and carry out the recommendations as required
Symptom Chart
Pinpoint Tests
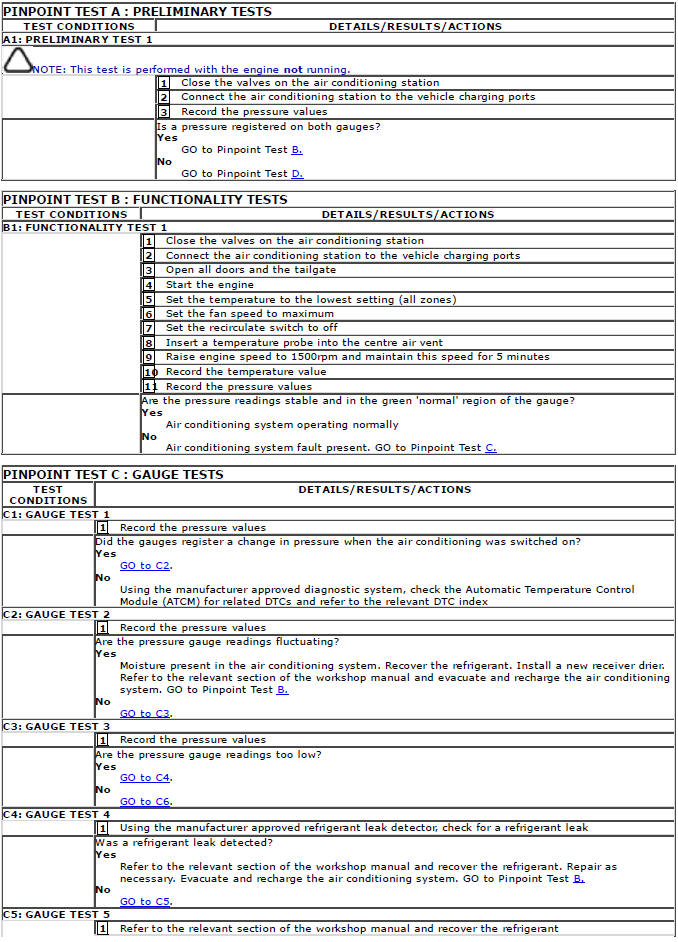
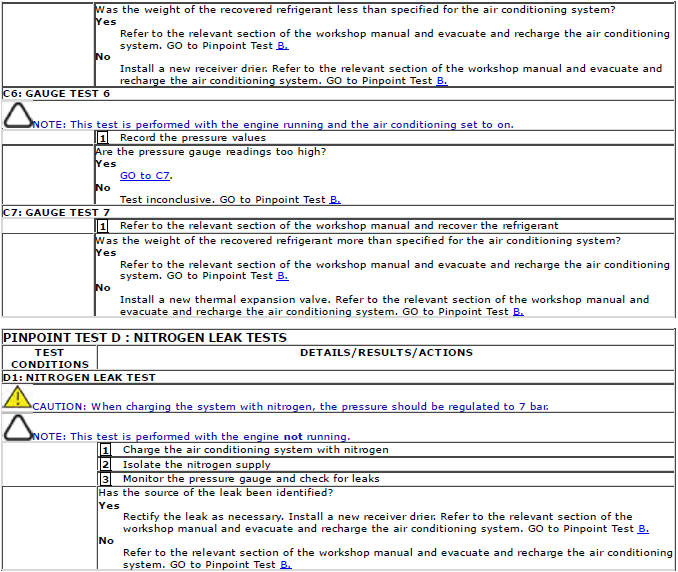
DTC Index
For a list of Diagnostic Trouble Codes (DTCs) that could be logged on this vehicle.
Auxiliary Climate Control
Principles of Operation
For a detailed description of the fuel fired booster heater system and operation, refer to the relevant Description and Operation section of the workshop manual. REFER to: (412-02 Auxiliary Climate Contro
Inspection and Verification
CAUTION: Diagnosis by substitution from a donor vehicle is NOT acceptable. Substitution of control modules does not guarantee confirmation of a fault and may also cause additional faults in the vehicle being checked and/or the donor vehicle.
NOTE: Check and rectify basic faults before beginning diagnostic routines involving pinpoint tests.
1. Verify the 1customer concern
2. Visually inspect for obvious signs of mechanical or electrical damage
Visual Inspection
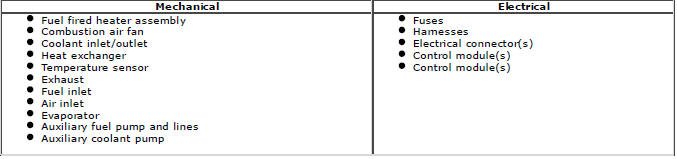
3. If an obvious cause for an observed or reported concern is found, correct the cause (if possible) before proceeding to the next step.
4. If the cause is not visually evident, check for Diagnostic Trouble Codes (DTCs) and refer to the DTC Index.
DTC Index
For a list of Diagnostic Trouble Codes (DTCs) that could be logged on this vehicle, please refer to Section 100-00.
REFER to: Diagnostic Trouble Code (DTC) Index - DTC: Fuel Fired Booster Heater Control Module (FFBHCM) (100-00 General Information, Description and Operation).
Air Conditioning (A/C) Compressor Commissioning
Activation
CAUTION: Failure to follow this instruction may result in damage to the component.
1. Set the ignition to the on position, make sure the air conditioning (A/C) is in the off position.
2. Start the engine and allow to run for a minimum of 5 minutes.
3. Set the heater controls to 22
READ NEXT:
 Air Distribution and Filtering
Component Location
NOTE: Right Hand Drive (RHD) shown, Left Hand Drive (LHD) similar
COMPONENT LOCATION
Passenger face level/side window register
Side window vent
Face level duct
Side window duc
Heating and Ventilation
Component Location
COMPONENT LOCATION
ATC (automatic temperature control)
RH (right-hand) ventilation outlet
LH (left-hand) ventilation outlet
Heater assembly
Blower motor control module
Overv
SEE MORE:
Engine starting
Never start the engine, or
leave it
running, when the vehicle is in an
enclosed space. Exhaust gasses are
poisonous and can cause
unconsciousness and death if inhaled.
If the engine fails to start,
do not
continue cranking as this will discharge
the battery. It may also damage the
cata
If the engine fails to start
Note: If the engine fails to crank when the
START/STOP button is pressed and there has
been a recent collision, seek qualified
assistance.
If the engine fails to crank, or fails to start,
consult your Dealer/Authorised Repairer.
Diesel engines:
If the engine persistently fails to start, make
