Range Rover Evoque: Lighting control
Lighting control
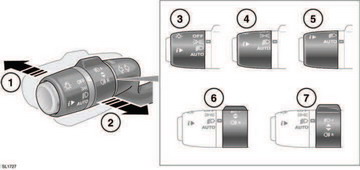
1. With the headlamps on, push the control away from the steering wheel to select high beam. The instrument pack warning lamp will illuminate.
Note: Do not use high beam where it may distract other road users.
2. Pull the control towards the steering wheel and release to flash the high beam on and off. The high beam will remain on for as long as the switch is held.
3. Sidelights.
4. Headlamps.
5. AUTO. With Auto lamps selected, when ambient light fades and the ignition is on, the side lamps, tail lamps, low beam headlamps and licence plate lamps will switch on automatically. Headlamp courtesy delay, High beam assist and Windscreen wipers detection may also be activated.
Note: Low exterior light levels, caused by adverse weather conditions, may also cause the autolamp system to activate.
6. Rear fog lamps. Will operate only while sidelights, headlamps or Auto lamps are selected. Turn the collar towards the steering wheel and release. The instrument pack warning lamp will illuminate.
7. Front fog lamps. Will operate only while sidelights, headlamps or Auto lamps are selected. Turn the collar away from the steering wheel and release.The instrument pack warning lamp will illuminate.
READ NEXT:
 Daytime running lamps
Daytime running lamps are LED lamps.
With the lighting control in the OFF position or
in AUTO position while lighting conditions do
not require headlamps on, then daytime
running lamps will switch
Headlamp courtesy delay
This feature operates whenever the lamps
master switch is in the AUTO (5) position and
the ignition is turned off. The headlamps will
remain illuminated for up to 240 seconds.
Note: The time delay
High beam assist
This feature of the Xenon lighting automatically
selects and deselects high beam, under
specific conditions of road lighting and in the
absence of other vehicle’s lights. The system is
only acti
SEE MORE:
Head restraints
Adjust the head restraint so
that the
top of the head restraint is above the
centre line of the head. An incorrectly
adjusted head restraint increases the
risk of death or serious injury in the
event of a collision.
Do not drive, or carry passengers with
the head restraints removed from
o
Rear seat access (coupe models)
The front seats tilt and power slide forwards for
entry to and exit from the rear seats. Operation
is controlled by a lever and switch.
1. Lift the locking lever and pivot the seatback
forwards.
2. Press the front of the switch to power the
seat forwards.
3. To return the seat, pivot the se
