Range Rover Evoque: Rear Disc Brake
General Specification

Torque Specifications

* New nuts/bolts must be installed
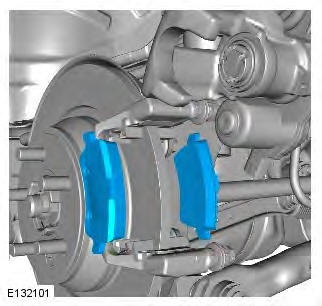
Brake Pads
Removal
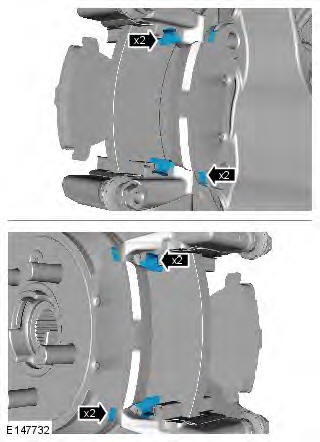
WARNING: Brake pads must be renewed in axle sets only. Failure to follow this instruction may result in braking efficiency being impaired.
CAUTION: LH illustration shown, RH is similar.
1. Connect the diagnostic tool and set the electronic parking brake to the maintenance position.
2. NOTE: This step is only required if the diagnostic tool is not available. Refer to: Electronic Parking Brake (EPB) Service Mode Activation and Deactivation (206-05 Parking Brake and Actuation, General Procedures).
3. NOTE: This step is only required if the vehicle has no battery power. Refer to: Electronic Parking Brake (EPB) Release When the Vehicle Has No Electrical Power (206-05 Parking Brake and Actuation, General Procedures).
4. WARNING: Make sure to support the vehicle with axle stands. Raise and support the vehicle.
5. Refer to: Wheel and Tire (204-04 Wheels and Tires, Removal and Installation).
6.

7.
8. NOTE: Note the fitted position.

9. Repeat the above procedure for the other side.
Installation
1. WARNING: Do not use compressed air to clean brake components. Dust from friction materials can be harmful if inhaled. Clean the brake caliper housing and anchor plate using brake cleaning fluid.
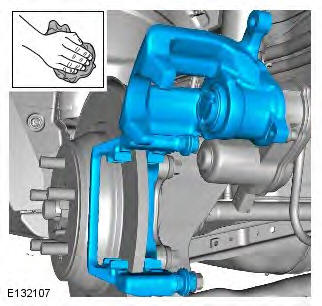
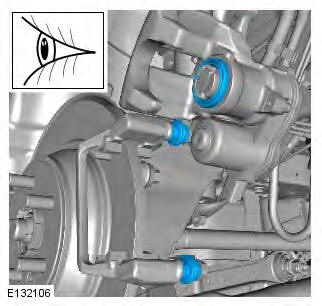
2. Inspect the caliper piston and slide pin seals for damage.
3.
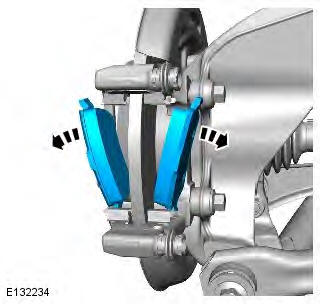
4. CAUTIONS:
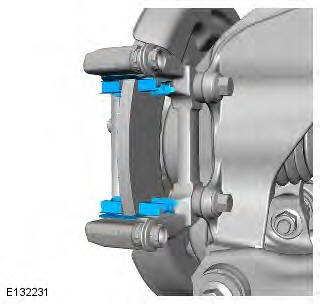
If new brake pads are installed, a gold coloured brake pad clip must be fitted in the lower position.
Failure to follow this instruction may result in damage to the vehicle.
If new brake pads are installed, a silver coloured, rubber coated brake pad clip must be fitted in the upper position. Failure to follow this instruction may result in damage to the vehicle.

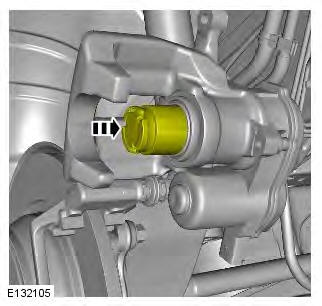
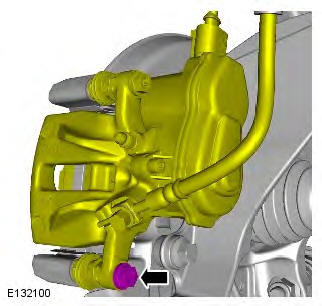
5. Apply a small amount of grease to the areas illustrated.
6.

7. Torque: 35 Nm
8. Refer to: Wheel and Tire (204-04 Wheels and Tires, Removal and Installation).
9. Repeat the above procedure for the other side.
10. Depress the brake pedal several times, check the fluid level in the brake fluid reservoir and top-up with brake fluid if necessary.
11. NOTE: This step is only required if the diagnostic tool is not available. Refer to: Electronic Parking Brake (EPB) Service Mode Activation and Deactivation (206-05 Parking Brake and Actuation, General Procedures).
12. Calibrate the electronic parking brake using the diagnostic tool.
Brake Disc
Removal
NOTE: Removal steps in this procedure may contain installation details.
1. Connect the diagnostic tool and set the electronic park brake (EPB) to the maintenance position.
2. NOTE: This step is only required if the diagnostic tool is not available. Refer to: Electronic Parking Brake (EPB) Service Mode Activation and Deactivation (206-05 Parking Brake and Actuation, General Procedures).
3. NOTE: This step is only required if the vehicle has no battery power. Refer to: Electronic Parking Brake (EPB) Release When the Vehicle Has No Electrical Power (206-05 Parking Brake and Actuation, General Procedures).
4. WARNING: Make sure to support the vehicle with axle stands. Raise and support the vehicle.
5. Remove the rear road wheels.
Refer to: Wheel and Tire (204-04 Wheels and Tires, Removal and Installation).
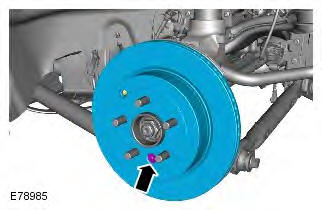
6. Torque: 35 Nm

7.
8. CAUTION: Discard the bolts. Torque: 110 Nm

9. Torque: 35 Nm
Installation
1. CAUTION: Make sure that the mating faces are clean and free of foreign material.

2. NOTE: Install new brake caliper anchor plate retaining bolts. To install, reverse the removal procedure.
3. Depress the brake pedal several times, check the fluid level in the brake fluid reservoir and top-up with brake fluid if necessary.
4. Calibrate the electric parking brake (EPB) using the diagnostic tool.
5. NOTE: This step is only required if the diagnostic tool is not available. Refer to: Electronic Parking Brake (EPB) Service Mode Activation and Deactivation (206-05 Parking Brake and Actuation, General Procedures).
Brake Caliper
Removal
NOTE: Removal steps in this procedure may contain installation details.
1. Connect the diagnostic tool and set the electronic park brake (EPB) to the maintenance position.
2. NOTE: This step is only required if the diagnostic tool is not available. Refer to: Electronic Parking Brake (EPB) Service Mode Activation and Deactivation (206-05 Parking Brake and Actuation, General Procedures).
3. NOTE: This step is only required if the vehicle has no battery power. Refer to: Electronic Parking Brake (EPB) Release When the Vehicle Has No Electrical Power (206-05 Parking Brake and Actuation, General Procedures).
4. WARNING: Make sure to support the vehicle with axle stands. Raise and support the vehicle.
5. Refer to: Wheel and Tire (204-04 Wheels and Tires, Removal and Installation).
6. WARNING: Be prepared to collect escaping fluids.
CAUTIONS:
Make sure that all openings are sealed. Use new blanking caps.
Discard the seals.
Torque: 40 Nm
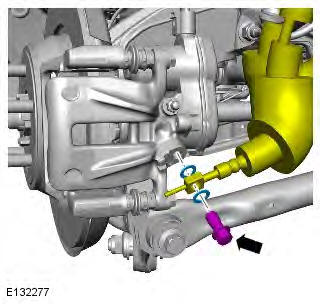
7. Torque: 35 Nm
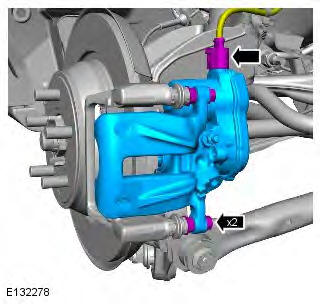
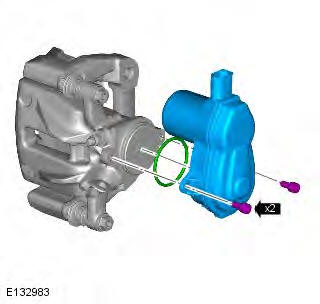
8. CAUTION: Discard the seal.
NOTE: Do not disassemble further if the component is removed for access only. Torque: 11 Nm
Installation
1. CAUTIONS:
Make sure that new sealing washers are installed.
Make sure that the brake hose is not twisted and is correctly located.
To install, reverse the removal procedure.
2. Bleed the brake caliper.
Refer to: Brake System Pressure Bleeding (206-00 Brake System - General Information, General Procedures).
3. Calibrate the electric parking brake (EPB) using the diagnostic tool.
4. NOTE: This step is only required if the vehicle has no battery power. Refer to: Electronic Parking Brake (EPB) Service Mode Activation and Deactivation (206-05 Parking Brake and Actuation, General Procedures).
Brake Caliper Anchor Plate
Removal
NOTE: Removal steps in this procedure may contain installation details.
1. Connect the diagnostic tool and set the electronic park brake (EPB) to the maintenance position.
2. NOTE: This step is only required if the diagnostic tool is not available. Refer to: Electronic Parking Brake (EPB) Service Mode Activation and Deactivation (206-05 Parking Brake and Actuation, General Procedures).
3. NOTE: This step is only required if the vehicle has no battery power. Refer to: Electronic Parking Brake (EPB) Release When the Vehicle Has No Electrical Power (206-05 Parking Brake and Actuation, General Procedures).
4. WARNING: Make sure to support the vehicle with axle stands. Raise and support the vehicle.
5. Refer to: Wheel and Tire (204-04 Wheels and Tires, Removal and Installation).
6. Torque: 35 Nm
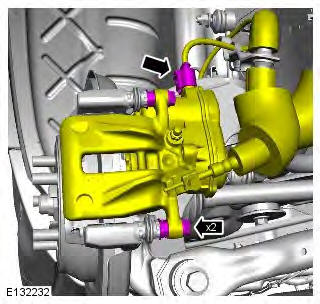
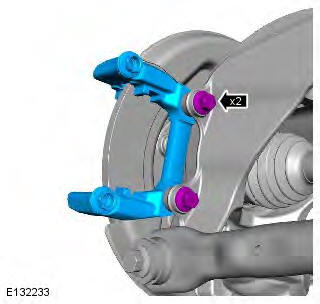
7. CAUTION: Note the fitted position of the component prior to removal.

8. CAUTION: Note the fitted position of the component prior to removal.
9. CAUTION: Discard the bolts. Torque: 110 Nm
Installation
1. NOTE: Install new brake caliper anchor plate retaining bolts. To install, reverse the removal procedure.
2. Depress the brake pedal several times, check the fluid level in the brake fluid reservoir and top-up with brake fluid if necessary.
3. Calibrate the electric parking brake (EPB) using the diagnostic tool.
4. NOTE: This step is only required if the diagnostic tool is not available. Refer to: Electronic Parking Brake (EPB) Service Mode Activation and Deactivation (206-05 Parking Brake and Actuation, General Procedures).
READ NEXT:
 Parking Brake and Actuation
Parking Brake - Component Location
NOTE: RHD (right-hand drive) installation shown, LHD (left-hand drive)
installation similar.
COMPONENT LOCATION
ABS (anti-lock brake system) module
Instrument c
Hydraulic Brake Actuation
Hydraulic Brake Actuation LHD AWD/RHD AWD - Component Location
NOTE: RHD (right-hand drive) installation shown, LHD (left-hand drive)
installation similar.
COMPONENT LOCATION
Brake pedal
Hydrauli
Power Brake Actuation
Brake Booster - Component Location
COMPONENT LOCATION - 2.2L Td4
NOTE: RHD (right-hand drive) installation shown, LHD (left-hand drive)
installation similar
Brake booster
Vacuum pipe (vehicles wi
SEE MORE:
Search area
The navigation map database is divided into
countries, or geographically defined areas
within countries, called search areas. When
setting a route, the destination (or waypoint)
entered must be in the currently selected
search area.
Before attempting to set a destination or
waypoint, set the
Setting a destination
After touching Agree, the initial map screen is
displayed, now select Nav Menu.
From the Navigation Menu, select Destination
entry.
Select Address from the Destination screen
and input the town name.
Once sufficient letters have been entered,
touch List to display all the possible towns.
If
