Range Rover Evoque: Rear View Mirrors
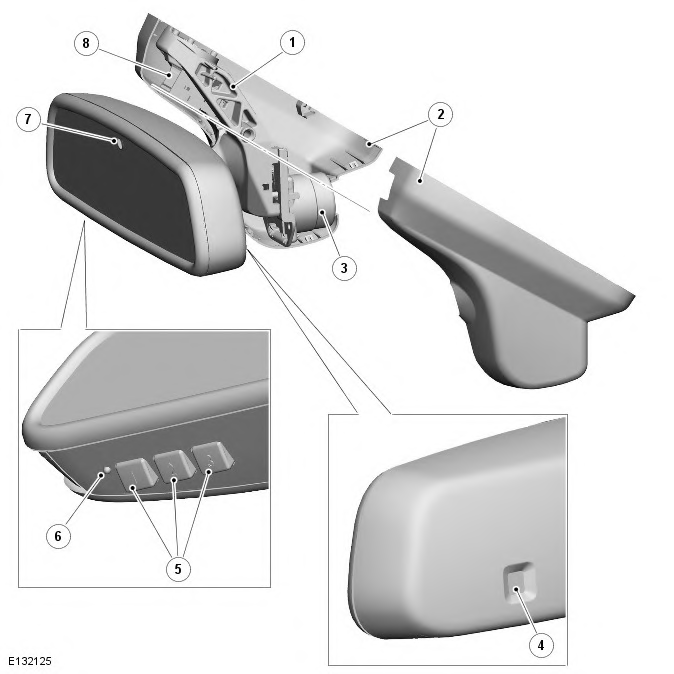
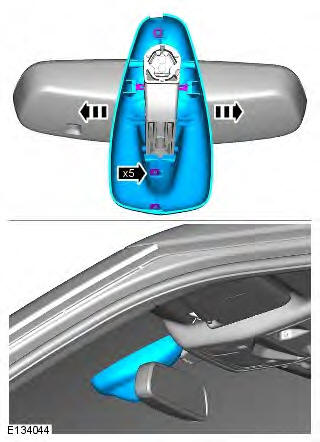
Rear View Mirrors - Component Location
NOTE: RHD (right-hand drive) installation shown, LHD (left-hand drive) installation similar.
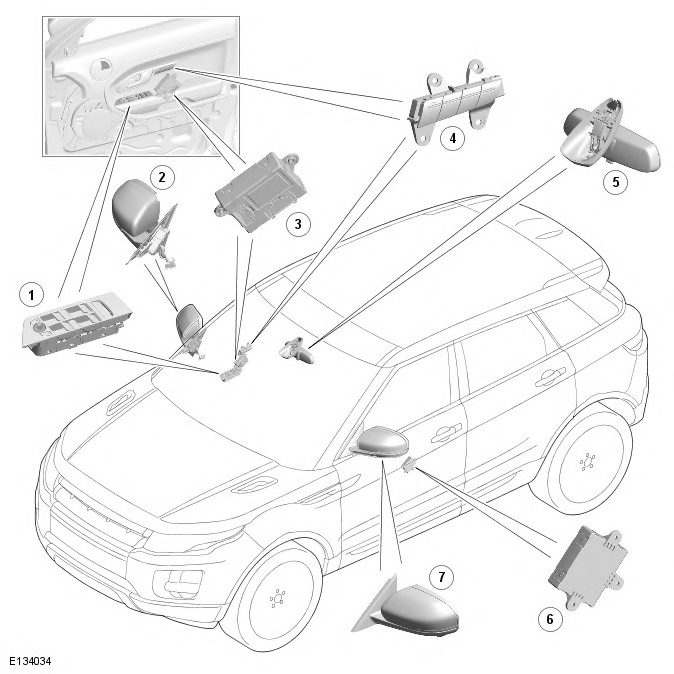
- DDM (driver door module)
- Driver exterior mirror
- Exterior mirror switches
- Memory switches
- Interior mirror (automatic dimming version shown)
- PDM (passenger door module)
- Passenger exterior mirror
Rear View Mirrors - Overview
Rear view mirrors consist of an interior mirror on the windshield and an exterior mirror on each front door cheater.
The interior mirror incorporates either manual dimming or automatic dimming. Depending on vehicle model and market, the automatic dimming interior mirror may also incorporate:
- A HomeLink universal transmitter. NOTE: HomeLink is a registered trademark owned by Johnson Controls Inc.
- The automatic high beam function.
Refer to: Exterior Lighting (417-01 Exterior Lighting, Description and Operation).
The exterior mirrors on all models incorporate electrical heating, electrical adjustment, repeater lamps for the turn signal indicators and the ambient air temperature sensor (LH (left-hand) mirror only). Depending on vehicle model and market, the exterior mirrors may also incorporate:
- Memory recall.
- Reverse dipping.
- Mirror foldback.
- Approach lamps. Refer to: Interior Lighting (417-02 Interior Lighting, Description and Operation).
- Proximity cameras.
Refer to: Parking Aid (413-13 Parking Aid, Description and Operation).
- Blind spot monitoring.
Refer to: Warning Devices (413-09 Warning Devices, Description and Operation).
The door modules operate the exterior mirror functions under the control of the CJB (central junction box) and switches in the driver door switchpack.
Rear View Mirrors - System Operation and Component Description
Control Diagram
NOTE: A = Hardwired connection; D = High speed CAN (controller area network); N = Medium speed CAN; O = LIN (local interconnect network) bus.
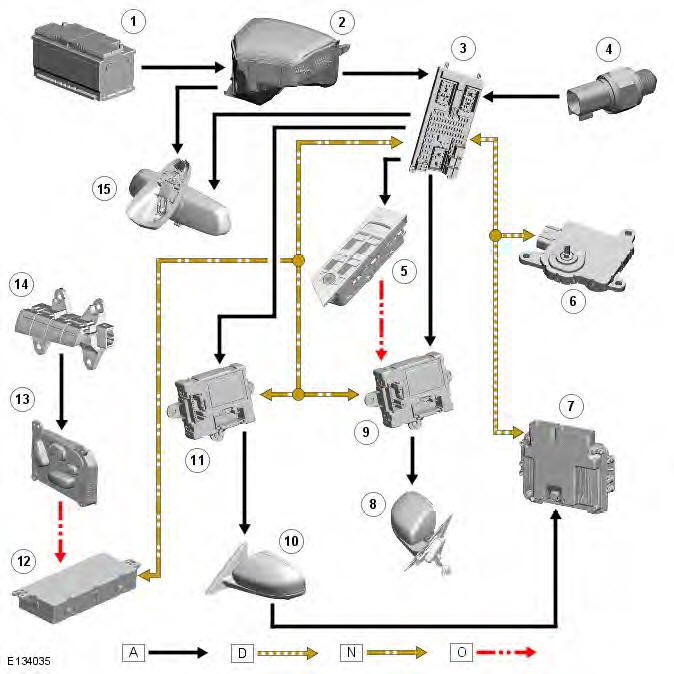
- Battery
- EJB (engine junction box)
- CJB (central junction box)
- Reverse gear switch (manual transmission vehicles)
- Driver door switchpack
- Transfer box module (manual transmission vehicles)
- ECM (engine control module)
- Driver door mirror
- DDM (driver door module)
- Passenger door mirror (containing ambient air temperature sensor)
- PDM (passenger door module)
- Driver seat module
- Driver seat switchpack
- Memory switches
- Interior mirror
System Operation
AUTOMATIC DIMMING INTERIOR MIRROR
Power for the feature(s) in the automatic dimming interior mirror is provided in power mode 6 (ignition).
Automatic Dimming
The light sensor in the front of the mirror monitors ambient light at the front of the vehicle and the light sensor in the rear of the mirror monitors the light coming from behind the vehicle. When the light from behind the vehicle exceeds the ambient light level, the automatic dimming circuits darken the interior mirror.
Automatic dimming is inhibited when reverse gear is selected, to provide the driver with maximum vision. The reverse gear signal is provided by a battery voltage signal from the reverse relay in the CJB.
Universal Transmitter
WARNING: The universal transmitter must not be used with any garage door that lacks a safety stop and reverse feature, as required by federal safety standards (this includes any garage or door opener model manufactured before April 1 1982). A garage door opener which cannot detect an object in the path of a closing door, and then automatically stop and reverse the door, does not meet current federal safety standards. Using a garage door opener without these features increases the risk of serious injury or death.
The universal transmitter has three channels, with separate operating buttons for each channel. When one of the buttons is pressed the universal transmitter outputs the radio signal programmed for the related channel (if any) and illuminates the status indicator to confirm transmission.
Hand held transmitters are programmed into the universal transmitter as follows:
- Turn the ignition on.
- WARNING: When programming the universal transmitter in the vicinity
of the affected system, the system will
operate. If the system controls garage doors or gates, ensure they are clear
of people and objects to prevent
personal injury or damage to equipment.
Press and hold the outer two buttons of the universal transmitter until the status indicator begins to flash, then release the buttons. This initializes the universal transmitter and erases previous settings from all three channels. - Place the signal emitting end of the hand held transmitter against the underside of the interior mirror.
- Simultaneously press and hold the activation button on the hand held transmitter and the chosen button of the universal transmitter. When the status indicator flashes rapidly, indicating the channel has been programmed, release the buttons (the status indicator flashes slowly at first and can take up to a minute before it flashes rapidly).
- To program another channel on the universal transmitter, repeat steps C. and D.
- Turn the ignition off.
The radio signals used to operate some home/office systems incorporate a code protection feature. After a channel has been programmed from the hand held transmitter, these systems will need to be trained to accept the signal from the universal transmitter. To check if a system is code protected, press the appropriate universal transmitter button. If the status indicator flashes rapidly for 1 to 2 seconds, before illuminating permanently, the system has a code protection feature.
The system is trained to the universal transmitter, as follows:
- Locate the training button on the receiver system (refer to the system's literature for details).
- Press the training button for 1 to 2 seconds, then perform step C. within 30 seconds.
- On the vehicle, press and release the appropriate universal transmitter button, twice. The receiver system should now be trained to the universal transmitter.
- If the system does not operate, repeat the procedure, but in step C. press and release the universal transmitter button three times.
Additional information on the universal transmitter can be found on: www.homelink.com
EXTERIOR MIRRORS
Heating
There are 2 modes of heated exterior mirror operation; manual and automatic.
Manual operation is activated by pressing the heated rear window switch . When the switch is pressed, the status LED (light emitting diode) in the switch illuminates and the exterior mirror heater element is energized. Manual operation is discontinued when the heated rear window switch is pressed a second time, between 5 and 21 minutes have elapsed (dependent on ambient air temperature), or the engine stops.
Automatic operation is initiated when low ambient air temperatures are experienced. The CJB receives the ambient air temperature value from the ECM on the high speed CAN bus. The CJB converts the ambient air temperature value to an on-time percentage and transmits it on the medium speed CAN bus to the two door modules, which then energize the exterior mirror heating elements accordingly. The on-time percentage is increased while the windshield wipers are on.

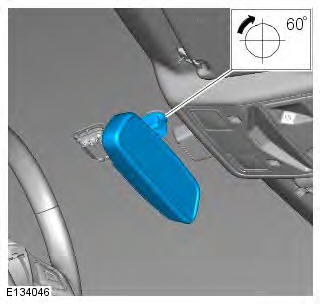
Adjustment
Adjustment is enabled while the ignition is on and, provided the driver door is not opened, for up to five minutes after the ignition is switched off.
When the L or R select switch is pressed, the tell-tale LED (light emitting diode) in the switch illuminates and the adjustment switch can be used to move the mirror glass of the related exterior mirror. The driver door switchpack interprets adjustment switch movement and transmits it to the DDM on a LIN bus. Adjustment signals for the passenger door exterior mirror are transmitted from the DDM to the PDM on the medium speed CAN bus. On receipt of an adjustment signal, the appropriate door module connects a power supply and ground to the relevant adjustment motor to produce the required movement of the mirror glass. When the adjustment switch is tilted in the opposite direction, the door module reverses the polarity of the adjustment motor, to move the mirror glass in the opposite direction.
Memory Recall
The vehicle can memorize up to three different positions for the exterior mirrors, the driver seat and the steering column.
This enables three different drivers to achieve their optimum driving position at the touch of a button. The memory store and memory pre-set switches are located on the driver door casing.
The memory function is incorporated into the CJB.
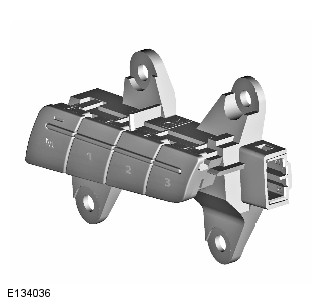
The memory switches form a resistive ladder in hardwired connections with the driver seat switchpack. When a position is stored or recalled for channels 1 to 3, the driver seat switchpack transmits the information on a LIN bus to the seat memory module, which relays it to the CJB on the medium speed CAN bus. It is then relayed to the door modules. Each door module evaluates the recall or storage command and performs the necessary adjustments to the exterior mirrors. If a manual mirror adjustment is selected while a memory recall is operating, it will over-ride the memory recall movement.
For mirror memory to operate, the mirror adjustment potentiometers must deliver a voltage value in the range of 80 mV - 4.8 V. Should a voltage applied be outside of this range the mirror will not operate when memory is selected.
Reverse Dipping
Reverse dipping can be enabled and disabled in the vehicle set-up section of the vehicle information and settings menu. If reverse dipping is enabled, both of the exterior mirrors automatically dip, to provide a better view of the kerb, when the ignition is on and reverse gear is engaged. The mirrors return to their original position immediately reverse gear is disengaged, or if the vehicle speed in reverse exceeds 12 km/h (7.5 mph).
The dipped positions of the exterior mirrors are stored in the CJB, which signals the front door modules on the medium speed CAN to move the mirror glass into and out of the dipped positions. Reverse gear engagement and disengagement is signaled to the CJB on the high speed CAN bus by the TCM (transmission control module) (automatic transmission) or the transfer box control module (manual transmission).
The dipped mirror position can be adjusted using the mirror switches while reverse gear is selected and the ignition is on.
On vehicles with an automatic transmission, reverse gear must be selected for approximately 0.5 second before the exterior mirrors move to the dipped position. The time delay prevents nuisance movement of the exterior mirrors when the transmission selection moves between Park and Drive.
Mirror Foldback
If mirror foldback is incorporated, pressing the L and R mirror select switches at the same time folds the exterior mirrors.
Pressing both of the switches again unfolds the mirrors. Operation of mirror foldback is inhibited at speeds over 110 km/h (70 mph). If the mirrors are accidentally knocked out of synchronization (i.e. with one mirror folded and the other in the normal position), pressing both of the switches again re-synchronizes them.
On vehicles with mirror foldback, automatic operation can be enabled and disabled using Land Rover approved diagnostic equipment. When automatic operation is enabled, the exterior mirrors automatically fold and unfold when the vehicle is locked and unlocked using the smart key. However, if the mirrors are folded using the mirror switches, they will not automatically unfold when the vehicle is unlocked.
To prevent the foldback motors from overheating, the foldback function is disabled for 3 minutes if the mirror foldback function is selected ten times within 60 seconds. On the tenth selection within 60 seconds, the exterior mirrors will only unfold; if the selection is for the exterior mirrors to fold, the selection is ignored.
Component Description
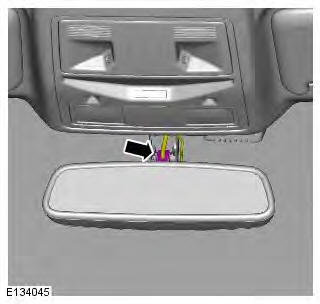
INTERIOR MIRROR
Interior mirrors consist of mirror glass in a housing that is connected to a mounting stem by a ball joint. The mounting stem is attached to a pad bonded onto the windscreen and concealed by two covers.
Manual Dimming Interior Mirror
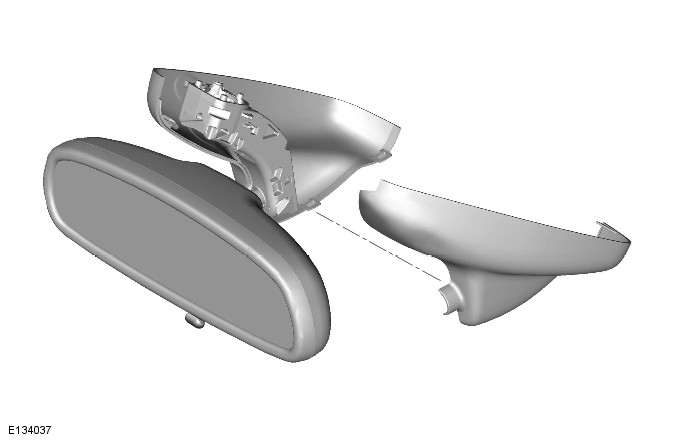
Manual dimming is performed with a lever on the underside of the mirror body.
Automatic Dimming Interior Mirror
- Mounting stem
- Covers
- Auto high beam control module and sensor (where fitted)
- Front light sensor
- Universal transmitter channel buttons
- Universal transmitter status indicator
- Rear light sensor
- Electrical connector
Automatic dimming is performed by electrochromic mirror glass that automatically dims to reduce glare from the headlights of following vehicles in dark or low light conditions.
Light sensors on the front and rear of the interior mirror provide light level inputs for the automatic dimming function.
Automatic dimming interior mirrors are connected to the vehicle wiring by an electrical connector concealed by covers installed over the mounting stem. On vehicles with the automatic high beam function, the covers also contain the auto high beam control module.
Interior mirrors which incorporate a HomeLink universal transmitter have operating buttons on the lower face. They also have a red LED status indicator, next to the buttons, which illuminates when the universal transmitter is transmitting.
The universal transmitter can operate up to three home or office remotely operated systems (e.g. garage door/gate openers, lighting and security systems), replacing the individual hand held transmitters required for each system. Universal transmitter operating frequencies vary across markets.
Power for the feature(s) in the automatic dimming interior mirror is provided by an ignition feed from the EJB.
EXTERIOR MIRRORS
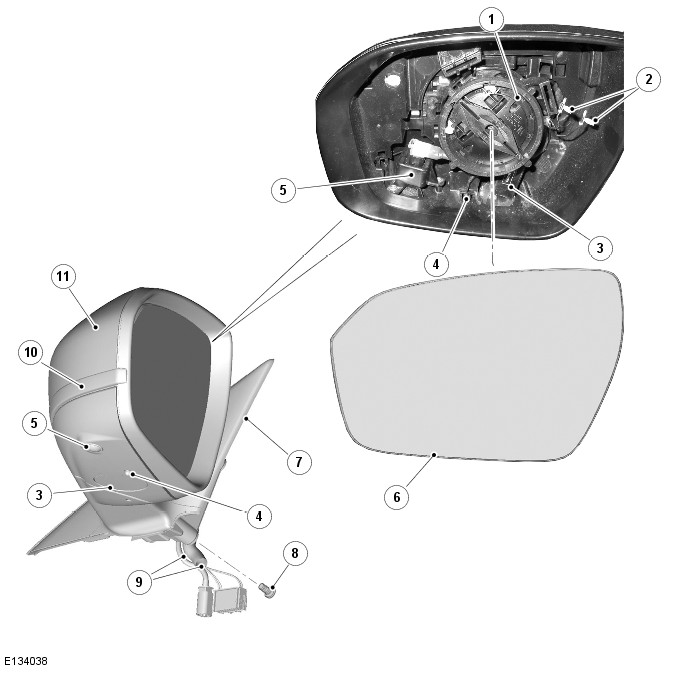
- Actuator
- Heating element connectors
- Approach lamp (where fitted)
- Ambient air temperature sensor
- Proximity camera (where fitted)
- Mirror glass
- Body assembly
- Screw (3 off)
- Fly leads
- Turn signal indicators repeater lamp
- Cover
The exterior mirrors are attached to the front door structure and connected to the door harness.
The door mirrors fold forwards or rearwards on impact. On vehicles without the mirror foldback option, the mirrors can be folded into a park position by pushing the mirror housing towards the side window.
Exterior mirror heating is provided by heater elements bonded to the back of the mirror glass. The power supply to the heater elements is controlled by the respective door modules, in response to signals from the CJB.
The exterior mirrors each incorporate an actuator which contains two adjustment motors for the mirror glass. One for horizontal (left/right) adjustment and one for vertical (up/down) adjustment. Power to the motors is controlled by the respective door modules in response to signals from the driver door switchpack. On vehicles with memory recall, the exterior mirrors incorporate horizontal and vertical plane position sensors.
Exterior mirrors with the foldback feature incorporate a foldback motor in the hinge. Operation of the foldback motor is controlled by the respective door modules in response to signals from the driver door switchpack.
EXTERIOR MIRROR SWITCHES
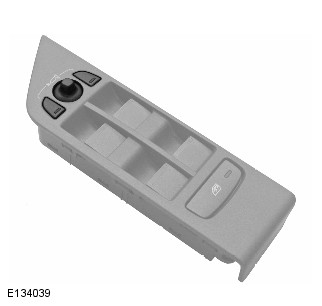
Left and right select switches and an adjustment switch for the exterior mirrors are incorporated into the driver door switchpack in the door casing. The switchpack is connected to the door harness and powered by a permanent battery feed from the CJB.
FRONT DOOR MODULES
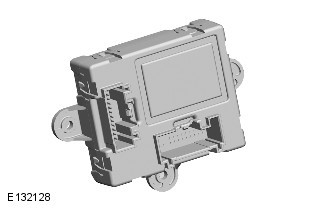
Each front door module is attached to the closing panel in the related door and connected to the door harness.
The two front door modules interpret the signals from the CJB and the driver door switchpack into appropriate outputs for the related exterior mirrors. For operation of the various exterior mirror functions each door module is powered by a permanent battery feed from the CJB. The live feed to the mirror foldback motors goes off 5 minutes after the ignition is switched off.
Rear View Mirrors
Torque Specifications

Interior Rear View Mirror
Removal
NOTE: Removal steps in this procedure may contain installation details.
1.
2.
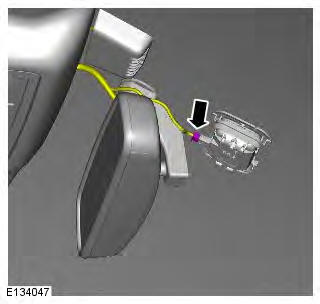
3.
4. NOTE: To install the rear view mirror, place in the 4 or 8 o'clock position and rotate to the 6 o'clock position to lock.
Installation
1. To install, reverse the removal procedure.
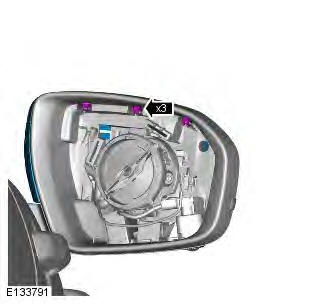
Exterior Mirror Glass
Removal
NOTE: Removal steps in this procedure may contain installation details.
1. CAUTION: Take extra care not to damage the clips.
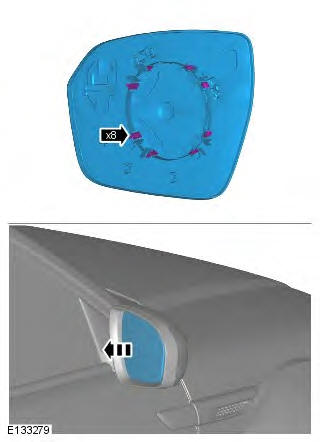
2. NOTE: If equipped.
Installation
1. To install, reverse the removal procedure.
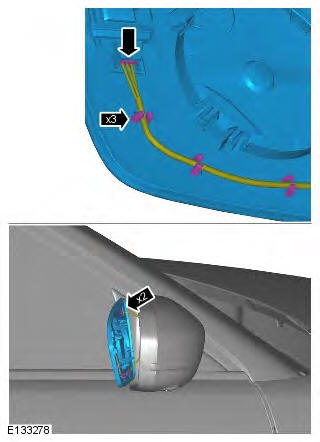
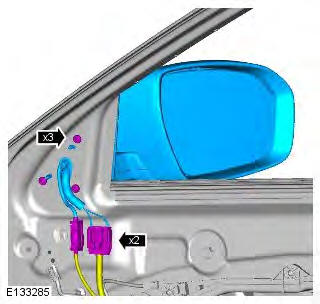
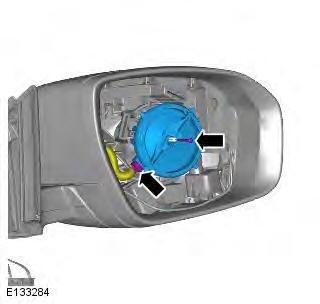
Exterior Mirror
Removal
NOTES:
Removal steps in this procedure may contain installation details.
RH illustration shown, LH is similar.
The ignition must be switched off.
1. Refer to: Front Door Trim Panel (501-05 Interior Trim and Ornamentation, Removal and Installation).
2. CAUTION: Take extra care not to damage the wiring harnesses.
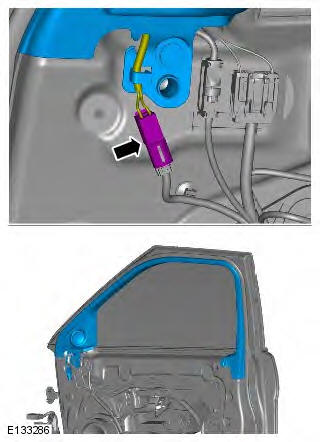
3. CAUTION: Take extra care not to damage the wiring harnesses.
Torque: 9 Nm
Installation
1. To install, reverse the removal procedure.
Exterior Mirror Motor
Removal
NOTES:
Removal steps in this procedure may contain installation details.
RH illustration shown, LH is similar.
The ignition must be switched off.
1. Refer to: Exterior Mirror Glass (501-09 Rear View Mirrors, Removal and Installation).
2. CAUTION: Make sure the locating tangs are aligned. Failure to follow this instruction may result in damage to the vehicle.
Torque: 1.2 Nm
Installation
1. To install, reverse the removal procedure.
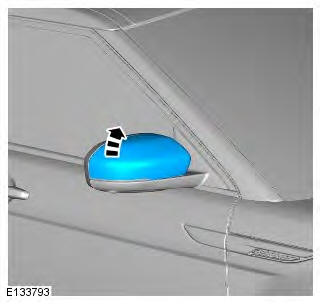
Exterior Mirror Cover
Removal
NOTE: Removal steps in this procedure may contain installation details.
1. Refer to: Exterior Mirror Glass (501-09 Rear View Mirrors, Removal and Installation).
2. CAUTION: Take extra care not to damage the clips.
3. CAUTIONS:
Protect the surrounding trim to avoid damage.
Protect the surrounding paintwork to avoid damage.
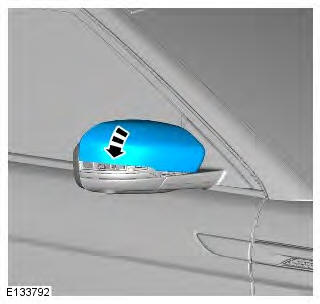
Installation
1. CAUTIONS:
Take extra care not to damage the clips.
Protect the surrounding trim to avoid damage.
Protect the surrounding paintwork to avoid damage.
To install, reverse the removal procedure.
Rear View Mirrors
Principle of Operation
For information on the description and operation of the mirrors, refer to the relevant section of the workshop manual.
REFER to: (501-09 Rear View Mirrors)
Inspection and Verification
CAUTION: Diagnosis by substitution from a donor vehicle is NOT acceptable. Substitution of control modules does not guarantee confirmation of a fault and may also cause additional faults in the vehicle being checked and/or the donor vehicle.
NOTE: Check and rectify basic faults before beginning diagnostic routines involving pinpoint tests.
1. Verify the customer concern.
2. Visually inspect for obvious mechanical or electrical faults.
Visual inspection
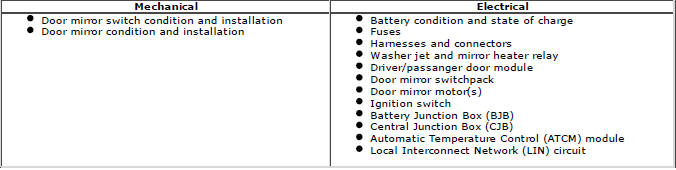
3. If an obvious cause for an observed or reported concern is found, correct the cause (if possible) before proceeding to the next step.
4. Use the approved diagnostic system or a scan tool to retrieve any DTCs before moving onto the symptom chart or DTC index.
- Because the DTCs are stored in more than one module, a complete vehicle read is recommended.
- Make sure that all DTCs are cleared following rectification.
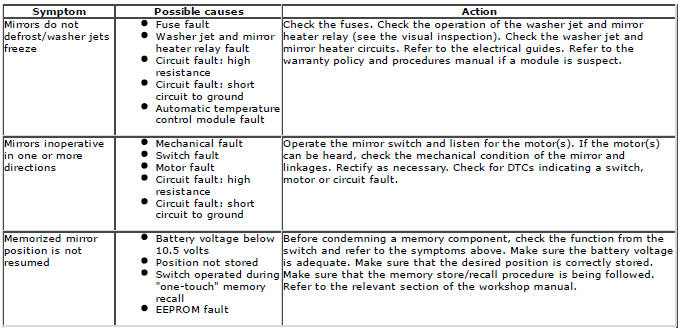
Symptom chart

DTC index
For a complete list of all Diagnostic Trouble Codes (DTCs) that could be logged on this vehicle, please refer to Section 100-00.
READ NEXT:
 Seats - Diagnosis and Testing
Principle of Operation
For a detailed description of the seating systems and operation, refer to the
relevant Description and Operation section of
the workshop manual. REFER to: Seats (501-10 Seating
Seats - System Operation and Component Description
Control Diagram
NOTE: A = Hardwired; N = Medium speed CAN (controller area network) bus; O
= LIN (local interconnect network)
bus
CONTROL DIAGRAM - FRONT POWER OPERATED NON-MEMORY SEATS
Driver sea
SEE MORE:
Important information
The information contained in this handbook covers all vehicle derivatives and
optional equipment,
some of which may not be fitted to your vehicle. Due to printing cycles, this
handbook may include
descriptions of options before they become generally available.
The vehicle options, hardware an
Symbols used in this handbook
Safety warnings indicate either a procedure which must be followed
precisely, or
information that should be considered with great care, in order to avoid the
possibility
of personal injury.
Cautions indicate either a procedure which must be followed precisely, or
information that
should
