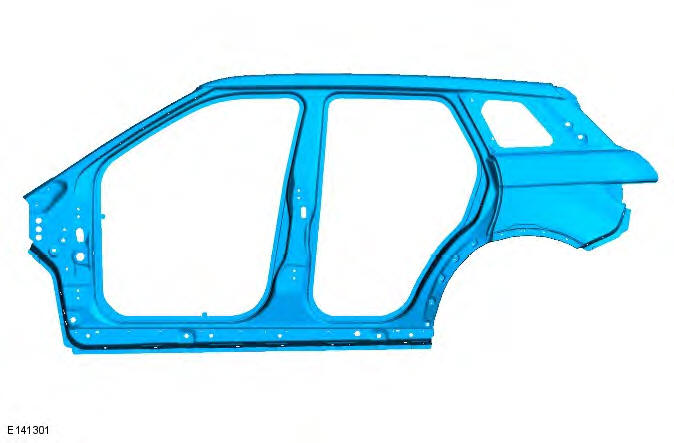
Range Rover Evoque: Side Panel
Removal
NOTES:
The side panel is manufactured from mild steel. The fender mounting bracket is serviced on the new panel.
This procedure identifies the method for the replacement of the side panel in full. There are possible alternative sections of the side panel that can be performed dependant on the extent of damage and/or the replacement of associated panels, refer to the joints in the A-pillar, B-pillar, rocker panel and quarter panel precedures.
1.
2. For additional information relating to this repair procedure please see the following: For additional information, refer to: Health and Safety Precautions (100-00 General Information, Description and Operation) / Body Repairs (501-25A Body Repairs - General Information, Description and Operation) / Corrosion Protection (501-25B Body Repairs - Corrosion Protection, Description and Operation) / Body and Frame (501-26 Body Repairs - Vehicle Specific Information and Tolerance Checks, Description and Operation) / Standard Workshop Practices (100-00 General Information, Description and Operation).
3. NOTE: There is no need for any butt joints when replacing a full side panel. Use the A-pillar outer panel, B-pillar outer panel, rocker panel and quarter panel links for the side panel replacement in combination with the procedure described in this section.
4. Remove the moonroof.
For additional information, refer to: Glass Roof Panel (501-11 Glass, Frames and Mechanisms, Removal and Installation).
5. Remove the roof panel.
For additional information, refer to: Roof Front Panel - Vehicles With: Sliding Roof Opening Panel (501-28A Roof Sheet Metal Repairs - 3-Door, Removal and Installation) / Roof Panel - Vehicles Without: Sliding Roof Opening Panel (501-28A Roof Sheet Metal Repairs - 3-Door, Removal and Installation).
6. Remove the A-pillar outer panel.
For additional information, refer to: A-Pillar Outer Panel (501-29B Side Panel Sheet Metal Repairs - 5-Door, Removal and Installation).
7. Remove the B-pillar outer panel.
For additional information, refer to: B-Pillar Outer Panel (501-29B Side Panel Sheet Metal Repairs - 5-Door, Removal and Installation).
8. Remove the rocker panel.
For additional information, refer to: Rocker Panel (501-29B Side Panel Sheet Metal Repairs - 5-Door, Removal and Installation).
9. Remove the quarter panel.
For additional information, refer to: Quarter Panel (501-30B Rear End Sheet Metal Repairs - 5-Door, Removal and Installation).
10. Remove the liftgate aperture weatherseal.
11. Remove the forced air extraction grille.
12. Release and lay aside the wiring harness along the inner quarter panel and back panel.
13. Release and lay aside the wiring harness on the A-pillar upper.
14. Release and lay aside the insulating material at the inner quarter panel.
15. RH side: Drain the fuel tank.
For additional information, refer to: Fuel Tank Draining (310-00 Fuel System - General Information, General Procedures).
16. RH side: Remove the fuel tank filler pipe.
For additional information, refer to: Fuel Tank Filler Pipe (310-01A Fuel Tank and Lines - TD4 2.2L Diesel, Removal and Installation).
17. This procedure details the missing joints between the a-pillar outer panel, b-pillar outer panel, rocker panel and quarter panel to make up the side panel replacement method.
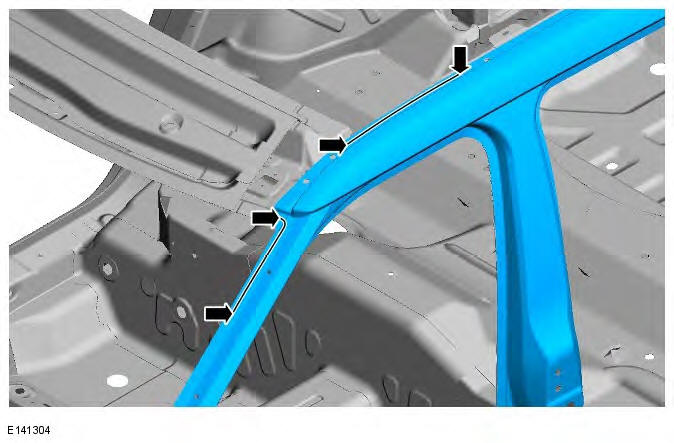
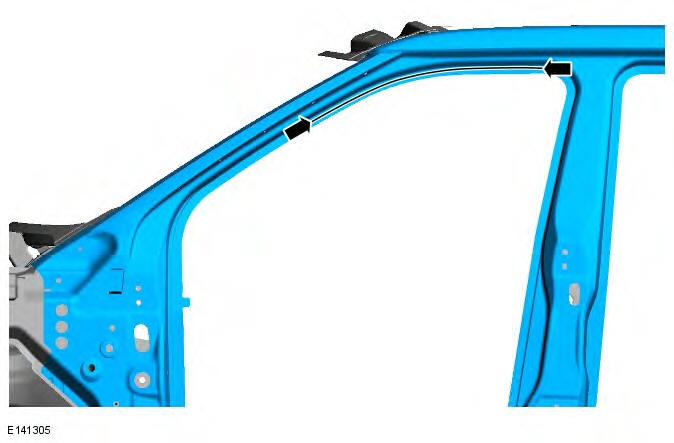
18. NOTE: The roof panels are already removed. Drill out the spot welds.
19. Drill out the spot welds.
20. Separate the joints and remove the old panel.
Installation
1. This procedure details the missing joints between the a-pillar outer panel, b-pillar outer panel, rocker panel and quarter panel to make up the side panel replacement method. The a-pillar outer panel, b-pillar outer panel, rocker panel and quarter panel methods cater for the rest of the installation procedure.
2. Prepare the old and new panel joint surfaces.
3. Offer up the new panel and clamp into position. Check alignment, if correct, proceed to next step, if not, rectify and recheck before proceeding.
4. NOTE: Make sure that spot welds are installed at least 5mm away from existing spot welds on underlying panels.
Spot weld.
5. NOTE: Make sure that spot welds are installed at least 5mm away from existing spot welds on underlying panels. Spot weld.
6. Refer to the A-pillar outer panel, B-pillar outer panel and quarter panel procedures to complete this installation.
7. Dress all welded joints.
8. NOTE: After this repair wax injection of the rocker panel repaired areas must be carried out. Seal panel flange edges in the MIG braze slot areas of the door apertures to prevent water ingress.
9. Apply a zinc rich primer to any bare metal surfaces at this stage.
10. The installation of associated panels and mechanical components is the reverse of removal.
READ NEXT:
 A-Pillar Outer Panel
Removal
NOTES:
The A-pillar outer panel is manufactured from mild steel. The fender
mounting bracket is serviced on the new panel.
The upper and lower butt joint must be MIG brazed due to the locati
A-Pillar Reinforcement
Removal
NOTES:
The A- Pillar reinforcement is manufactured from DP600, it is serviced
with its upper and lower door hinge mounting
brackets.
The A-Pillar reinforcement is unpicked from the side pane
B-Pillar Reinforcement
Removal
NOTES:
The B-Pillar reinforcement is manufactured from boron steel.
The B-Pillar reinforcement is unpicked from the side panel reinforcement,
'ring-frame', it is not serviced separately.
Th
SEE MORE:
Heating and ventilation controls
Controls
1. Temperature controls. For individual
driver/passenger settings.
2. Maximum defrost program.
3. Air distribution.
Note: More than one setting may be
selected at a time to achieve the desired
distribution.
4. AUTO mode. For fully automatic operation.
5. Heated windscreen.
6. He
Recirculation with pollution and humidity sensing
- Press the AUTO button briefly to activate
timed recirculation. The AUTO LED will
illuminate. The system automatically
selects fresh and recirculated air
dependent on pollution and cabin
humidity.
- Press and hold the AUTO button to activate
latched recirculation. The AUTO LED will
flash an
