Range Rover Evoque: Active On-Demand Coupling Module
Removal
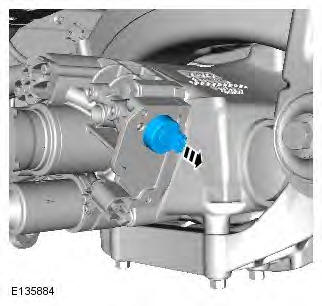
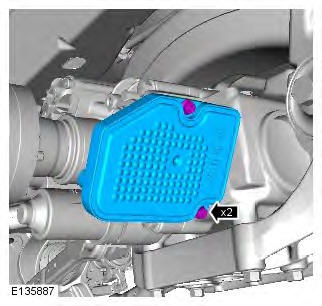
NOTE: If a new Active on-demand coupling module is installed, the throttle valve must also be installed.
1. WARNING: Make sure to support the vehicle with axle stands. Raise and support the vehicle.
2.

3. CAUTIONS:
Make sure that the area around the component is clean and free of foreign material.
Be prepared to collect escaping fluids.
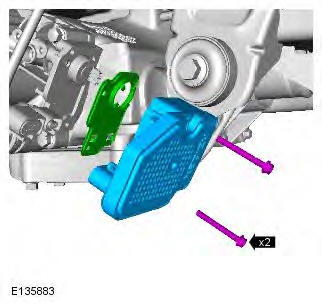
4.
Installation
1.
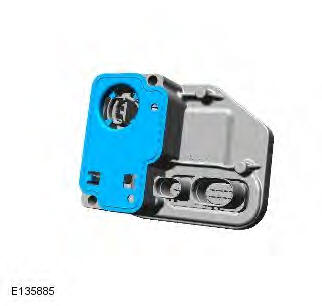
2. CAUTION: The throttle valve must be installed to the active on-demand coupling module before the assembly is installed to the active on-demand coupling.
Failure to follow this instruction may result in damage to the vehicle.
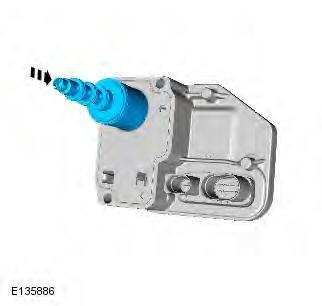
3. NOTE: Lubricate the O-ring seal. Torque: 6 Nm
4.
Active On-Demand Coupling Oil Pump
Removal
NOTE: Removal steps in this procedure may contain installation details.
1. WARNING: Make sure to support the vehicle with axle stands. Raise the vehicle on the lift.
2. Refer to: Drive Pinion Flange - Vehicles With: M66 6-Speed Manual Transmission AWD (205-02 Rear Drive Axle/Differential, Removal and Installation).
3.
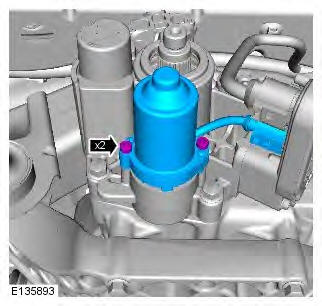
4. CAUTIONS:
Be prepared to collect escaping oil.
Make sure that the area around the component is clean and free of foreign material.
Lubricate the O-ring seals.
Only use the specified material to lubricate the seals.
NOTES:
Remove and discard the O-ring seals.
Install new O-ring seals.
Torque: 6 Nm
Installation
1. To install, reverse the removal procedure.
2. Check and top-up the active on-demand coupling fluid level.
Refer to: Active On-Demand Coupling Filling (205-02 Rear Drive Axle/Differential, General Procedures).
Active On-Demand Coupling Drive Pinion Seal
Special Tool(s)
 100-012
Slide Hammer
 205-862-1
Installer, Active On-demand Pinion Seal
 308-529
Remover, Seals
Removal
1. WARNING: Make sure to support the vehicle with axle stands. Raise the vehicle on the lift
2. Remove the differential drive flange.
Refer to: Drive Pinion Flange - Vehicles With: AWF21 6-Speed Automatic Transmission (205-02 Rear Drive Axle/Differential, Removal and Installation).
Refer to: Drive Pinion Flange - Vehicles With: M66 6-Speed Manual Transmission AWD (205-02 Rear Drive Axle/Differential, Removal and Installation).
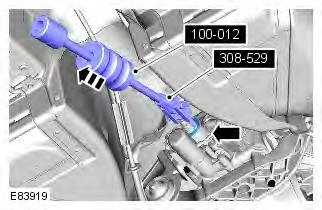
3. Carefully remove and discard the pinion oil seal.
Special Tool(s): 308-529, 100-012
Installation
1. CAUTION: Only use the specified material to lubricate the seals. Lubricate the oil seal.
Refer to: Specifications (205-02 Rear Drive Axle/Differential, Specifications).
2.
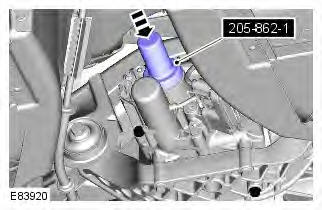
- Using the special tool, install a new oil seal.
Special Tool(s): 205-862-1
- Tap in the seal until the head of the drift is against the active on-demand coupling housing.
3. Install the differential drive flange.
Refer to: Drive Pinion Flange - Vehicles With: AWF21 6-Speed Automatic Transmission (205-02 Rear Drive Axle/Differential, Removal and Installation).
Refer to: Drive Pinion Flange - Vehicles With: M66 6-Speed Manual Transmission AWD (205-02 Rear Drive Axle/Differential, Removal and Installation).
READ NEXT:
 Differential Case Vehicles With: AWF21
6-Speed Automatic Transmission
Differential Case Vehicles With: AWF21
6-Speed Automatic Transmission
Removal
NOTE: Removal steps in this procedure may contain installation details.
All vehicles
1. WARNING: Make sure to support the vehicle with axle stands.
Raise and support the vehicle.
2. Remove th
Differential Support Insulator
Removal
1. WARNING: Make sure to support the vehicle with axle stands.
Raise and support the vehicle.
2. Support the rear differential using a transmission jack.
3. CAUTION: Mark the components to aid
Differential Rear Bushing
Special Tool(s)
205-860-09
Installer, Differential Bushing
205-861-01
Remover, Differential Bushing
205-861-02
Remover/Installer, Differential Bushing
205-861-03
Installer, Differential Bushing
205-86
SEE MORE:
Diesel engined vehicles
Do not use RME (bio-diesel)
except in
the case of those proprietary diesel
fuels which contain a mix of up to 7%.
Land Rover vehicles can accept no
responsibility for damage caused by
using RME in concentrations greater
than 7%.
Use only high quality diesel fuel according to
EN590 or equi
Sulphur content
If your vehicle is fitted
with a Diesel
Particulate Filter (DPF) the maximum
Sulphur content must not exceed
0.005%. Using an incorrect fuel will
cause serious damage to the DPF.
The Sulphur content of diesel used in Land
Rover vehicles should not exceed 0.3% (3000
parts per million).
In
