Range Rover Evoque: Differential Case Vehicles With: AWF21 6-Speed Automatic Transmission
Removal
NOTE: Removal steps in this procedure may contain installation details.
All vehicles
1. WARNING: Make sure to support the vehicle with axle stands.
Raise and support the vehicle.
2. Remove the LH rear wheel and tire.
Refer to: Wheel and Tire (204-04 Wheels and Tires, Removal and Installation).
3. Refer to: Rear Halfshaft LH (205-05 Rear Drive Halfshafts, Removal and Installation).
Vehicles with petrol engine
4. Refer to: Exhaust System (309-00A Exhaust System - GTDi 2.0L Petrol, Removal and Installation).
Vehicles with diesel engine
5. Refer to: Exhaust System (309-00B Exhaust System - TD4 2.2L Diesel, Removal and Installation).
All vehicles
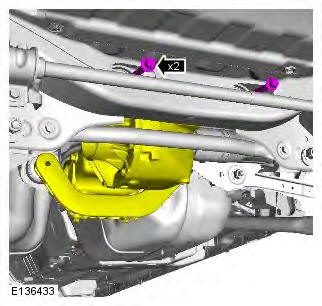
6. CAUTIONS:
Mark the position of the driveshaft flange in relation to the drive pinion flange.
To avoid damage to the joint or gaiter, do not allow the driveshaft to hang.

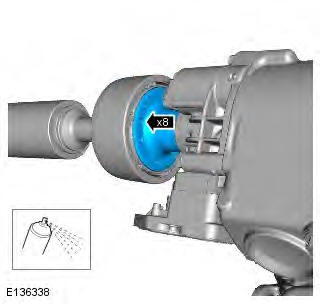
7. NOTE: Use penetrating oil - spray through the driveshaft bolt holes as shown.
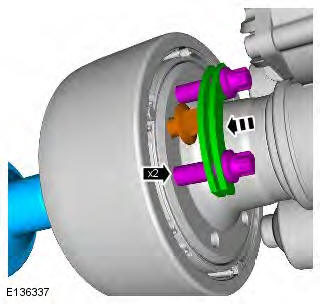
8. NOTE: Driveshaft joint shown removed for clarity.

9. NOTES:
Two washers must be installed to the assist in the removal of the driveshaft.
Alternate tighten the bolts until the movement of the driveshaft joint is detected.

10. CAUTION: Make sure that the driveshaft is supported with suitable retaining straps.
- Remove the bolts, turn the driveshaft and repeat the above step at the other unthreaded hole.
- Repeat above steps until the driveshaft joint is fully released.
11.

12.
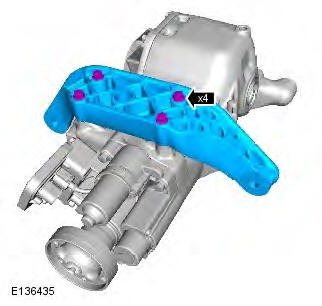
13. Using a transmission jack, support the differential case.
14.

15.

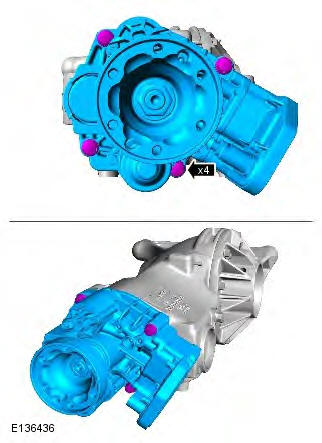
16.
- Carefully release the RH inboard halfshaft joint from the differential and tie aside.
- Carefully lower and remove the differential case.
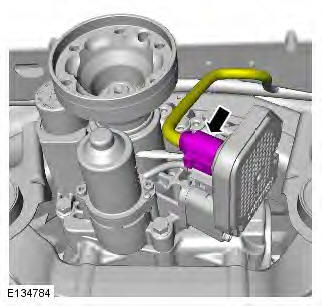
17. NOTE: Do not disassemble further if the component is removed for access only.
18. NOTE: Remove and discard the O-ring seal.
Installation
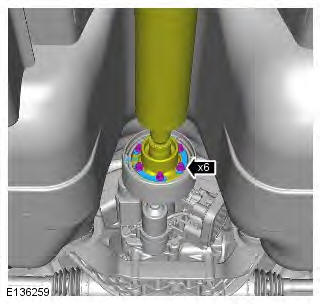
1. CAUTIONS:
Make sure that the area around the component is clean and free of foreign material.
A new O-ring seal is to be installed.
Make sure that new bolts are installed.
Torque: 24 Nm

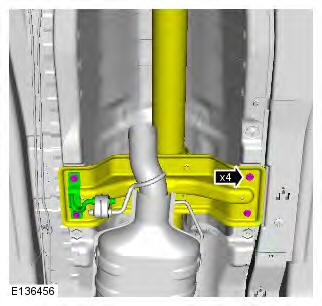
2. Torque: 35 Nm

3. Using a transmission jack, carefully raise the assembly.

4. Torque: 110 Nm
5. Torque: 175 Nm

6.
7.

8. CAUTION: The component must be aligned with the installation markings. Torque: 40 Nm
9. Torque: 25 Nm
Vehicles with diesel engine
10. Refer to: Exhaust System (309-00B Exhaust System - TD4 2.2L Diesel, Removal and Installation).
Vehicles with petrol engine
11. Refer to: Exhaust System (309-00A Exhaust System - GTDi 2.0L Petrol, Removal and Installation).
All vehicles
12. Refer to: Rear Halfshaft LH (205-05 Rear Drive Halfshafts, Removal and Installation).
13. Install the LH rear wheel and tire.
Refer to: Wheel and Tire (204-04 Wheels and Tires, Removal and Installation).
14. Check and top-up the active on-demand coupling fluid level.
Refer to: Active On-Demand Coupling Filling (205-02 Rear Drive Axle/Differential, General Procedures).
15. Fill the differential case with fluid.
Refer to: Differential Draining and Filling (205-02 Rear Drive Axle/Differential, General Procedures).
READ NEXT:
 Differential Support Insulator
Removal
1. WARNING: Make sure to support the vehicle with axle stands.
Raise and support the vehicle.
2. Support the rear differential using a transmission jack.
3. CAUTION: Mark the components to aid
Differential Rear Bushing
Special Tool(s)
205-860-09
Installer, Differential Bushing
205-861-01
Remover, Differential Bushing
205-861-02
Remover/Installer, Differential Bushing
205-861-03
Installer, Differential Bushing
205-86
Drive Pinion Flange Vehicles With: AWF21
6-Speed Automatic Transmission
Special Tool(s)
205-053
Retainer, Drive Flange
Removal
All vehicles
1. WARNING: Make sure to support the vehicle with axle stands.
Raise and support the vehicle.
Vehicles with diesel engine
2. Refer t
SEE MORE:
Important information
The information contained in this handbook covers all vehicle derivatives and
optional equipment,
some of which may not be fitted to your vehicle. Due to printing cycles, this
handbook may include
descriptions of options before they become generally available.
The vehicle options, hardware an
Symbols used in this handbook
Safety warnings indicate either a procedure which must be followed
precisely, or
information that should be considered with great care, in order to avoid the
possibility
of personal injury.
Cautions indicate either a procedure which must be followed precisely, or
information that
should
