Range Rover Evoque: Differential Draining and Filling
1. WARNING: Make sure to support the vehicle with axle stands.
CAUTION: Make sure the vehicle is on a flat level surface.
Raise and support the vehicle.
2. No provision is made to fully drain the rear differential.
During repair procedures, fluid will be lost. A container should be positioned to collect any spillage.
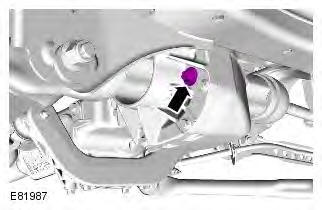
3. Make sure the vehicle is level. Remove the rear differential filler plug and discard the sealing washer.
4. Fill the rear differential, until a thin thread of fluid runs from the filler hole.
Refer to: Specifications (205-02 Rear Drive Axle/Differential, Specifications).
5. Using a new washer, install the drain plug.
Torque: 35 Nm
6. Lower the vehicle.
Active On-Demand Coupling Filling
NOTE: If installing a new active on-demand coupling, fill with 650 ml of fluid. It is not possible to completely drain the active on-demand coupling fluid during service. The procedure below MUST be followed for both filling and topping up.
1. CAUTION: Make sure the vehicle is on a flat level surface. Raise and support the vehicle.
2. No provision is made to fully drain the active on-demand coupling.
During repair procedures, fluid will be lost. A container should be positioned to collect any spillage.
3. CAUTION: This is a filler plug only and must not be used as a fluid level indicator. Make sure the vehicle is level. Remove the filler plug and discard the sealing washer.
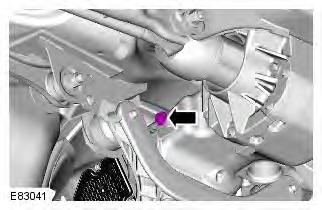
4. Fill the active on-demand coupling, until a thin thread of fluid runs from the filler hole.
Refer to: Specifications (205-02 Rear Drive Axle/Differential, Specifications).
5. Install the active on-demand fluid filler plug.
6. Turn the ignition on for 5 minutes.
7. Turn the ignition off and remove the remote handset.
8. Fill the active on-demand coupling, until a thin thread of fluid runs from the filler hole.
9. CAUTION: This is a filler plug only and must not be used as a fluid level indicator. Using a syringe, remove exactly 70 ml of fluid.
10. CAUTION: Replace the washer.
Install and tighten the filler plug.
Torque: 35 Nm
READ NEXT:
 Active On-Demand Coupling Vehicles With:
AWF21 6-Speed Automatic Transmission
Active On-Demand Coupling Vehicles With:
AWF21 6-Speed Automatic Transmission
Removal
1. WARNING: Make sure to support the vehicle with axle stands.
Raise and support the vehicle.
2. Refer to: Exhaust System (309-00B Exhaust System - TD4 2.2L
Diesel, Removal and Installation).
Active On-Demand Coupling Module
Removal
NOTE: If a new Active on-demand coupling module is installed, the throttle
valve must also be installed.
1. WARNING: Make sure to support the vehicle with axle stands.
Raise and support the v
Differential Case Vehicles With: AWF21
6-Speed Automatic Transmission
Removal
NOTE: Removal steps in this procedure may contain installation details.
All vehicles
1. WARNING: Make sure to support the vehicle with axle stands.
Raise and support the vehicle.
2. Remove th
SEE MORE:
Important information
The information contained in this handbook covers all vehicle derivatives and
optional equipment,
some of which may not be fitted to your vehicle. Due to printing cycles, this
handbook may include
descriptions of options before they become generally available.
The vehicle options, hardware an
Symbols used in this handbook
Safety warnings indicate either a procedure which must be followed
precisely, or
information that should be considered with great care, in order to avoid the
possibility
of personal injury.
Cautions indicate either a procedure which must be followed precisely, or
information that
should
