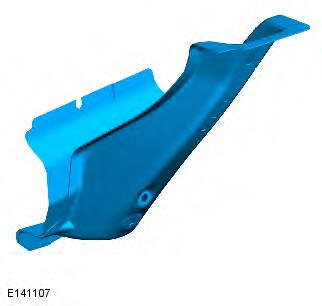
Range Rover Evoque: Fender Apron Panel Front Reinforcement
Removal
NOTES:
The fender apron panel front reinforcement is manufactured from RP220 and mild steel.
The panel is serviced less its weld studs
1. In this procedure, to make sure the vehicle is correctly aligned, it must be placed on an approved alignment jig.
2. The front side member and fender apron panel is replaced in conjunction with:
- Front bumper cover
- Front bumper
- Hood
- Hood latch panel
- Front fender
- Fender apron lower panel
- Front bumper mounting
- Front side member section
- Engine and suspension
3. For additional information relating to this repair procedure please see the following: For additional information, refer to: Health and Safety Precautions (100-00 General Information, Description and Operation) / Body Repairs (501-25A Body Repairs - General Information, Description and Operation) / Corrosion Protection (501-25B Body Repairs - Corrosion Protection, Description and Operation) / Body and Frame (501-26 Body Repairs - Vehicle Specific Information and Tolerance Checks, Description and Operation) / Standard Workshop Practices (100-00 General Information, Description and Operation).
4. Remove the fender apron lower panel.
For additional information, refer to: Fender Apron Lower Panel (501-27 Front End Sheet Metal Repairs, Removal and Installation).
5. Remove the front side member section.
For additional information, refer to: Front Side Member Section (501-27 Front End Sheet Metal Repairs, Removal and Installation).
6. Remove the front fender.
For additional information, refer to: Fender (501-02 Front End Body Panels, Removal and Installation).
7. Remove the engine and front suspension as an assembly.
8. RH Side: Remove the coolant expansion tank.
For additional information, refer to: Coolant Expansion Tank (303-03A Engine Cooling - TD4 2.2L Diesel, Removal and Installation).
9. RH Side: Evacuate the A/C system.
For additional information, refer to: Air Conditioning (A/C) System Recovery, Evacuation and Charging - GTDi 2.0L Petrol (412-00 Climate Control System - General Information, General Procedures) / Air Conditioning (A/C) System Recovery, Evacuation and Charging - TD4 2.2L Diesel (412-00 Climate Control System - General Information, General Procedures).
10. RH Side: Remove the fender apron A/C pipes.
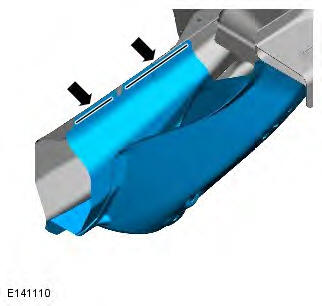
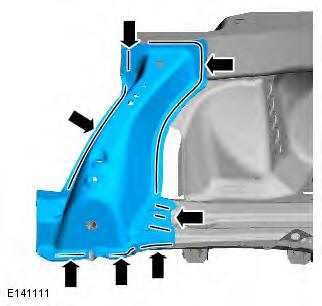
11. NOTE: Some of the spot welds will have been released when adjacent panels were removed. Drill out the spot welds as indicated.
12. NOTE: Some of the spot welds will have been released when adjacent panels were removed. Drill out the spot welds as indicated.
13. Separate the joints and remove the old panel.
Installation
1. NOTE: The drilled out spot welds must be replaced with MIG plug welds in the same quantities. Using the removed fender apron panel front reinforcement as a guide, drill holes in the new panel as required ready for MIG plug welding.
2. Prepare the old and new panel joint surfaces.
3. Offer up the new panel and clamp into position. Check alignment, if correct, proceed to next step. If not, rectify and recheck before proceeding.
4. MIG Plug weld.
5. MIG Plug weld.
6. Dress all welded joints.
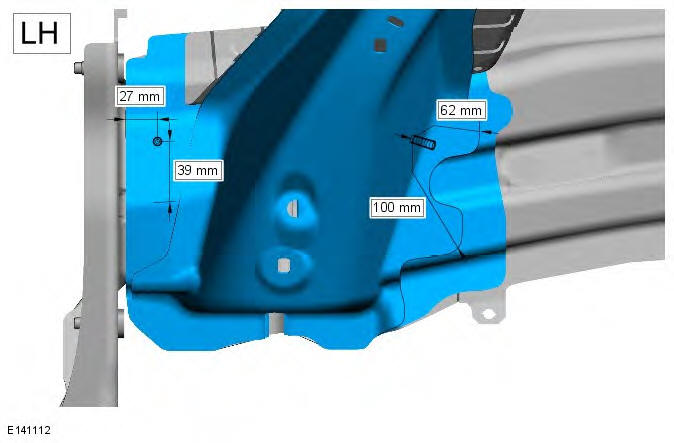
7. LH Only.
Prepare the new panel and install the weld studs in their original locations. The measurements provided in the graphic are to be used as a guide only, the components that are located/fixed to these weld studs must be offered up and cross checked for alignment prior to the installation of the weld studs to the new panel.
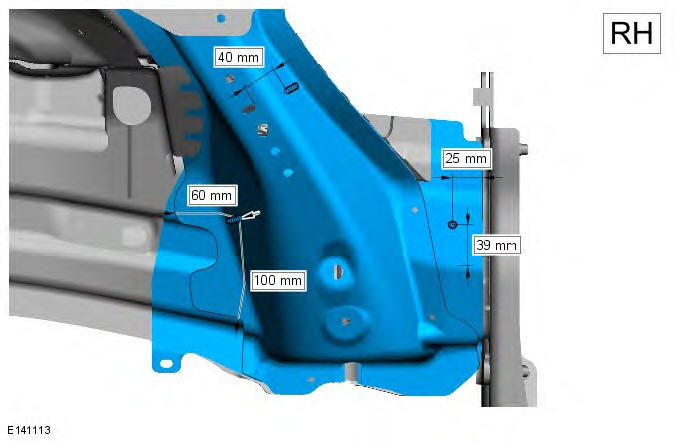
8. RH Only.
Prepare the new panel and install the weld studs in their original locations. The measurements provided in the graphic are to be used as a guide only, the components that are located/fixed to these weld studs must be offered up and cross checked for alignment prior to the installation of the weld studs to the new panel.
9. Apply a zinc rich primer to any bare metal surfaces at this stage.
10. NOTE: Make sure all underbody joints are sealed following this repair procedure
The installation of associated panels and mechanical components is the reverse of removal.
Front End Sheet Metal
Galvanic Corrosion
For additional information, refer to: Corrosion Protection (501-25B Body Repairs - Corrosion Protection, Description and Operation).
Front end service panels
- Hood latch panel
- Fender apron upper panel
- Fender apron panel front extension
- Fender apron panel reinforcement
- Suspension top mount
- Front side member and suspension top mount assembly
- Front side member closing panel
- Fender apron panel
- Front side member section
- Fender apron lower panel
- Front bumper mounting
- Fender apron panel front reinforcement
- Front side member
- Front bumper
Time schedules, front end
The following schedules show the total time taken to replace single panels and also combinations of panels. The published times include the removal of Mechanical, Electrical and Trim, (MET), items, plus paint times based on Metallic Clear Over Base Paint, (blends to adjacent panels are not included). A corrosion protection time is included where appropriate.
The times were generated by Thatcham, (the Motor Insurance Repair Research Centre), and are to be used as a guide only, based on new undamaged panels. Job allowances are not included, as a guide Thatcham recommend 0.3 hours to be added to single panel times and 0.5 hours to be added to combination times.
Single panel times

Combination panel replacement times
Combination panel times

Combination panel times

Combination panel times

Combination panel times

Combination panel times


READ NEXT:
 Roof Panel Vehicles Without: Sliding
Roof Opening Panel
Roof Panel Vehicles Without: Sliding
Roof Opening Panel
Removal
NOTES:
The roof panel is manufactured from aluminium 6111T4.
The screw in studs must be renewed with the installation of a new roof panel.
1. The roof panel is replaced in conjunction with:
Roof Front Panel Vehicles With: Sliding
Roof Opening Panel
Removal
NOTES:
The roof front panel is manufactured from mild steel.
The 4 x screw in studs must be replaced in the installation of the roof front
panel.
1. The roof front panel is replaced in conju
SEE MORE:
Control Diagram, System Operation
Control Diagram
NOTE: A = Hardwired; D = High Speed CAN (controller area network) bus; N =
Medium Speed CAN bus; O = LIN
(local interconnect network) bus
DW12C is shown, GTDi is similar
Battery
Blower motor
LH (left-hand) temperature blend stepper motor
Windshield distribution (defrost) stepp
Component Description
ATC MODULE
NOTE: The 'ECON' button has been renamed 'A/C' to prevent confusion with
the Stop/Start system 'Eco' switch.
The ATC module is mounted in the center console and is integral with the
control panel. The module works in conjunction
with the ECM to control all aspects of heating, ventilati
