Range Rover Evoque: Front Disc Brake
General specifications

Torque Specifications

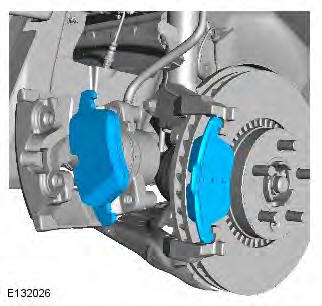
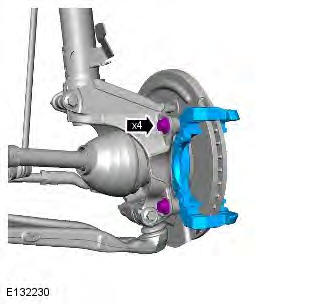
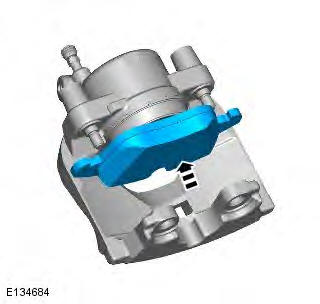
Brake Pads
Removal
WARNING: Brake pads must be renewed in axle sets only. Failure to follow this instruction may result in braking efficiency being impaired.
CAUTION: LH illustration shown, RH is similar.
1. WARNING: Make sure to support the vehicle with axle stands. Raise and support the vehicle.
2. Remove the front road wheels.
Refer to: Wheel and Tire (204-04 Wheels and Tires, Removal and Installation).
3.
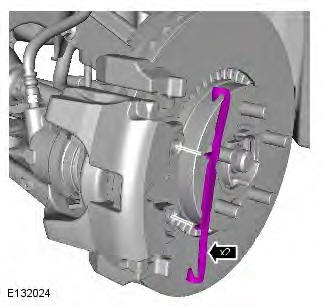
4. Tie aside.

5.

6. Repeat the above procedure for the other side.
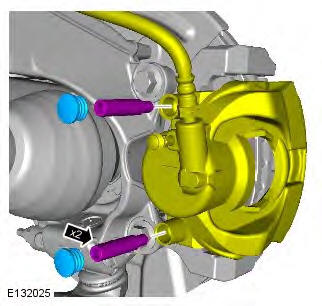
Installation
1. WARNING: Do not use compressed air to clean brake components. Dust from friction materials can be harmful if inhaled.
CAUTION: Make sure that the mating faces are clean and free of foreign material and that no grease is applied to the brake pad guides. Clean the brake caliper housing and anchor plate using brake cleaning fluid.

2. Inspect the caliper piston and slide pin seals for damage.
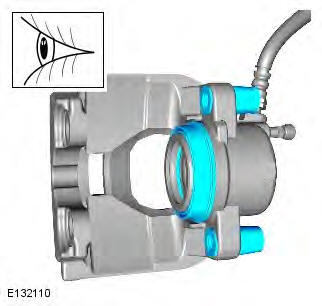
3.
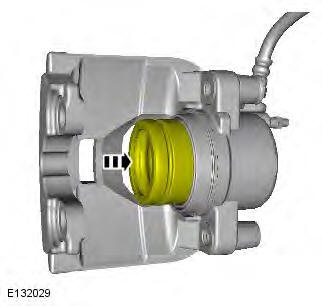
4.
5. CAUTION: Make sure that the brake hose is not twisted and is correctly located. Torque: 28 Nm

6.

7. Repeat the above procedure for the other side.
8. Install the front road wheels.
Refer to: Wheel and Tire (204-04 Wheels and Tires, Removal and Installation).
9. Depress the brake pedal several times, check the fluid level in the brake fluid reservoir and top-up with brake fluid if necessary.
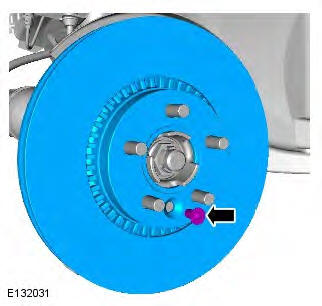
Brake Disc
Removal
WARNING: If installing a new brake disc, install new brake pads.
CAUTIONS:
Brake discs must be renewed in pairs.
LH illustration shown, RH is similar.
1. WARNING: Make sure to support the vehicle with axle stands. Raise and support the vehicle.
2. Remove the front wheel.
Refer to: Wheel and Tire (204-04 Wheels and Tires, Removal and Installation).
3. CAUTION: Make sure that no load is placed on the brake hose. Tie aside.
4.

Installation
1. Clean the brake disc using brake cleaning fluid.
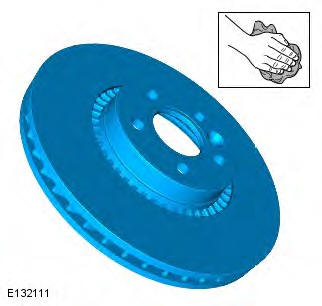
2. Torque: 35 Nm
3. WARNING: Do not use compressed air to clean brake components. Dust from friction materials can be harmful if inhaled. Clean the brake caliper housing and anchor plate using brake cleaning fluid.
4. CAUTIONS:
Make sure that the brake hose is not twisted and is correctly located.
Make sure that new bolts are installed.
Torque: 200 Nm

5. Install the front wheel.
Refer to: Wheel and Tire (204-04 Wheels and Tires, Removal and Installation).
6. Depress the brake pedal several times, check the fluid level in the brake fluid reservoir and top-up with brake fluid if necessary.
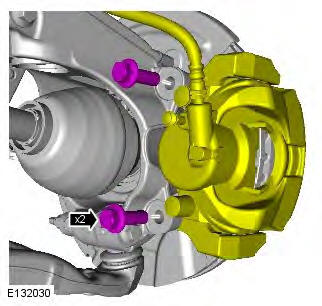
Brake Caliper Anchor Plate
Removal
NOTE: Removal steps in this procedure may contain installation details.
1. WARNING: Make sure to support the vehicle with axle stands. Raise and support the vehicle.
2. Refer to: Brake Pads (206-03 Front Disc Brake, Removal and Installation).
3. CAUTION: Discard the bolts. Torque: 200 Nm
Installation
1. CAUTION: Make sure that new bolts are installed. To install, reverse the removal procedure.
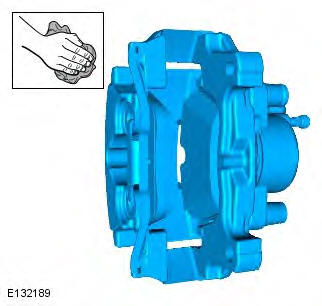
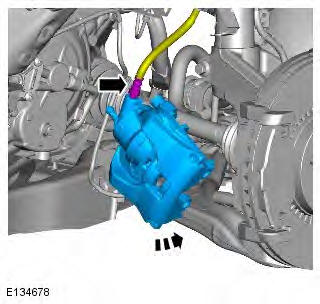
Brake Caliper
Removal
CAUTION: If brake fluid is spilt on the paintwork, the affected area must be immediately washed down with cold water.
1. WARNING: Make sure to support the vehicle with axle stands. Raise and support the vehicle.
2. Refer to: Wheel and Tire (204-04 Wheels and Tires, Removal and Installation).
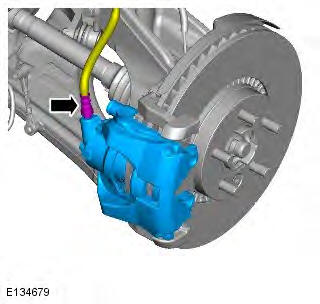
3.

4. CAUTION: Be prepared to collect escaping fluids.
NOTE: Loosen but do not fully remove.

5.
6. CAUTIONS:
Make sure that all openings are sealed. Use new blanking caps.
Be prepared to collect escaping fluids.
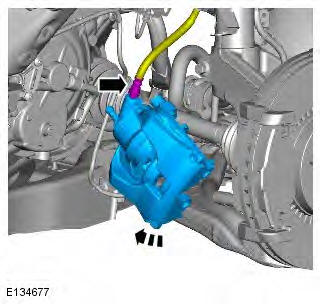
7.
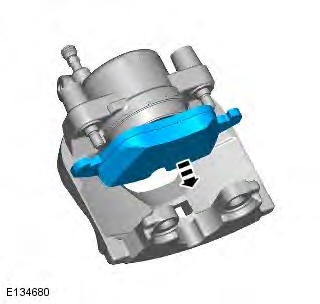
Installation
1. CAUTION: Make sure that the mating faces are clean and free of foreign material and that no grease is applied to the brake pad guides.
2. CAUTION: Be prepared to collect escaping fluids.
NOTES:
Remove and discard all blanking caps.
Do not tighten at this stage.
3. Torque: 28 Nm

4. CAUTION: Make sure that the brake hose is not twisted and is correctly located. Torque: 17 Nm
5.

6. Refer to: Brake System Pressure Bleeding (206-00 Brake System - General Information, General Procedures).
7. Refer to: Wheel and Tire (204-04 Wheels and Tires, Removal and Installation).
READ NEXT:
 Rear Disc Brake
General Specification
Torque Specifications
* New nuts/bolts must be installed
Brake Pads
Removal
WARNING: Brake pads must be renewed in axle sets only. Failure to follow
this instruction may resul
Parking Brake and Actuation
Parking Brake - Component Location
NOTE: RHD (right-hand drive) installation shown, LHD (left-hand drive)
installation similar.
COMPONENT LOCATION
ABS (anti-lock brake system) module
Instrument c
Hydraulic Brake Actuation
Hydraulic Brake Actuation LHD AWD/RHD AWD - Component Location
NOTE: RHD (right-hand drive) installation shown, LHD (left-hand drive)
installation similar.
COMPONENT LOCATION
Brake pedal
Hydrauli
SEE MORE:
System
- Button feedback: Soft key confirmation
tone on or off.
- Clock adjust: Select 12 or 24 hour clock.
Set current time. Select Date to change the
date, or to alter the date format.
Select Set, to store new settings.
Note: The clock can also be adjusted from
the touch screen time display.
- Ho
Voice
- Command list: View the categories and the
acceptable voice commands.
Select an Information button to view
alternative function commands.
- Voicetags: View the categories. Select a
category to manage the voicetags for the
chosen system. See 140, VOICETAGS.
- Operating guide: View brief Voice
