Range Rover Evoque: Front Door Window Regulator and Motor
Removal
NOTE: Removal steps in this procedure may contain installation details.
1. WARNING: To avoid accidental deployment, the restraints control module backup power supply must be depleted. Wait at least two minutes after disconnecting the battery ground cable(s) before commencing any repair or adjustment to the supplemental restraint system (SRS), or any component(s) adjacent to the SRS sensors.
Failure to follow these instructions may result in personal injury.
Make the SRS system safe.
Refer to: Standard Workshop Practices (100-00 General Information, Description and Operation).
2. Refer to: Front Door Trim Panel (501-05 Interior Trim and Ornamentation, Removal and Installation).
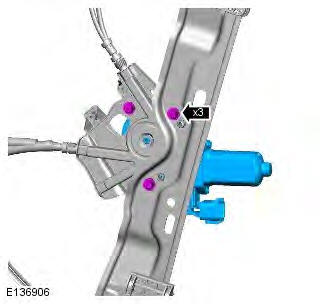
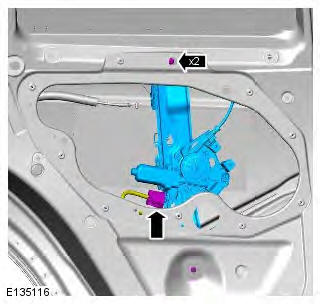
3.
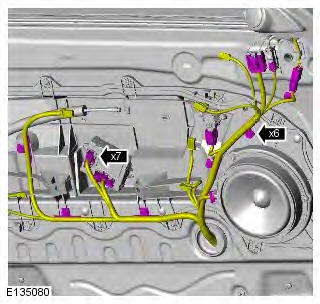
4. Torque: 1.7 Nm
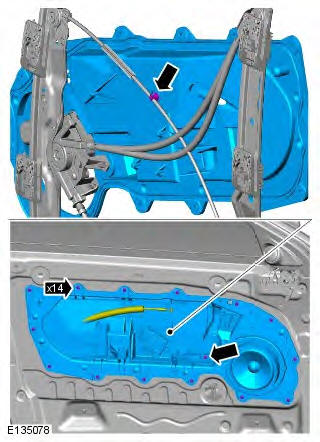
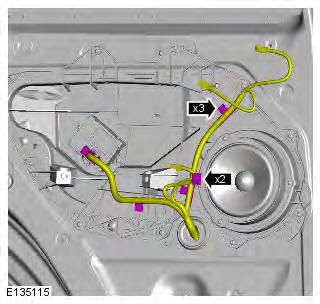
5.
- Release the clips.
- Raise the glass and secure it at the top of the door frame.
- Secure with adhesive tape.
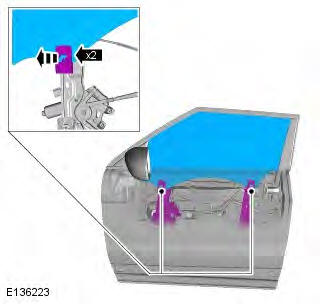
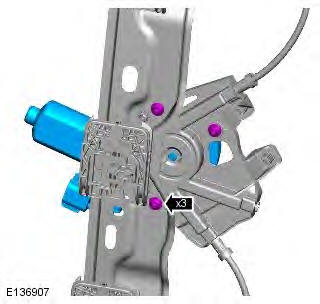
6. Torque: 8 Nm
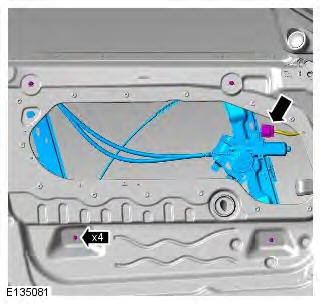
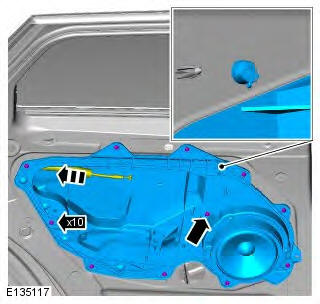
7. NOTE: Do not disassemble further if the component is removed for access only.
Torque: 4.5 Nm
Installation
1. To install, reverse the removal procedure.
Rear Door Window Regulator and Motor
Removal
NOTE: Removal steps in this procedure may contain installation details.
1. Refer to: Rear Door Trim Panel (501-05 Interior Trim and Ornamentation, Removal and Installation).
2.
3. Torque: 1 7 Nm
4.
- Release the clip.
- Raise the glass and secure it at the top of the door frame.
- Secure with adhesive tape.
5. Torque: 8 Nm
6. NOTE: Do not disassemble further if the component is removed for access only.
Torque: 4.5 Nm
Installation
1. NOTE: An audible click is heard when the clip is fully latched. To install, reverse the removal procedure.
Driver Door Window Control Switch
Removal
NOTES:
The ignition must be switched off.
Removal steps in this procedure may contain installation details.
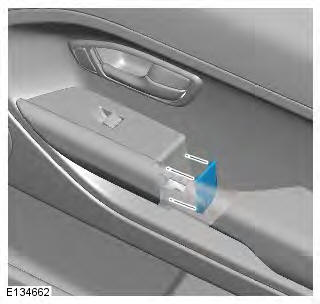
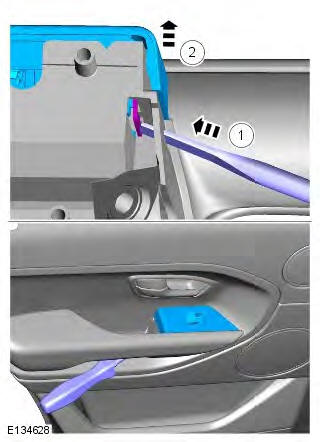
1.
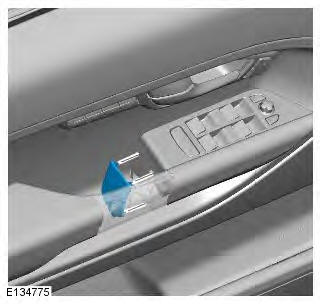
2.
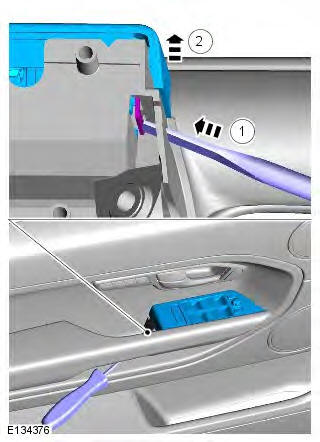
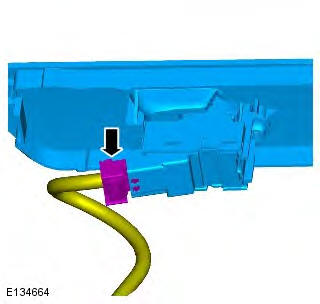
3.
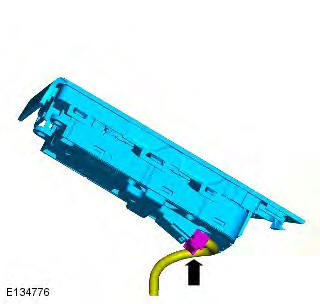
4. NOTE: Do not disassemble further if the component is removed for access only.

Installation
1. To install, reverse the removal procedure.
Passenger Door Window Control Switch
Removal
NOTES:
Removal steps in this procedure may contain installation details.
The ignition must be switched off.
1.
2.
3.
4. NOTE: Do not disassemble further if the component is removed for access only.
Torque: 0.6 Nm

Installation
1. To install, reverse the removal procedure.
Glass, Frames and Mechanisms
Principles of Operation
The glass, frames and mechanisms are of fairly straightforward design requiring no specialized techniques for diagnosis.
Some of the components from the description and operation section, such as the rain sensor and antennae are covered in other sections of the manual, so this section will provide basic diagnosis for the window and heated screen functions.
For a detailed description of the Glass, Frames and Mechanisms and operation, refer to the relevant Description and Operation section of the workshop manual.
Inspection and Verification
CAUTION: Diagnosis by substitution from a donor vehicle is NOT acceptable. Substitution of control modules does not guarantee confirmation of a fault and may also cause additional faults in the vehicle being checked and/or the donor vehicle.
NOTE: Check and rectify basic faults before beginning diagnostic routines involving pinpoint tests.
1. Verify the customer concern
2. Visually inspect for obvious signs of damage and system integrity
Visual Inspection
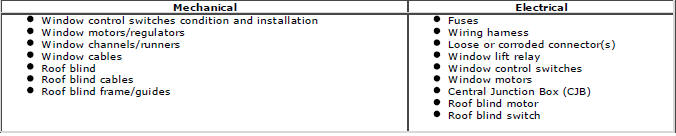
3. If an obvious cause for an observed or reported concern is found, correct the cause (if possible) before proceeding to the next step
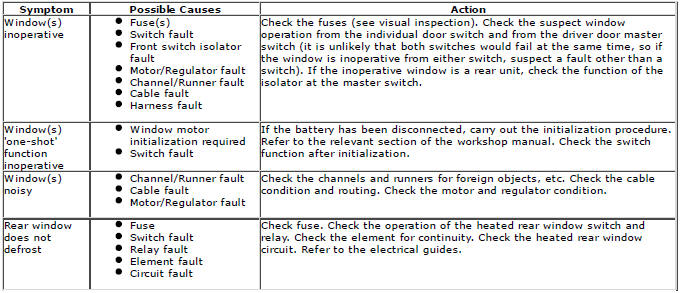
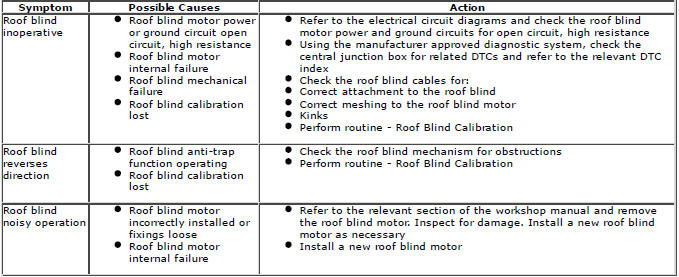
4. If the cause is not visually evident, verify the symptom and refer to the Symptom Chart, alternatively check for Diagnostic Trouble Codes (DTCs) and refer to the DTC Index
5. Check DDW for open campaigns. Refer to the corresponding bulletins and SSMs which may be valid for the specific customer complaint and carry out the recommendations as required
Symptom chart
Roof Blind Calibration
NOTE: Roof blind calibration will be lost if the battery is disconnected, or the roof blind motor power supply is interrupted whilst the roof blind is in motion.
Calibrate the roof blind as follows:
1. Start the engine and leave running during the calibration process.
2. Ensure that the blind is in the fully closed position; press the close switch to achieve this.
3. Press and hold the close switch again and wait for the cables to double click (it should take approximately 30 seconds), and release the switch.
4. Within 3 seconds, press and hold the close switch. The roof blind will automatically travel toward the open position and then to the fully closed position. Release the switch when movement is complete.
DTC index
For a complete list of all Diagnostic Trouble Codes (DTCs) that could be logged on this vehicle, please refer to Section 100-00. REFER to: (100-00 General Information).
READ NEXT:
 Glass Roof Panel
Removal
CAUTIONS:
Always protect paintwork and glass when removing exterior components.
Always protect the interior components when removing body glass.
Measure all gaps between the glass roof panel
Glass Roof Panel Blind
Removal
CAUTION: When removing and installing the glass roof panel blind, extreme
cleanliness must be observed at all
times.
NOTE: Removal steps in this procedure may contain installation details.
A
Glass Roof Panel Blind Motor
Removal
NOTES:
Removal steps in this procedure may contain installation details.
Some variation in the illustrations may occur, but the essential information is
always correct.
All vehicles
1. NOTE:
SEE MORE:
Rear Wheelhouse Front Extension
Removal
NOTE: The rear wheelhouse front extension is taken from the rear
wheelhouse outer and is manufactured from mild steel.
1. The rear wheelhouse outer is replaced in conjunction with:
Rear bumper cover
Quarter panel
Quarter glass
Front inner quarter panel
2. For additional information r
Inner Quarter Panel
Removal
NOTES:
The inner quarter panel is manufactured from mild steel.
There are NVH components on this panel, they are not serviced on the new panel.
If damaged, new components will be required.
1. The front inner quarter panel is replaced in conjunction with:
Rear bumper cover
Quarter panel
