Range Rover Evoque: Fuel Tank and Lines - Diagnosis and Testing
Principles of Operation
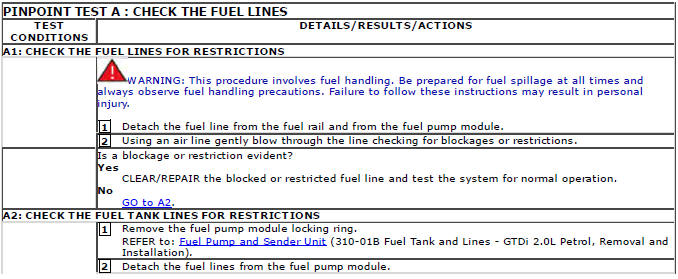
For a detailed description of the fuel tank and lines systems, refer to the relevant Description and Operation section in the workshop manual. REFER to: (310-01B Fuel Tank and Lines - GTDi 2.0L Petrol)
Inspection and Verification
WARNINGS:
Eye protection must be worn at all times when working on or near any fuel related components. Failure to follow this instruction may result in personal injury.
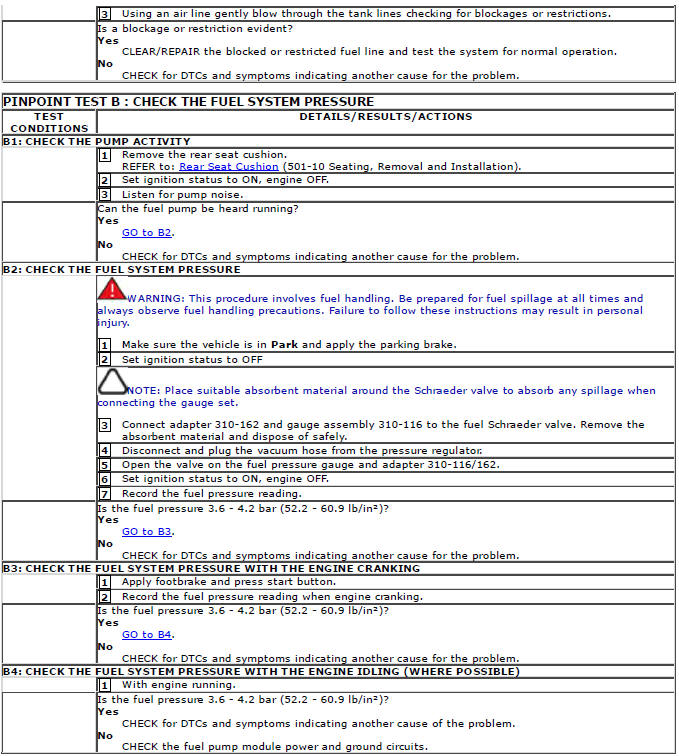
This procedure involves fuel handling. Be prepared for fuel spillage at all times and always observe fuel handling precautions. Failure to follow this instruction may result in personal injury.
After carrying out repairs, the fuel system must be checked visually for leaks. This should be done after the engine has been run, but with the engine switched OFF. Failure to follow this instruction may result in personal injury.
If taken internally, DO NOT induce vomiting. Seek immediate medical attention. Failure to follow this instruction may result in personal injury.
If fuel contacts the eyes, flush the eyes with cold water or eyewash solution and seek medical attention. Failure to follow this instruction may result in personal injury.
Wash hands thoroughly after handling, as prolonged contact may cause irritation. Should irritation develop, seek medical attention. Failure to follow this instruction may result in personal injury.
CAUTIONS: Before disconnecting any part of the system, it is imperative that all dust, dirt and debris is removed from around components to prevent ingress of foreign matter into the fuel system. Failure to follow this instruction may result in damage to the vehicle.
It is essential that absolute cleanliness is observed when working with these components. Always install blanking plugs to any open orifices or lines. Failure to follow this instruction may result in damage to the vehicle.
Diagnosis by substitution from a donor vehicle is NOT acceptable. Substitution of control modules does not guarantee confirmation of a fault, and may also cause additional faults in the vehicle being tested and/or the donor vehicle.
NOTE: Check and rectify basic faults before beginning diagnostic routines involving pinpoint tests.
1. Verify the customer concern
2. Visually inspect for obvious signs of damage and system integrity
Visual Inspection

3. If an obvious cause for an observed or reported concern is found, correct the cause (if possible) before proceeding to the next step
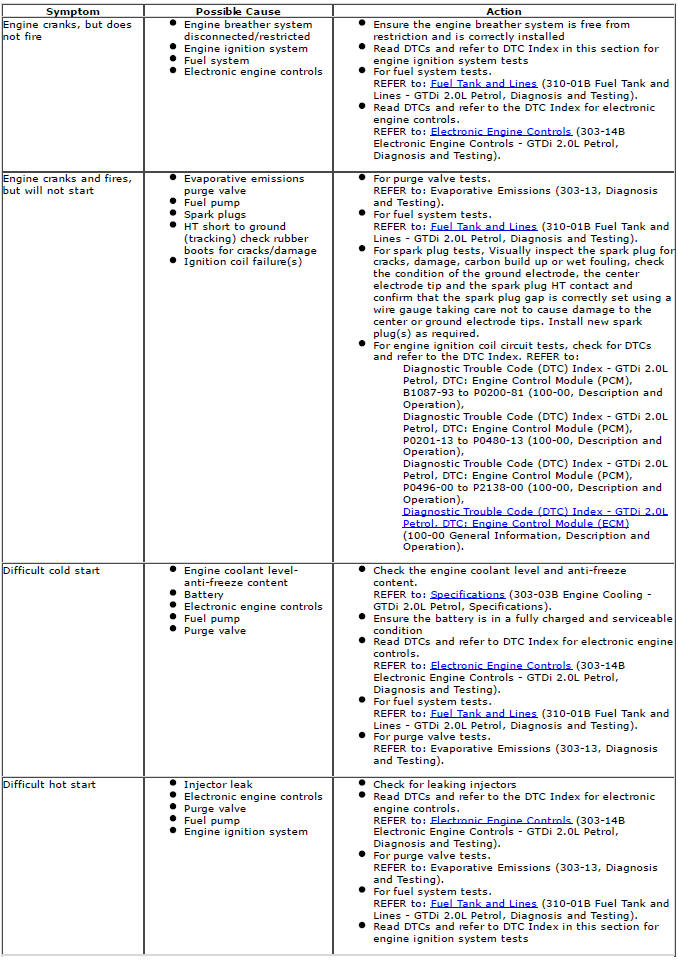
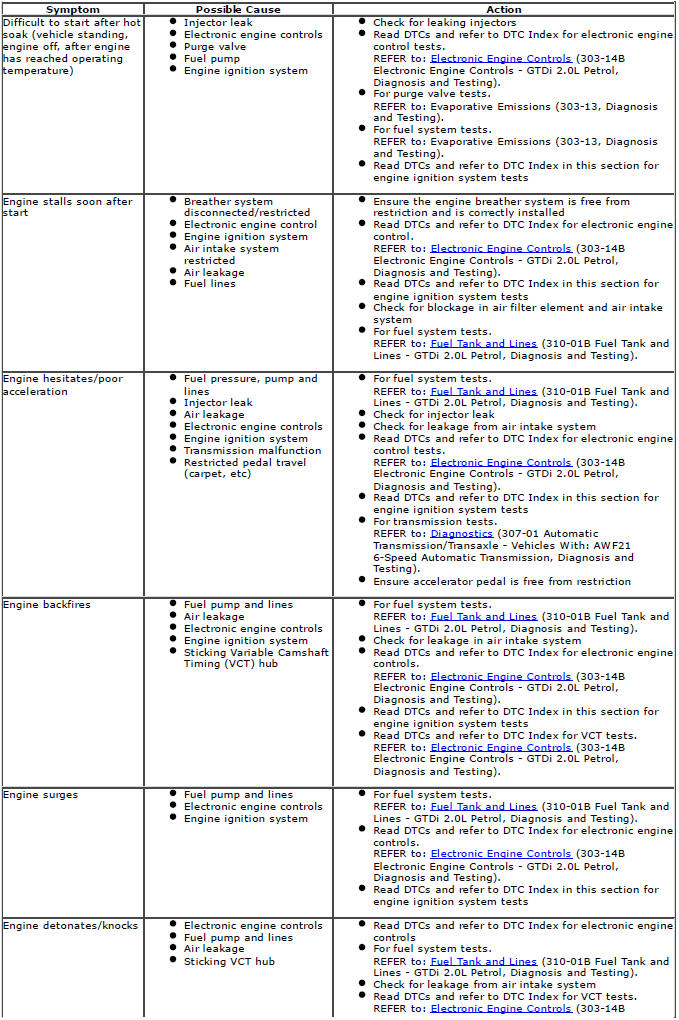
4. If the cause is not visually evident, verify the symptom and refer to the Symptom Chart, alternatively, check for Diagnostic Trouble Codes (DTCs) and refer to the DTC Index
Symptom Chart
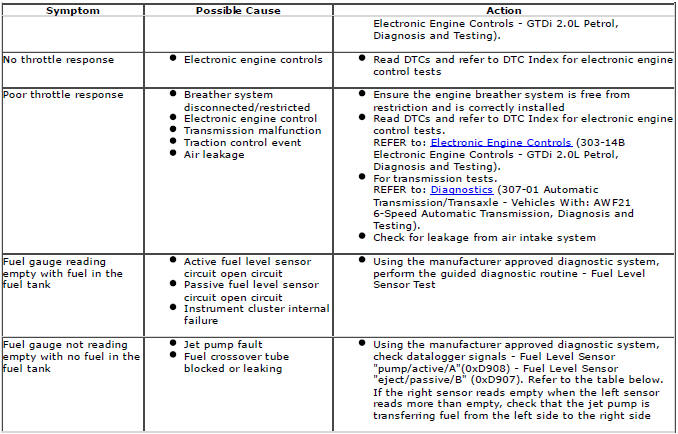
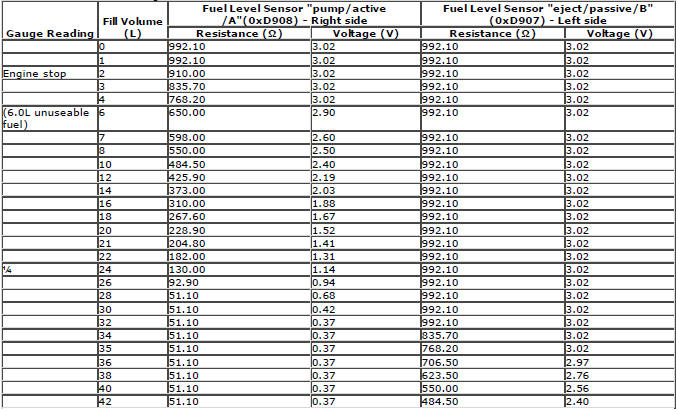
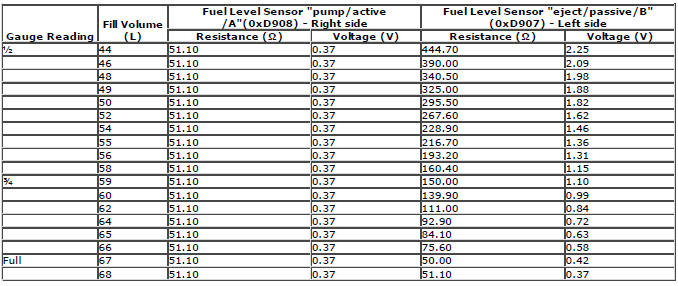
Fuel Gauge, Resistance, Voltage And Fuel Tank Level Comparison Chart
Use the chart to determine fuel tank fuel volume versus fuel gauge reading to determine the fuel level symptom and fault.
NOTES: The vehicle must be parked on a level surface to obtain an accurate fuel level gauge reading.
The actual values may vary, according to the quantity of fuel in the left and right sides of the fuel tank.
Volume, Resistance and Voltage Values
DTC Index
NOTES:
If a module or component is suspect, and the vehicle remains under the Manufacturers warranty, refer to the Warranty Policy and Procedure manual (section B1.2), or determine if any prior approval programme is in operation, prior to the installation of a new module/component.
Generic scan tools may not read the codes listed, or may read only five digit codes. Match the five digits from the scan tool to the first five digits of the seven digit code listed to identify the fault (the last two digits give extra information read by the manufacturer-approved diagnostic system).
When performing electrical voltage or resistance tests, always use a digital multimeter (DMM) accurate to three decimal places, and with an up-to-date calibration certificate. When testing resistance, always take the resistance of the DMM leads into account.
Check and rectify basic faults before beginning diagnostic routines involving pinpoint tests.
If DTCs are recorded and, after performing the pinpoint tests, a fault is not present, an intermittent concern may be the cause. Always check for loose connections and corroded terminals.
For a complete list of all diagnostic trouble codes that could be logged on this vehicle.
Acceleration Control - Accelerator Pedal
Removal
NOTES:
Removal steps in this procedure may contain installation details.
LH illustration shown, RH is similar.
1.
2. Torque: 10 Nm
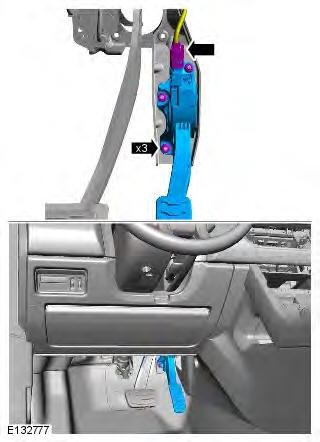
Installation
1. To install, reverse the removal procedure.
READ NEXT:
 Speed Control
Speed Control Actuator
Removal
1. Refer to: Accelerator Pedal (310-02 Acceleration Control, Removal
and Installation).
Installation
1. To install, reverse the removal procedure.
Speed Control Deactiv
Climate Control System - General Information
Climate Control
Lubricants, Fluids, Sealers and Adhesives
General Specification
Capacities
Refrigerant oil adding capacities for replacment parts
NOTE: Rotate the A/C compressor shaft at least 6 t
SEE MORE:
Important information
The information contained in this handbook covers all vehicle derivatives and
optional equipment,
some of which may not be fitted to your vehicle. Due to printing cycles, this
handbook may include
descriptions of options before they become generally available.
The vehicle options, hardware an
Symbols used in this handbook
Safety warnings indicate either a procedure which must be followed
precisely, or
information that should be considered with great care, in order to avoid the
possibility
of personal injury.
Cautions indicate either a procedure which must be followed precisely, or
information that
should
