Range Rover Evoque: Headlamps
Moving the nearside headlamp unit to access bulbs;
1. Remove the two plastic fixings.
2. Pull the tube up to release from the air box.
This will allow more room for manoeuvrability.
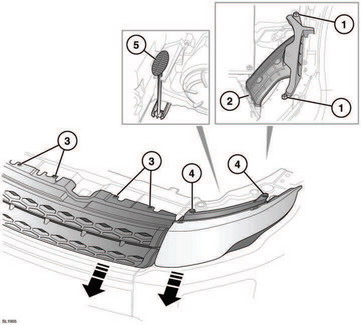
3. Remove the four grille fixings.
4. Remove the two retaining bolts.
5. At the rear of the headlamp unit, pull up on the T grip release mechanism and hold while sliding the headlamp unit forward 40mm.
Moving the offside headlamp unit to access bulbs;

1. Remove the four grille fixings.
2. Remove the two retaining bolts.
3. Remove the fixing then move the filler tube rearwards. This will allow more room for access to the bulb holders.
4. At the rear of the headlamp unit, pull up on the T grip release mechanism and hold while sliding the headlamp unit forward 40mm.
Removing a headlamp bulb;
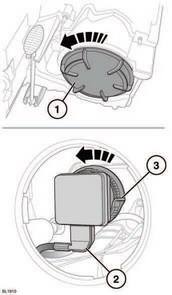
1. At the back of the headlamp unit, remove the cover. Turn it counter clockwise to release.
2. The back of the bulb unit will now be exposed. Pull down on the electrical connector to release it from the bulb unit.
3. Turn the retaining collar counter clockwise to release the bulb. Remove the bulb unit from the housing.
READ NEXT:
 Direction indicator and side lamp bulbs
Removing the nearside bulbs;
To gain more room for accessibility, follow
steps 1 and 2 for moving the nearside
headlamp unit.
1. At the back of the headlamp unit, remove
the indicator bulb hous
Rear lamp bulbs
1. Remove the two fixings.
2. Direction indicator.
3. Reversing lamp
Turn the relevant bulb holder counter
clockwise and pull to remove from the lamp
unit. Grip the holder then press the bulb i
Rear fog lamp
Access to the rear fog lamp
requires
special tools and should be undertaken
only by a qualified technician. If in
doubt, consult your Land Rover
Dealer/Authorised Repairer.
SEE MORE:
Important information
The information contained in this handbook covers all vehicle derivatives and
optional equipment,
some of which may not be fitted to your vehicle. Due to printing cycles, this
handbook may include
descriptions of options before they become generally available.
The vehicle options, hardware an
Symbols used in this handbook
Safety warnings indicate either a procedure which must be followed
precisely, or
information that should be considered with great care, in order to avoid the
possibility
of personal injury.
Cautions indicate either a procedure which must be followed precisely, or
information that
should
