Range Rover Evoque: Navigation controls
Consists of two menu screens. Icons for the second menu are shown individually.
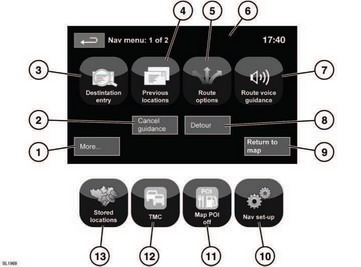
Navigation controls
See 104, TOUCH SCREEN OVERVIEW.
1. Move to other Navigation menu.
2. Cancels current route guidance.
3. Provides a choice of options for entering a destination.
4. Will display previous destinations entered.
5. Allows the user to select various options for the route.
6. When a destination is set, the Range Rover logo in this position is replaced by a soft key which enables the last voice instruction to be repeated.
7. Voice guidance can be turned off for the current journey. Softkey is highlighted while voice guidance is enabled.
8. Allows the user to take a detour from the current route.
9. Advances to the main map screen.
10. Settings for the navigation system.
11. Allows the user to turn on or off POI icons.
12. TMC (Traffic Message Channel). Not used for entering a destination but, when enabled, will provide data about road conditions and any events that may affect the journey.
13. Manage the stored locations.
READ NEXT:
 Map split screen
Map split screen
1. TMC (Traffic Message Channel)
information.
2. North is up.
3. Small compass display which always
indicates North.
4. Next direction display.
5. Current vehicle position.
Screen modes
Touch the screen mode selection button (12)
to view a series of icons, each depicting a
different screen mode (as detailed below).
Touch the relevant icon to select the desired
screen mode.
Ful
Search area
The navigation map database is divided into
countries, or geographically defined areas
within countries, called search areas. When
setting a route, the destination (or waypoint)
entered must be in
SEE MORE:
Important information
The information contained in this handbook covers all vehicle derivatives and
optional equipment,
some of which may not be fitted to your vehicle. Due to printing cycles, this
handbook may include
descriptions of options before they become generally available.
The vehicle options, hardware an
Symbols used in this handbook
Safety warnings indicate either a procedure which must be followed
precisely, or
information that should be considered with great care, in order to avoid the
possibility
of personal injury.
Cautions indicate either a procedure which must be followed precisely, or
information that
should
