Range Rover Evoque: Rocker Panel
Removal
NOTES:
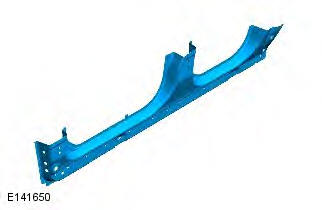
The rocker panel is manufactured from mild steel.
Some of the butt joints must be MIG brazed due to the location of boron reinforcements.
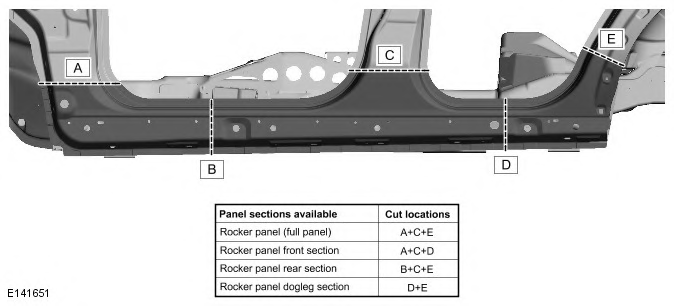
1. This procedure identifies the method for the replacement of the rocker panel in full.
The graphic and table identify possible alternative sections of the rocker panel that can be performed dependant on the extent of damage to the vehicle and/or the replacement of associated panels. Where an alternative section is selected, some steps within this procedure may not be necessary. For joint references relating to B & D refer to the b-pillar outer panel procedure.
For additional information, refer to: B-Pillar Outer Panel (501-29B Side Panel Sheet Metal Repairs - 5-Door, Removal and Installation).
2. The rocker panel is replaced in conjunction with:
- Front bumper cover
- Front fender
- Front door
- Rear door
3. For additional information relating to this repair procedure please see the following: For additional information, refer to: Health and Safety Precautions (100-00 General Information, Description and Operation) / Body Repairs (501-25A Body Repairs - General Information, Description and Operation) / Corrosion Protection (501-25B Body Repairs - Corrosion Protection, Description and Operation) / Body and Frame (501-26 Body Repairs - Vehicle Specific Information and Tolerance Checks, Description and Operation) / Standard Workshop Practices (100-00 General Information, Description and Operation).
4. Remove the front fender.
For additional information, refer to: Fender (501-02 Front End Body Panels, Removal and Installation).
5. NOTE: If the lower front fender retaining bracket is damaged it must be replaced. Remove the bolt on front fender lower retaining bracket from the a-pillar outer panel.
6. Remove the front door.
For additional information, refer to: Front Door (501-03 Body Closures, Removal and Installation).
7. Remove the rear door.
For additional information, refer to: Rear Door (501-03 Body Closures, Removal and Installation).
8. Remove the lower door hinge from the A-pillar, 2 x bolts. Torque 30Nm.
9. Remove the lower door hinge from the B-pillar, 2 x bolts. Torque 30Nm.
10. Remove the front road wheel.
For additional information, refer to: Wheel and Tire (204-04 Wheels and Tires, Removal and Installation).
11. Remove the rear road wheel.
For additional information, refer to: Wheel and Tire (204-04 Wheels and Tires, Removal and Installation).
12. Remove the front seat.
For additional information, refer to: Front Seat (501-10 Seating, Removal and Installation).
13. Remove the floor console.
For additional information, refer to: Floor Console (501-12 Instrument Panel and Console, Removal and Installation).
14. Remove the front door aperture weatherseal.
15. Remove the rear door aperture weatherseal.
16. Remove the cowl side trim panel.
For additional information, refer to: Cowl Side Trim Panel (501-05 Interior Trim and Ornamentation, Removal and Installation).
17. Remove the B-Pillar lower trim.
For additional information, refer to: B-Pillar Lower Trim Panel (501-05 Interior Trim and Ornamentation, Removal and Installation).
18. Remove the rear quarter trim panel.
For additional information, refer to: Rear Quarter Trim Panel (501-05 Interior Trim and Ornamentation, Removal and Installation).
19. Remove the rocker panel inner trim.
For additional information, refer to: Front Scuff Plate Trim Panel (501-05 Interior Trim and Ornamentation, Removal and Installation).
20. Remove the rocker panel outer moulding.
21. Remove the front safety belt retractor.
For additional information, refer to: Front Safety Belt Retractor (501-20A Safety Belt System, Removal and Installation).
22. Remove the rear seat cushion.
For additional information, refer to: Rear Seat Cushion (501-10 Seating, Removal and Installation).
23. Release and lay aside the carpet.
24. Release and lay aside the bulkhead inner insulation.
25. Release and lay aside the insulating material.
26. Release and lay aside the wiring harness along the inner rocker panel.
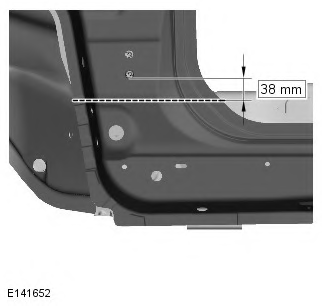
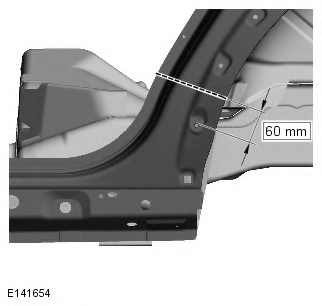
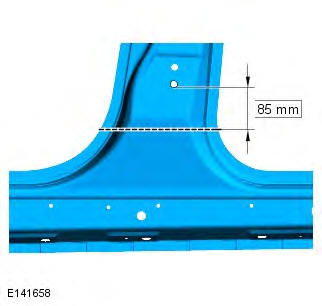
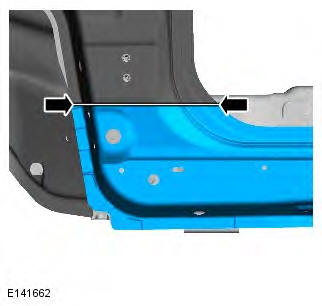
27. CAUTION: Care should be taken not to cut through into the inner reinforcements. Cut the A-pillar outer panel as indicated.
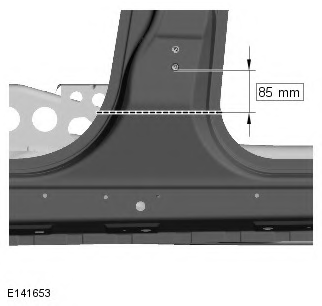
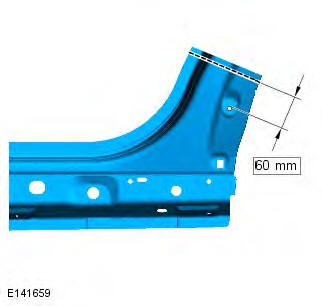
28. CAUTION: Care should be taken not to cut through into the inner reinforcements. Cut the B-pillar outer panel as indicated.
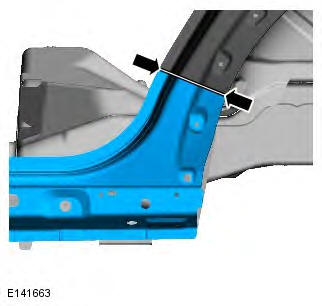
29. CAUTION: Care should be taken not to cut through into the inner reinforcements.
Cut the quarter panel as indicated.
30. Drill out the spot welds.
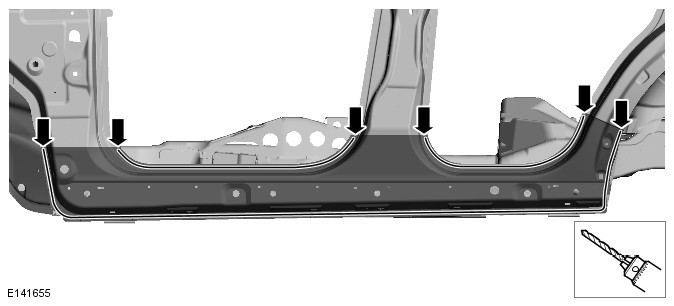
31. NOTE: If the NVH components are damaged on separation, new components will be required. Separate the joints and remove the old panel, also releasing the NVH components from the old panel as indicated.
Installation
1. Cut the new rocker panel, A-pillar butt joint as indicated.
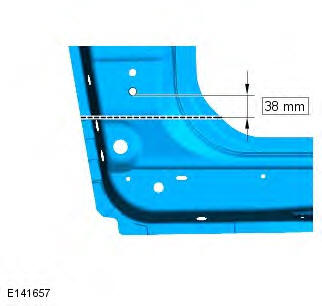
2. Cut the new rocker panel, B-pillar butt joint as indicated.
3. Cut the new rocker panel, quarter panel butt joint as indicated.
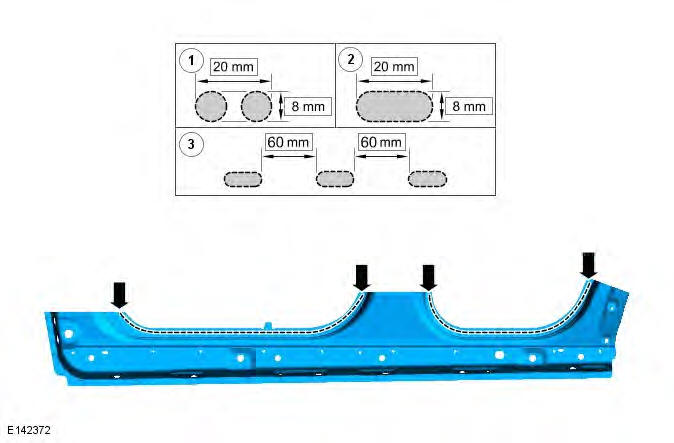
4. Cut 8mm x 20mm slots as indicated in new panel.
Follow steps 1 to 3 as shown in the above inset.
5. Prepare the old and new panel joint surfaces including the NVH components.
6. Offer up the new panel and clamp into position. Check alignment, if correct, proceed to next step, if not, rectify and recheck before proceeding.
7. Remove the new panel.
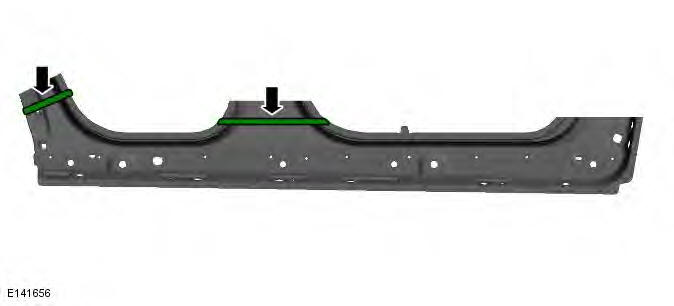
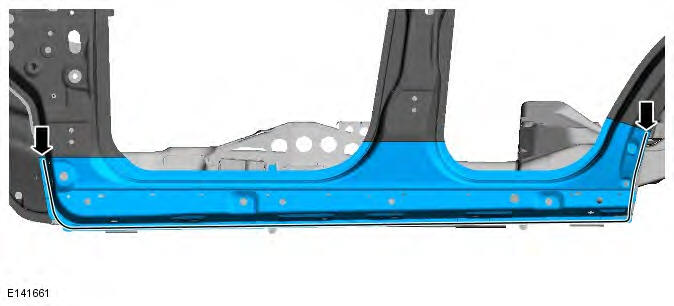
8. Apply panel bonding adhesive to spot welded/bonded areas as indicated. Use the bond path shown in the graphic as a guide, the panel bond adhesive must only be applied in the areas where spot welding is accessible for the installation of the new panel. It is not to be applied in any areas of MIG welding/brazing installation joints, leave a 30mm gap, so it does not affect the MIG weld/braze joint on installation.

9. Apply sealer adhesive to the NVH components.
10. Offer up the new panel and clamp into position. Check alignment, if correct, proceed to next step, if not, rectify and recheck before proceeding.
11. Tack MIG weld the A-pillar butt joint.
12. Tack MIG weld the quarter panel butt joint.
13. NOTE: This joint must be MIG brazed due to the boron reinforcement
Tack MIG braze the B-pillar butt joint.
14. NOTE: Make sure that spot welds are installed at least 5mm away from existing spot welds on underlying panels. Spot weld.
15. MIG braze the slots in the door aperture areas.
16. MIG weld the A-pillar butt joint.
17. MIG weld the quarter panel butt joint.
18. NOTE: This joint must be MIG brazed due to boron reinforcement. MIG braze the B-pillar butt joint.

19. Dress all welds.
20. NOTE: After this repair wax injection of the repaired areas must be carried out. Seal panel flange edges in the MIG braze slot areas of the door apertures to prevent water ingress.
21. NOTE: Make sure all underbody joints are sealed following this repair procedure
The installation of associated panels and mechanical components is the reverse of removal.
Side Panel Sheet Metal
Side service panels
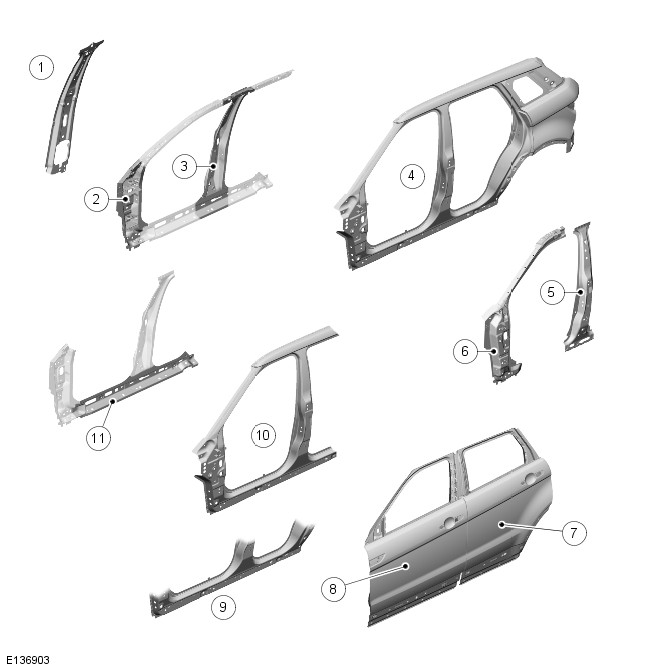
- B-Pillar inner panel
- A-Pillar reinforcement
- B-Pillar reinforcement
- Side panel
- B-Pillar outer panel
- A-Pillar outer panel
- Rear door
- Front door
- Rocker panel
- Side panel front section
- Rocker panel inner reinforcement
Galvanic Corrosion
For additional information, refer to: Corrosion Protection (501-25B Body Repairs - Corrosion Protection, Description and Operation).
Time schedules, side panels
The following schedules show the total time taken to replace single panels and also combinations of panels. The published times include the removal of Mechanical, Electrical and Trim, (MET), items, plus paint times based on Metallic Clear Over Base Paint, (blends to adjacent panels are not included). A corrosion protection time is included where appropriate.
The times were generated by Thatcham, (the Motor Insurance Repair Research Centre), and are to be used as a guide only, based on new undamaged panels. Job allowances are not included, as a guide Thatcham recommend 0.3 hours to be added to single panel times and 0.5 hours to be added to combination times.
Single panel times

Combination panel replacement times
Combination panel times

Combination panel times

Combination panel times

Combination panel times

Combination panel times

READ NEXT:
 B-Pillar Outer Panel
Removal
NOTES:
Within this procedure there are 2 different options depending on type of
vehicle body.
The b-pillar outer panel is manufactured from mild steel.
The rocker panel butt joints must be
Quarter Panel
Removal
NOTES:
Within this procedure there are 2 different options depending on type of
vehicle body and combination of replacement panels.
The quarter panel is manufactured from mild steel.
The ro
SEE MORE:
Important information
The information contained in this handbook covers all vehicle derivatives and
optional equipment,
some of which may not be fitted to your vehicle. Due to printing cycles, this
handbook may include
descriptions of options before they become generally available.
The vehicle options, hardware an
Symbols used in this handbook
Safety warnings indicate either a procedure which must be followed
precisely, or
information that should be considered with great care, in order to avoid the
possibility
of personal injury.
Cautions indicate either a procedure which must be followed precisely, or
information that
should
