Range Rover Evoque: Safety Belt System
Safety Belt System
Diagnosis and Testing
Principle of Operation
For a detailed description of the seatbelt system and operation, refer to the relevant description and operation section of the workshop manual REFER to: Safety Belt System (501-20A Safety Belt System, Description and Operation).
Safety Information
WARNINGS:
To avoid accidental deployment the back-up power supply must be depleted before beginning any work on the SRS system or its components. Failure to follow this instruction may result in personal injury Do not use a multimeter to probe an SRS module. It is possible for the power from the multimeter battery to trigger the activation of the module. Failure to follow this instruction may result in personal injury
NOTE: Do not to use a cellular phone or to have a cellular phone in close proximity when working on the SRS system or components
Power supply depletion
Before beginning any work on the SRS system or related components:
1. Remove the ignition key
2. Disconnect the battery leads, ground first
3. Wait 2 minutes for the power circuit to discharge
There are comprehensive instructions on the correct procedures for SRS system repairs, refer to the relevant section of the workshop manual
Inspection and Verification
CAUTION: Diagnosis by substitution from a donor vehicle is NOT acceptable. Substitution of control modules does not guarantee confirmation of a fault and may also cause additional faults in the vehicle being checked and/or the donor vehicle
NOTE: Check and rectify basic faults before beginning diagnostic routines including pinpoint tests
1. Verify the customer concern by operating the seatbelt
2. Visually inspect for obvious signs of mechanical or electrical damage
Visual Inspection

3. If an obvious cause for an observed or reported concern is found, correct the cause (if possible) before proceeding to the next step
4. If the cause is not visually evident, carry out the test methods described below, alternatively check for diagnostic trouble codes and refer to the relevant diagnostic trouble code index
For a complete list of all diagnostic trouble codes that could be logged on this vehicle, please refer to section 100-00.
REFER to: Diagnostic Trouble Code (DTC) Index - DTC: Restraints Control Module (RCM) (100-00 General Information, Description and Operation).
Symptom Chart for Seatbelt Rows 1, 2 and 3

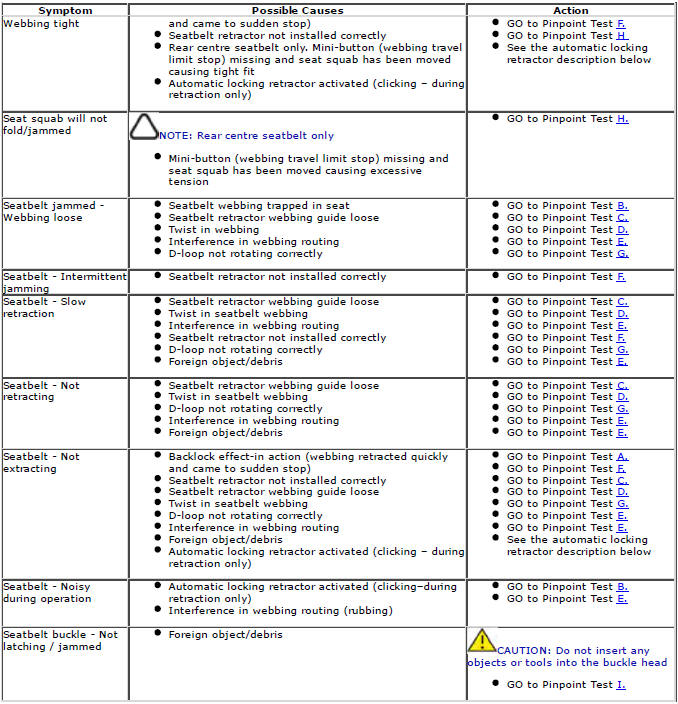
Inertia Reel Seatbelts
The vehicle is equipped with (two row one), (three row two), and (two row three (seven seat versions only) ) inertia reel seatbelts
These seatbelts are 'dual sensitive' which means that they have:
- Car sense system - A vehicle motion sensor, which locks the seatbelt webbing under braking, cornering, on steep hills and in adverse camber conditions, when parked on a steep incline or driveway or two wheels on a high curb
- Webb sense system - A webbing motion sensor, which locks when the seatbelt webbing is extracted suddenly
The seatbelts in the following positions are equipped with an automatic locking retractor function:
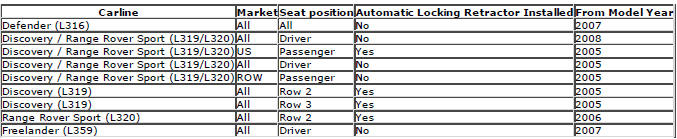
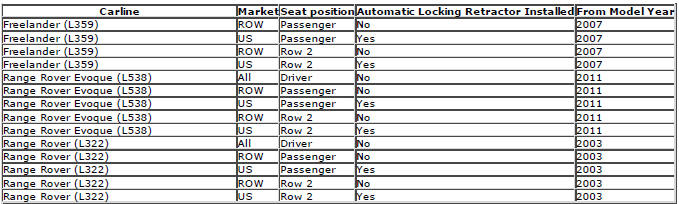
The automatic locking retractor function is a feature to secure a child seat or heavy load to the seat

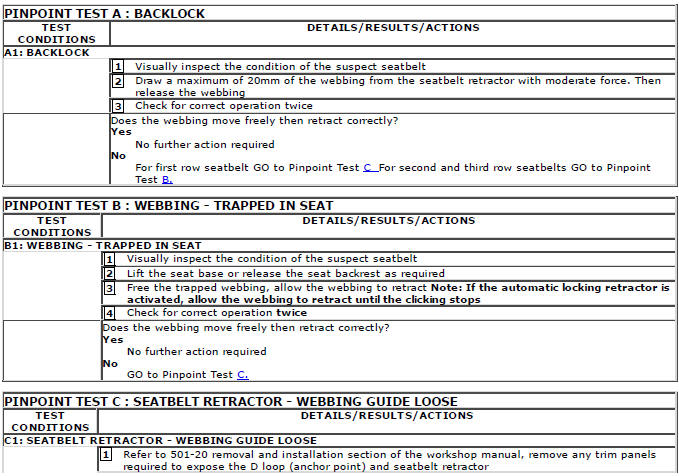
Seatbelt Locking Test
With the vehicle stationary and on level ground take firm hold of the seatbelt webbing (on the tongue side of the upper seatbelt anchor) and withdraw sharply, the retractor should lock. Preventing further webbing release (repeat this test 3 times). Any seatbelt retractor which fails to lock must not be used and a new seatbelt must be installed.
DTC Index
For a list of diagnostic trouble codes that could be logged on this vehicle, please refer to Section 100-00 or for removal and installation/description and operation see Section 501-20
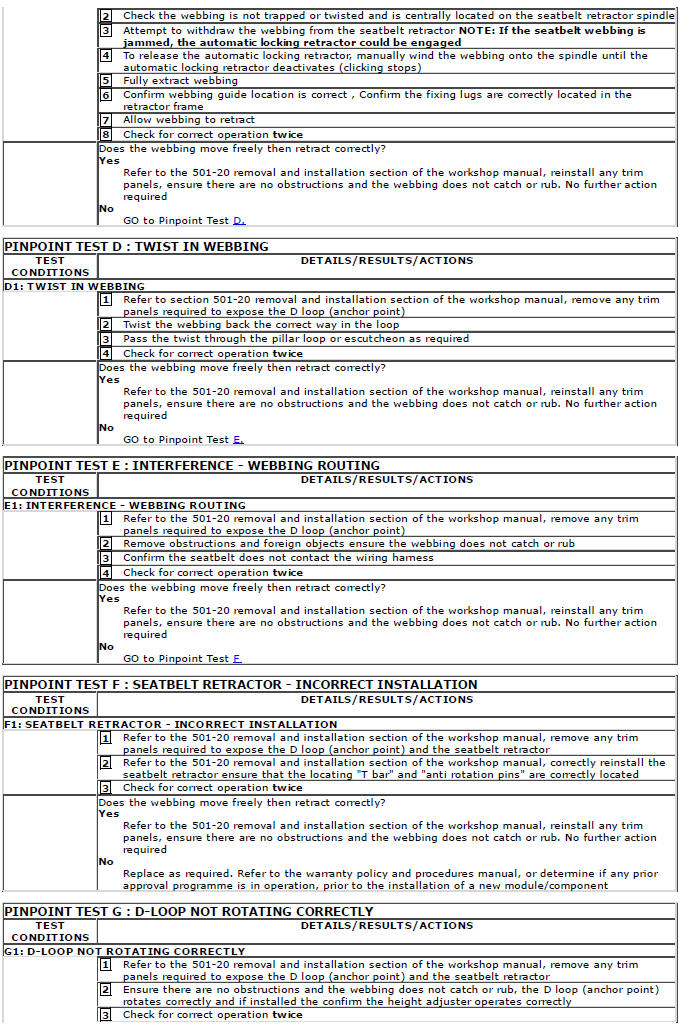
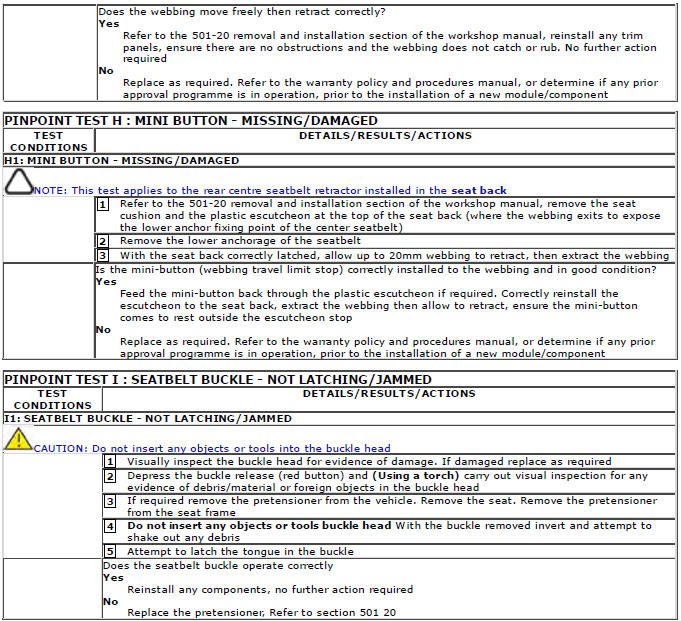
Diagnostic Guide Inertia Reel Seatbelts
Component Location
COMPONENT LOCATION
- Front RH (right-hand) safety belt retractor
- Front RH safety belt
- Rear RH safety belt
- Rear RH safety belt retractor
- Rear safety belt buckles
- Center safety belt
- Center safety retractor
- Rear LH (left-hand) safety belt retractor
- Rear LH safety belt
- Front LH safety belt
- Front LH safety belt retractor
- Front LH safety belt buckle
- Front RH safety belt buckle
Overview
OVERVIEW
A 3 point safety belt is installed in all seating positions. Each seatbelt has emergency locking retractor functionality.
The emergency locking retractor function incorporates a lift shaft locking system with webbing sensor and car sensing activating mechanisms. The webbing sensor activates the locking mechanism if the webbing is subjected to a sharp pull.
The car sensor activates the locking system if the vehicle is subjected to sudden deceleration or severe tilt angle.
All row 2 passengers and front Passenger emergency locking retractors are enhanced with automatic locking retractors (NAS only).
The automatic locking retractor allows webbing to be extracted to activate a ratchet device. This device allows webbing to be cinched tight to facilitate child seat fitment. With seatbelt webbing tensioned in automatic locking retractor mode the seatbelt is always locked.
A safety belt warning indicator is installed in the instrument cluster to remind the all seat occupants to fasten their safety belts. On North American Specification (NAS) vehicles, when the ignition mode is accessory/convenience, the warning indicator illuminates if the safety belt of an occupied front seat is not fastened. The warning indicator remains illuminated until the safety belt of each occupied front seat is fastened, or the ignition mode is off. In all markets except NAS, a belt minder function provides a more intrusive reminder to fasten the front safety belts.
System Operation and Component Description
System Operation
Front Belt Minder Function
The belt minder function provides warnings to the driver if the appropriate front safety belts are not fastened when driving.
The belt minder function is controlled by the instrument cluster using:
- High speed CAN (controller area network) bus messages, from the RCM (restraints control module), to monitor the status of the front safety belts.
- An input from the occupant detection system to monitor the status of the front passenger seat (ROW).
- An input from the occupant classification system to monitor the status of the front passenger seat (Federal USA).
When the ignition is switched to on, the instrument cluster illuminates the safety belt warning indicator until one of the front safety belts is fastened or the belt minder function is triggered. The belt minder function is triggered when the ignition switch is in accessory/convenience and the following conditions coexist:
- The belt minder function is enabled
- The vehicle is not in reverse
- Vehicle speed is initially set at 20 km/h (12mph) or more, then afterwards from 10 km/h (6mph) or more until ignition - cycled
- The driver safety belt or, if the front passenger seat is occupied, the front passenger safety belt, is unfastened.
When the belt minder is triggered, the instrument cluster generates the following warnings for repeated 10 seconds for a total of approximately 190 seconds.
NOTE: There are slight timing differences between ROW and Federal USA (second is driver only, lights only) vehicles.
- Flashes the safety belt warning indicator at 2 Hz
After 10 seconds the safety belt warning indicator changes from flashing to continuously illuminated for 20 seconds. While the trigger conditions still coexist, the warnings are repeated every 30 seconds until one of the following occurs:
- Approximately 3 minutes has elapsed from when the warnings were first triggered
- The safety belt of each occupied front seat is fastened
- The ignition mode is position 0
For non-Federal USA vehicles the belt minder function can be enabled and disabled using the driver safety belt switch. The belt minder function can also be enabled and disabled using the recommended Land Rover diagnostic tool.
Successful completion of the change is indicated by a single chime and the safety belt warning indicator flashing five times, at 2 Hz.
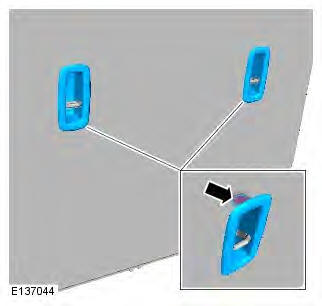
Safety Belt FMVSS 208 Warning Indicator
Visual Beltminder
A front and rear seat Beltminder system warns the driver when the seat belt of an occupied seat is not fastened or is unfastened during a journey.
Diagram shows Beltminder located in the middle of the instrument cluster message center.
A graphic in 'Visual Beltminder' indicates which seat belts are fastened at the start of a journey and also when a seat belt is fastened or unfastened during a journey. Each seating position is represented by a passenger icon, the color of which indicates the seat belt status:
- Green - seat belt in the indicated position is fastened
- Red - seat belt in the indicated position has been unfastened while the vehicle ignition is on
- Grey - seat belt not fastened, a red symbol will turn grey after 30 seconds.
NOTE: The indicators will be displayed each time there is a status change, e.g., a seat belt is unfastened or a door is opened and then closed.
In addition, an audible warning will sound under the following conditions:
- The seat belt of an occupied front seat is not fastened or is unfastened during a journey
- A rear seat belt is unfastened.
NOTE: If a heavy object is placed on the front passenger seat, it may activate the Beltminder feature. It is recommended that any objects placed on the front passenger seat are secured using the seat belt.
Component Description
SECOND ROW SAFETY BELTS
The retractor of each outboard second row safety belt is attached to the body immediately behind the D pillar. The webbing runs from the retractor, through an upper mounting on the D pillar, to an anchor point at the front of the related wheel arch.
The retractor for the center second row safety belt (bench seat only) is installed in the top of the seat back. The webbing runs from the retractor, over the top of the seat, to an anchor point at the base of the seat frame.
The buckles for the second row safety belts are attached to the rear floor.
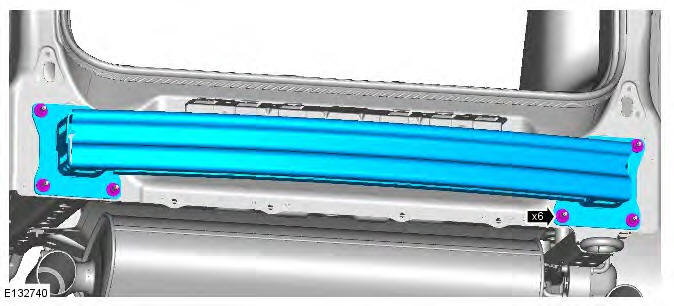
Rear Bumper
Removal
NOTE: Removal steps in this procedure may contain installation details.
1. WARNING: Make sure to support the vehicle with axle stands. Raise and support the vehicle.
2. Refer to: Rear Bumper Cover (501-19 Bumpers, Removal and Installation).
3. Torque: 30 Nm
Installation
1. To install, reverse the removal procedure.
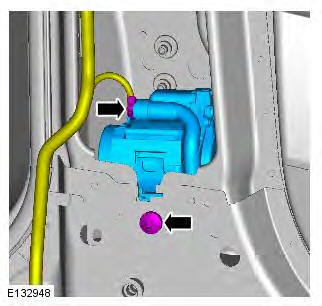
Front Safety Belt Retractor
Removal
NOTE: Removal steps in this procedure may contain installation details.
All vehicles
1. Make the SRS system safe.
Refer to: Standard Workshop Practices (100-00 General Information, Description and Operation).
2. Refer to: Supplemental Restraint System (SRS) Health and Safety Precautions (100-00 General Information, Description and Operation).
5-door
3. Refer to: B-Pillar Upper Trim Panel - 5-Door (501-05 Interior Trim and Ornamentation, Removal and Installation).
4. Refer to: B-Pillar Lower Trim Panel (501-05 Interior Trim and Ornamentation, Removal and Installation).
3-door
5. Refer to: B-Pillar Upper Trim Panel - 3-Door (501-05 Interior Trim and Ornamentation, Removal and Installation).
6. Refer to: Rear Quarter Trim Panel (501-05 Interior Trim and Ornamentation, Removal and Installation).
All vehicles
7. Torque: 40 Nm
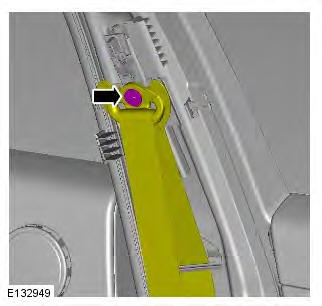
8. Torque: 9 Nm
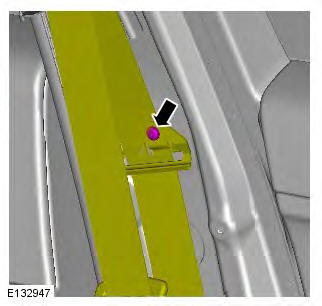
9. Torque: 40 Nm
Installation
1. To install, reverse the removal procedure.
Rear Safety Belt Retractor
Removal
NOTE: Removal steps in this procedure may contain installation details.
All vehicles
1. Make the SRS system safe.
Refer to: Standard Workshop Practices (100-00 General Information, Description and Operation).
2. Refer to: Supplemental Restraint System (SRS) Health and Safety Precautions (100-00 General Information, Description and Operation).
5-door
3. Refer to: C-Pillar Lower Trim Panel (501-05 Interior Trim and Ornamentation, Removal and Installation).
3-door
4. Refer to: Rear Quarter Trim Panel (501-05 Interior Trim and Ornamentation, Removal and Installation).
All vehicles
5. Torque: 40 Nm
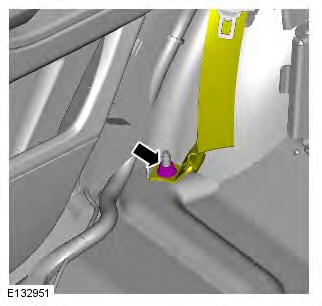
6. Torque: 40 Nm
Installation
1. To install, reverse the removal procedure.
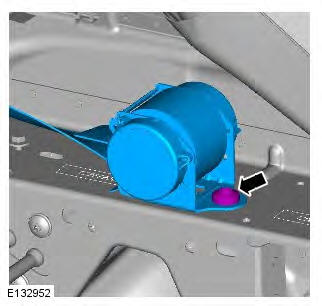
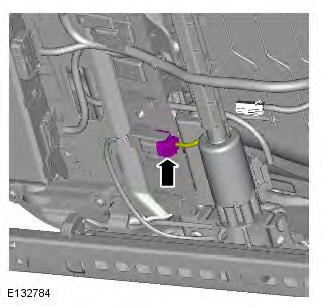
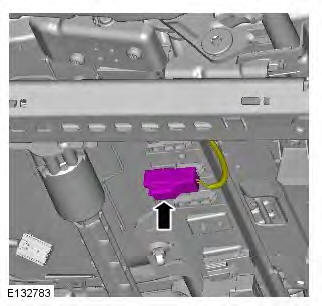
Rear Center Safety Belt Retractor
Removal
1. Disconnect the battery ground cable.
Refer to: Specifications (414-01 Battery, Mounting and Cables, Specifications).
2. Refer to: Rear Seat Backrest Cover - 5-Door (501-10 Seating, Removal and Installation).
Refer to: Rear Seat Backrest Cover - 3-Door (501-10 Seating, Removal and Installation).
3.
4. Remove the carpet from the LH rear seat backrest.

5.

Installation
1. Torque: 35 Nm
2. Install the carpet to the LH rear seat backrest.
3.

4. Refer to: Rear Seat Backrest Cover - 3-Door (501-10 Seating, Removal and Installation).
Refer to: Rear Seat Backrest Cover - 5-Door (501-10 Seating, Removal and Installation).
5. Connect the battery ground cable.
Refer to: Specifications (414-01 Battery, Mounting and Cables, Specifications).
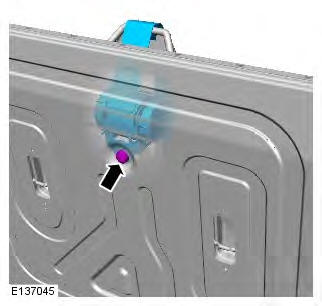
Front Safety Belt Buckle
Removal
NOTE: Removal steps in this procedure may contain installation details.
1. Make the SRS system safe.
Refer to: Standard Workshop Practices (100-00 General Information, Description and Operation).
2. Refer to: Supplemental Restraint System (SRS) Health and Safety Precautions (100-00 General Information, Description and Operation).
3. Refer to: Front Seat (501-10 Seating, Removal and Installation).
4.
5.
6. NOTE: Make sure the wiring harness is routed correctly. Torque: 40 Nm

Installation
1. To install, reverse the removal procedure.
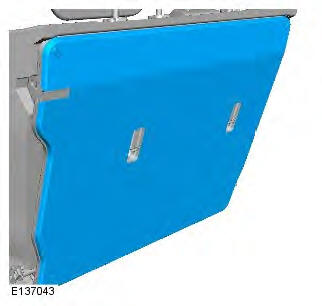
Rear Safety Belt Buckle
Removal
NOTE: Removal steps in this procedure may contain installation details.
1. Make the SRS system safe.
Refer to: Standard Workshop Practices (100-00 General Information, Description and Operation).
2. Refer to: Supplemental Restraint System (SRS) Health and Safety Precautions (100-00 General Information, Description and Operation).
3. Refer to: Rear Seat Cushion (501-10 Seating, Removal and Installation).
4. Torque: 40 Nm
Installation
1. To install, reverse the removal procedure.
READ NEXT:
 Air Bag Supplemental Restraint System
(SRS)
Air Bag Supplemental Restraint System
(SRS)
Component Location
COMPONENT LOCATION SHEET 1 OF 2
Battery
ECM (engine control module)
CJB (central junction box)
Passenger air bag
Overhead console
RCM (restraints control module)
Driver air
Restraints Control Module (RCM)
Removal
NOTES:
The RCM must be replaced after every time any SRS component has been
deployed.
Removal steps in this procedure may contain installation details.
1. Make the SRS system safe.
Refer to
SEE MORE:
Important information
The information contained in this handbook covers all vehicle derivatives and
optional equipment,
some of which may not be fitted to your vehicle. Due to printing cycles, this
handbook may include
descriptions of options before they become generally available.
The vehicle options, hardware an
Symbols used in this handbook
Safety warnings indicate either a procedure which must be followed
precisely, or
information that should be considered with great care, in order to avoid the
possibility
of personal injury.
Cautions indicate either a procedure which must be followed precisely, or
information that
should
