Range Rover Evoque: Engine Upper/Lower Support Insulator
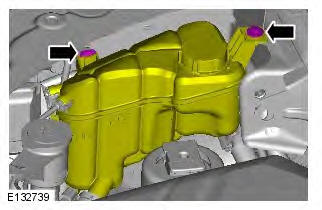
Engine Upper Support Insulator
Removal
NOTES:
Removal steps in this procedure may contain installation details.
Some variation in the illustrations may occur, but the essential information is always correct.
1. Refer to: Engine Mount RH (303-01B Engine - GTDi 2.0L Petrol, Removal and Installation).
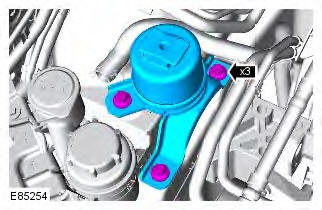
2. Torque: 10 Nm
3. Torque: 80 Nm
Installation
1. To install, reverse the removal procedure.
Engine Lower Support Insulator
Removal
NOTE: Removal steps in this procedure may contain installation details.
1. WARNING: Make sure to support the vehicle with axle stands. Raise and support the vehicle.
2. Refer to: Engine Undershield (501-02 Front End Body Panels, Removal and Installation).
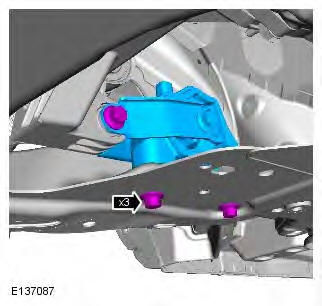
3. CAUTION: Discard the bolts.
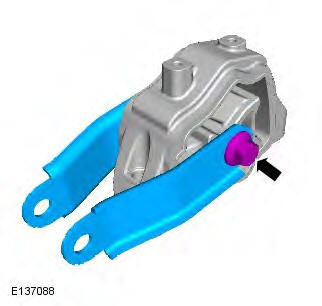
4. CAUTION: Discard the bolt.
Installation
1. CAUTIONS:
Make sure that a new bolt is installed.
Only tighten the bolt finger-tight at this stage.

2. CAUTIONS:
Make sure that new bolts are installed.
Install all the bolts finger tight before final tightening.
Torque:
- Stage 1: 50 Nm
- Stage 2: 180
READ NEXT:
Removal NOTES: Some illustrations may show the engine removed for clarity. Some variation in the illustrations may occur, but the essential information is always correct. Removal steps in this proc Oil Filter Housing
Special Tool(s) JLR-303-1595 Alignment Tool, Crankshaft Damper Removal NOTES: Some illustrations may show the engine removed for clarity. Some variation in the illustrations may occur, but the essent Balance Shaft Assembly
Principles of Operation For a detailed description of the engine system, refer to the relevant Description and Operation section in the workshop manual. REFER to: (303-01B Engine - GTDi 2.0L Petrol) Engine - Diagnosis and Testing
SEE MORE:
Fuel Fired Booster Heater Module (AHCM) CAUTION: Diagnosis by substitution from a donor vehicle is NOT acceptable. Substitution of control modules does not guarantee confirmation of a fault, and may also cause additional faults in the vehicle being tested and/or the donor vehicle. NOT
Fuel Fired
Booster Heater Control Module (FFBHCM)
Image Processing Module B (IPMB) 5 Camera System CAUTION: Diagnosis by substitution from a donor vehicle is NOT acceptable. Substitution of control modules does not guarantee confirmation of a fault, and may also cause additional faults in the vehicle being tested and/or the donor vehicle.
Image
Processing Module (Multi-Camera)
